


What Is Kubernetes NodeSelector?
In Kubernetes, nodeSelector is the simplest recommended way to constrain a Pod to schedule only on Nodes with specific labels. It acts as a hard filter for the kube-scheduler: if a node does not match every single label defined in the nodeSelector, the Pod will not be placed there.
How it works:
- Label the target nodes: Assign key-value labels to nodes based on properties such as storage type, hardware, architecture, or workload role.
- Define the pod constraint: Add a nodeSelector under the pod's spec with the labels required for scheduling.
- Match all specified labels: The scheduler considers only nodes that match every key-value pair defined in the nodeSelector.
- Evaluate other scheduling requirements: Matching nodes must still satisfy resource requirements, taints, affinity rules, and other scheduling constraints.
- Keep unmatched pods pending: If no eligible node matches, the pod remains Pending until cluster conditions or scheduling constraints change.
nodeSelector vs. node affinity: While nodeSelector is excellent for simple deployments, more complex scheduling requirements typically demand Node Affinity.
| Feature | nodeSelector | Node Affinity |
|---|---|---|
| Complexity | Simple and lightweight | More complex configuration |
| Matching Logic | Exact key-value matches only | Supports expressive operators (In, NotIn, Exists, Gt, Lt) |
| Rule Flexibility | Hard rules only (Must match or Pod stays Pending) | Hard and Soft rules (Can "prefer" a node but fall back if unavailable) |
| Pod-level Targeting | No (Node labels only) | Yes (Can schedule relative to other running Pods via Pod Affinity) |
This is part of a series of articles about Kubernetes scheduling
In this article:
- What Is Kubernetes NodeSelector?
- How Kubernetes NodeSelector Works
- Kubernetes NodeSelector Syntax
- Kubernetes NodeSelector Examples
- Kubernetes NodeSelector vs. Node Affinity vs. nodeName
- Kubernetes NodeSelector Best Practices
How Kubernetes NodeSelector Works
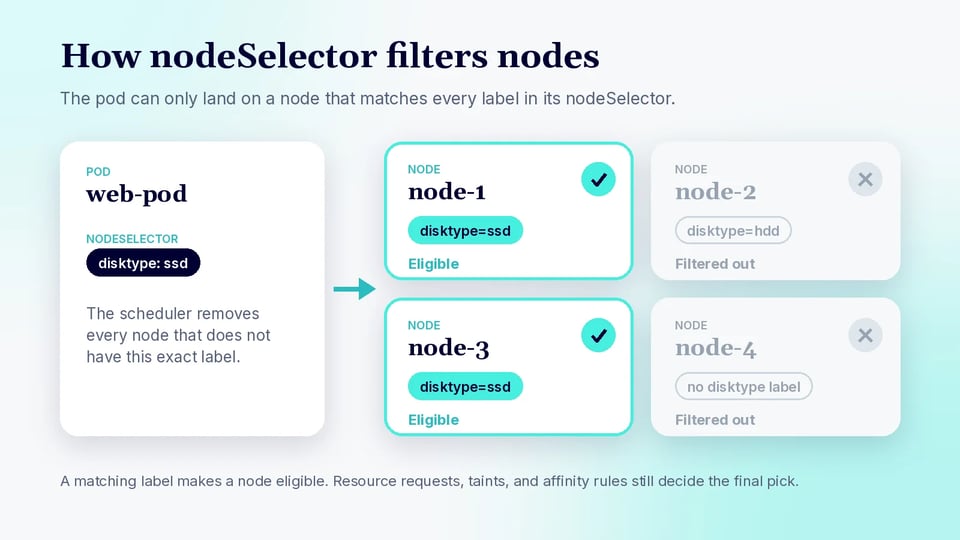
Kubernetes nodeSelector works by matching labels defined in a pod specification against labels assigned to nodes. The scheduler considers only nodes that satisfy every key-value pair in the pod's nodeSelector. This mechanism provides basic control over workload placement without requiring more advanced scheduling rules.
1. Node Labels
Node labels are key-value pairs attached to Kubernetes nodes. They describe node properties that workloads can use for scheduling, such as hardware type, storage configuration, or workload role. Kubernetes also assigns some standard labels automatically, including labels for architecture, operating system, and topology.
You can add custom labels with kubectl label nodes. For example, kubectl label nodes node-1 disktype=ssd assigns the label disktype=ssd to node-1. Pods can then reference this label through nodeSelector.
2. Pod Scheduling Constraints
A pod defines nodeSelector under its spec field. Each entry specifies a node label that must be present with the specified value. For example, nodeSelector: {disktype: ssd} restricts the pod to nodes labeled disktype=ssd.
When multiple entries are specified, a node must match all of them. nodeSelector supports exact key-value matching rather than operators such as In, NotIn, or numeric comparisons. For more complex conditions, Kubernetes provides node affinity.
3. How the Kubernetes Scheduler Evaluates nodeSelector
When scheduling a pod, the Kubernetes scheduler first identifies nodes that are eligible to run it. During this filtering process, it checks the pod's nodeSelector against the labels on each candidate node. Nodes that do not match every requested label are removed from consideration.
The scheduler then evaluates the remaining nodes using its other scheduling criteria and selects a suitable node. A matching nodeSelector makes a node eligible but does not guarantee selection because resource requirements, taints, affinity rules, and other constraints can also affect placement.
4. What Happens When No Matching Node Is Available
If no node satisfies the pod's nodeSelector and its other scheduling requirements, the scheduler cannot assign the pod to a node. The pod remains in the Pending state rather than being placed on a node that violates the constraint.
Kubernetes continues attempting to schedule the pod as cluster conditions change. Scheduling can succeed later if a matching node becomes available, its labels change, or the pod's constraints are modified. Scheduler events, visible with commands such as kubectl describe pod, can help identify the constraint preventing placement.
Kubernetes NodeSelector Syntax
The nodeSelector field is defined under spec in a pod template. It contains one or more node label key-value pairs. A node must match every pair for the pod to be eligible for scheduling on that node.
apiVersion: v1kind: Podmetadata: name: web-podspec: nodeSelector: workload: web containers: - name: nginx image: nginx:latestIn this example, Kubernetes can schedule web-pod only on nodes labeled workload=web. You can apply the label with:
kubectl label nodes node-1 workload=webMultiple constraints can be specified by adding more entries:
spec: nodeSelector: workload: web environment: productionHere, an eligible node must have both workload=web and environment=production. nodeSelector performs exact label matching; for expressions such as multiple acceptable values or exclusion rules, use node affinity instead.
Kubernetes NodeSelector Examples
Schedule Pods on High-Memory Nodes
You can label nodes according to their memory type and use that label to place memory-intensive applications on suitable nodes. For example, label an appropriate node with node-type=high-memory:
kubectl label nodes worker-2 node-type=high-memoryThen configure the pod to require that label:
apiVersion: v1kind: Podmetadata: name: memory-appspec: nodeSelector: node-type: high-memory containers: - name: web-server image: nginx:latestThe scheduler considers only nodes with the node-type=high-memory label when placing this pod.
Schedule Pods in a Specific Availability Zone
Kubernetes commonly exposes node topology through the topology.kubernetes.io/zone label. You can use it to constrain a pod to a specified availability zone:
apiVersion: v1kind: Podmetadata: name: zone-podspec: nodeSelector: topology.kubernetes.io/zone: eu-west-1b containers: - name: app image: nginx:latestThe pod can run only on nodes whose zone label is eu-west-1b. The actual zone names depend on the cluster and infrastructure provider.
Schedule Workloads by Node Type
Custom labels can separate nodes according to their intended workload. For example, you can designate a group of nodes for backend applications:
kubectl label nodes worker-3 role=backendReference the same label in the pod specification:
apiVersion: v1kind: Podmetadata: name: backend-podspec: nodeSelector: role: backend containers: - name: app image: nginxThis approach is useful when a cluster contains node pools with different hardware, capacity, or operational purposes.
Schedule GPU Workloads on GPU Nodes
GPU workloads typically need both node placement constraints and GPU resource requests. If GPU nodes have a suitable label, nodeSelector can restrict scheduling to those nodes:
apiVersion: v1kind: Podmetadata: name: gpu-workloadspec: nodeSelector: accelerator: nvidia-gpu containers: - name: inference-app image: example/gpu-app:14.32 resources: limits: nvidia.com/gpu: 1The nodeSelector controls node eligibility, while nvidia.com/gpu: 1 requests a GPU resource from the device plugin. The label name is cluster-specific, so use a label that is actually configured on your GPU nodes.
Kubernetes NodeSelector vs. Node Affinity vs. nodeName
Kubernetes provides several mechanisms for controlling which node runs a pod. nodeSelector, node affinity, and nodeName can all influence placement, but they operate differently and suit different scheduling requirements:
- nodeSelector is the simplest option. It requires a node to have exact label key-value pairs specified by the pod. It works well when workloads have straightforward placement requirements, such as running only on SSD or GPU nodes.
- Node affinity also uses node labels but supports more expressive rules. It can match multiple values, use operators such as In, NotIn, Exists, and DoesNotExist, and define both required and preferred placement rules. Use it when scheduling logic cannot be represented with exact label matches.
- nodeName works differently because it bypasses normal scheduler node selection. Setting
spec.nodeNameassigns the pod directly to the named node. This is generally useful for specialized cases where the exact target node is already known, rather than routine workload scheduling.
| Feature | nodeSelector | Node Affinity | nodeName |
|---|---|---|---|
| Placement method | Matches node labels | Evaluates label-based expressions | Targets a specified node |
| Scheduling flexibility | Low | High | Very low |
| Exact label matching | Yes | Yes | No |
| Multiple-value matching | No | Yes | No |
| Required rules | Yes | Yes | Direct assignment |
| Preferred rules | No | Yes | No |
| Uses normal scheduler node selection | Yes | Yes | No |
| Best suited for | Simple label-based placement | Complex or preferred placement rules | Assigning a pod to a known node |
Kubernetes NodeSelector Best Practices
Here are some useful practices to consider when working with nodeSelector in Kubernetes.
1. Use Consistent Node Labeling Conventions
Define a standard naming scheme for labels used by nodeSelector. For example, labels such as workload=compute, storage=ssd, and accelerator=gpu clearly describe why a workload might select a node. For organization-specific labels, use a DNS-style prefix such as example.com/node-pool=gpu.
Keep label keys and values consistent across clusters and environments where possible. Avoid having values such as gpu, GPU, and gpu-node represent the same property. Small inconsistencies can leave pods in the Pending state because nodeSelector requires exact matches.
Labels should also describe properties that matter for scheduling rather than temporary operational information. Document important scheduling labels so application teams know which labels are available and what guarantees each one provides.
2. Use Stable Labels Instead of Node Names
Prefer labels that describe a node group or capability instead of tying workloads to individual nodes. Nodes are often temporary resources and can disappear during autoscaling, upgrades, maintenance, or infrastructure failures.
For example, node-pool=compute allows a pod to run on any suitable node in a compute pool. Directly targeting a node such as worker-03 creates a dependency on that machine and makes node replacement more difficult.
Where possible, configure node labels as part of node pool or infrastructure provisioning. Replacement nodes then receive the same labels automatically, allowing existing nodeSelector rules to continue working without changes to workload manifests.
3. Combine nodeSelector with Resource Requests and Limits
nodeSelector determines whether a node has the required labels, but it does not indicate whether that node has enough CPU or memory. Configure resource requests alongside placement rules so the scheduler can account for the resources each pod needs.
For example, a pod might select high-memory nodes while requesting 8Gi of memory. The scheduler considers only matching nodes and then checks whether those nodes have enough allocatable capacity for the request. Without appropriate requests, workloads can compete for resources even when they are placed on the intended node type.
Resource limits provide additional runtime controls for resource consumption. Use requests and limits according to the workload's behavior rather than assuming that selecting a larger or specialized node removes the need for resource management.
4. Use Taints and Tolerations for Dedicated Nodes
nodeSelector controls where a particular pod can run, but it does not stop other pods from using the same nodes. This distinction matters when nodes are reserved for workloads that require expensive or specialized hardware.
Apply a taint to dedicated nodes and add a corresponding toleration to workloads allowed to use them. Then use nodeSelector to ensure those workloads actively select the intended node group. For example, GPU nodes can be tainted so ordinary applications are not scheduled there while GPU workloads tolerate the taint and select the GPU label.
Taints, tolerations, and nodeSelector therefore solve complementary problems. The selector restricts the workload's placement, while the taint helps protect dedicated node capacity from workloads that should run elsewhere.
5. Use Protected Labels for Security-Sensitive Node Isolation
Do not treat ordinary node labels as a strong security boundary. Depending on cluster configuration and permissions, a compromised or improperly controlled node could potentially influence labels used to determine where sensitive workloads run.
For security-sensitive isolation, Kubernetes can use the NodeRestriction admission plugin together with the Node authorizer. NodeRestriction prevents kubelets from setting or changing labels with the reserved node-restriction.kubernetes.io/ prefix and qualified names whose prefix ends in .node-restriction.kubernetes.io.
An administrator can therefore apply a label such as example.com.node-restriction.kubernetes.io/pci-dss=true and reference it from scheduling rules. Because the kubelet cannot assign that protected label to itself, it provides a stronger basis for isolating workloads that must run only on administrator-designated nodes.
FAQ
What is nodeSelector in Kubernetes? nodeSelector is the simplest recommended way to constrain a Pod to nodes with specific labels. It is a hard filter for the kube-scheduler. If a node does not match every label in the nodeSelector, the Pod is not placed there.
How do I use nodeSelector? First label the target node with kubectl label nodes, for example kubectl label nodes node-1 disktype=ssd. Then add a nodeSelector under the Pod's spec with the same key and value, such as disktype: ssd. The scheduler will consider only nodes that match.
What happens if no node matches the nodeSelector? The Pod stays in the Pending state rather than being placed on a node that breaks the constraint. Kubernetes keeps trying as conditions change, so scheduling can succeed later if a matching node appears, node labels change, or the Pod's constraints are edited. Running kubectl describe pod shows the scheduler events that explain why.
What is the difference between nodeSelector and node affinity? nodeSelector supports exact key-value matches and hard rules only. Node affinity supports operators such as In, NotIn, Exists, DoesNotExist, Gt, and Lt, and it can express both required and preferred placement. Use node affinity when exact label matches are not enough.
What is the difference between nodeSelector and nodeName? nodeSelector still goes through the scheduler, which filters nodes by label and then picks one. Setting nodeName bypasses normal scheduler node selection and assigns the Pod directly to the named node, which is mostly useful for specialized cases where the target node is already known.
Does nodeSelector stop other pods from using the same nodes? No. nodeSelector controls where a particular Pod can run, but it does not reserve the node. To keep ordinary workloads off dedicated nodes, apply a taint to those nodes and add a matching toleration to the workloads that are allowed to use them.
Optimize Kubernetes Node Placement and Utilization with PerfectScale
PerfectScale is a Kubernetes optimization platform that is deployed through a single Helm command and delivers actionable insights and autonomous optimization across your complete K8s stack. While nodeSelector controls where workloads can run, PerfectScale helps you make sure those workloads are sized correctly and that the nodes they land on are the right fit, so you can reduce wasted capacity without impacting performance or reliability.
Key capabilities of PerfectScale:
- Autonomous workload right-sizing: Podfit provides a granular view of cluster health and costs, quickly identifies wasted resources and resilience issues, and delivers data-driven recommendations or automation to right-size workloads immediately.
- Node utilization visibility: Infrafit offers comprehensive visibility into node utilization, helping you identify and eliminate idle node capacity while maintaining peak cluster performance and reliability.
- Data-driven node selection: Get recommendations that help you select the right nodes for your workloads, supporting better decisions about the node groups your scheduling labels target.
- Node autoscaler optimization: Maximize the effectiveness of node autoscalers such as Karpenter, with integrations for HPA, Cluster Autoscaler, EKS Auto Mode, Fargate, Node Auto Provisioning, Google Autopilot, and more.
- Prioritized real-time alerts: Address the most impactful resilience risks and cost spikes first with auto-prioritized alerts delivered to Slack, Datadog, MS Teams, PagerDuty, and other tools.
- Governance and forecasting: The Trends report provides visibility into cost, waste, and risk metrics over time across clusters, node groups, namespaces, and workloads, supporting accurate budget planning and root cause analysis.
- Support for any environment: Optimize clusters across public clouds such as EKS, GKE, and AKS, private clouds such as OpenShift, on-premises, and hybrid setups.
Ready to optimize your Kubernetes nodes and workloads? Learn more about the PerfectScale platform.