


What is a Kubernetes DaemonSet?
A DaemonSet is a core Kubernetes workload controller that ensures a copy of a specific Pod runs on all (or selected) nodes within a cluster. When a new node is added to the cluster, the DaemonSet automatically spins up a Pod on it; when a node is removed, the associated Pod is garbage collected.
Unlike Deployments, which focus on maintaining a specific number of total replicas across the entire cluster, DaemonSets focus on node-level coverage, tying pod scheduling to the cluster’s node topology. This guarantees that certain workloads, such as monitoring agents or log collectors, are distributed evenly and consistently across the infrastructure, providing uniform coverage and functionality. DaemonSets are essential for workloads that need to run on all, or specific, nodes for operational consistency.
Here is an example YAML manifest of a DaemonSet:
The following example defines a DaemonSet running a fluentd logging agent on the cluster:
apiVersion: apps/v1kind: DaemonSetmetadata: name: fluentd-logging namespace: kube-systemspec: selector: matchLabels: name: fluentd-logging template: metadata: labels: name: fluentd-logging spec: tolerations: - key: node-role.kubernetes.io/control-plane operator: Exists containers: - name: fluentd image: quay.io/fluentd_elasticsearch/fluentd:v5.0.1Common use cases of DaemonSets:
- Log collection: Run agents like Fluentd, Filebeat, or Logstash on every node to collect and forward container and system logs.
- Node monitoring: Deploy tools like Prometheus Node Exporter or Datadog Agent on each node to gather health, resource, and workload metrics.
- Security and observability agents: Ensure intrusion detection, tracing, or observability agents run across all nodes for consistent cluster coverage.
- Kubernetes device plugins: Run device plugins on nodes with specialized hardware, such as GPUs or FPGAs, so Kubernetes can expose those resources to workloads.
This is part of a series of articles about Kubernetes Objects
In this article:
- How Does a DaemonSet Work?
- Kubernetes DaemonSet Use Cases
- Kubernetes DaemonSet vs. Deployment
- Kubernetes DaemonSet Tutorial
- Kubernetes DaemonSet Best Practices
How Does a DaemonSet Work?
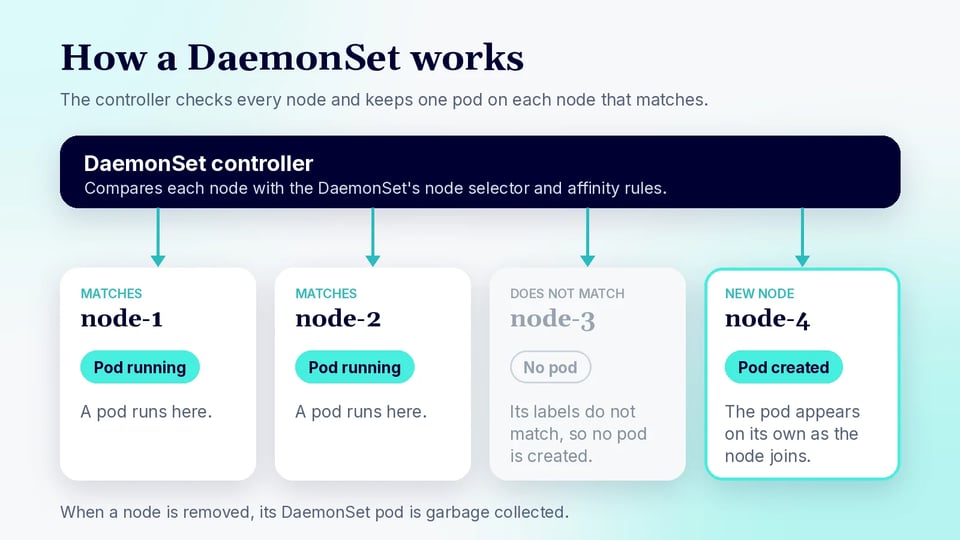
When a DaemonSet is created, the Kubernetes control plane evaluates each node against the DaemonSet’s scheduling criteria. If a node matches, the DaemonSet controller creates the specified pod on that node. If the node is later removed from the cluster, its DaemonSet pod is garbage collected.
If the node's labels change so it no longer matches the DaemonSet's node selector or affinity rules, the controller deletes the pod. The controller automatically adds a toleration for the node.kubernetes.io/unschedulable taint, so DaemonSet pods keep running on cordoned nodes and can even be scheduled onto them. This mechanism ensures that DaemonSet pods closely follow the state of the cluster, adapting to node changes without user intervention.
DaemonSets support advanced scheduling features, such as node affinity, tolerations, and selectors, allowing administrators to target specific subsets of nodes. For example, DaemonSets can be restricted to only run on nodes labeled with a certain key or those with specific hardware. As the cluster changes (nodes are added, relabelled, or deleted) the DaemonSet controller continuously reconciles the actual state with the desired state, making sure pods are always deployed where needed.
Kubernetes DaemonSet Use Cases
Log Collection
Log collection is a common use case for DaemonSets. Centralized logging solutions often require an agent to be present on every node to collect and forward logs from containers and system components. By deploying a log collector, such as Fluentd or Filebeat, as a DaemonSet, administrators ensure that every node is covered without manually deploying agents or worrying about new nodes missing the logging component. This approach streamlines log management and ensures consistency across the entire cluster.
The use of DaemonSets for log collection also simplifies the process of scaling clusters. As new nodes join, the DaemonSet controller automatically deploys the logging agent, eliminating manual steps and reducing the risk of missing logs from newly added infrastructure. This automated, node-level deployment makes DaemonSets the preferred method for cluster-wide log aggregation in Kubernetes environments, supporting compliance and troubleshooting initiatives.
Related content: Read our guide to Kubernetes logs
Node Monitoring
Node monitoring is another scenario where DaemonSets excel. Monitoring tools like Prometheus Node Exporter or Datadog Agent are typically deployed as DaemonSets to collect metrics about node health, resource usage, and running workloads. By leveraging DaemonSets, these agents are automatically distributed to every node, providing comprehensive visibility into the cluster’s operational state.
Automatic deployment through DaemonSets ensures that monitoring remains consistent as the cluster changes. When nodes are added or removed, the DaemonSet controller adjusts the monitoring agent deployment accordingly. This dynamic management simplifies cluster operations and ensures that administrators always have up-to-date metrics for every node, which is critical for effective capacity planning and incident response.
Related content: Read our guide to Kubernetes monitoring
Security and Observability Agents
Security and observability agents, such as intrusion detection systems or distributed tracing collectors, often need to run on every node to provide full cluster coverage. DaemonSets make it straightforward to deploy these agents uniformly, ensuring that all traffic and activity are monitored for threats or performance bottlenecks. This uniform deployment is crucial for maintaining a secure and observable Kubernetes environment.
Using DaemonSets for security agents also supports compliance requirements by guaranteeing that no node is left unmonitored. As the cluster evolves, the DaemonSet automatically adapts, maintaining security coverage without manual intervention. This approach ensures that security and observability measures keep pace with the dynamic nature of Kubernetes clusters, reducing operational gaps and risks.
Kubernetes Device Plugins
Kubernetes Device Plugins allow specialized hardware, such as GPUs or FPGAs, to be exposed to pods. These plugins are typically deployed as DaemonSets to ensure each node with the appropriate hardware runs the necessary device plugin pod. This setup enables Kubernetes to schedule workloads that require specific hardware resources, supporting use cases like machine learning or hardware acceleration.
Deploying device plugins as DaemonSets guarantees that hardware resources are consistently managed across all applicable nodes. As new nodes with specialized hardware are added, the DaemonSet controller automatically deploys the corresponding device plugin, making the resource available to the scheduler. This automated approach streamlines cluster operations and maximizes the utilization of specialized hardware.
Kubernetes DaemonSet vs. Deployment
While both DaemonSets and Deployments manage pods in Kubernetes, their purposes and behaviors differ significantly. Deployments are designed to maintain a specified number of pod replicas, distributing them across available nodes to achieve high availability and load balancing. This makes Deployments suitable for stateless applications where the primary goal is to ensure a certain level of redundancy and scalability, regardless of how many nodes are in the cluster.
DaemonSets ensure that exactly one pod (or a specified number) runs on each node or on a subset of nodes. This is ideal for workloads that need to be present on every node, such as monitoring agents, log collectors, or device plugins. DaemonSets adapt automatically as nodes are added or removed, while Deployments require manual scaling to match node changes. Understanding this distinction is key to choosing the right controller for specific workloads in Kubernetes.
| Aspect | Deployment | DaemonSet |
|---|---|---|
| Primary purpose | Runs a specified number of replicas for an application | Runs a pod on every node or selected nodes |
| Scaling behavior | Scaled manually or via autoscaling based on replica count | Automatically adjusts as nodes are added or removed |
| Best suited for | Stateless apps, APIs, web services, scalable workloads | Monitoring agents, log collectors, node-level services |
| Pod placement | Kubernetes scheduler distributes pods across nodes | Ensures pods are placed on each eligible node |
Kubernetes DaemonSet Tutorial
This tutorial explains how to create and work with a DaemonSet. It is adapted from the Kubernetes documentation.
1. Create a Kubernetes DaemonSet
To create a Kubernetes DaemonSet, define it in a YAML manifest using apiVersion: apps/v1 and kind: DaemonSet. The manifest must include standard Kubernetes fields such as metadata and spec, along with a pod template under .spec.template. The DaemonSet’s .spec.selector must match the labels assigned to the pod template; after the DaemonSet is created, this selector cannot be changed. Kubernetes also requires the pod’s restart policy to be Always, either explicitly or through the default setting.
For example, the following manifest creates a simple DaemonSet that runs a container on each eligible node:
apiVersion: apps/v1kind: DaemonSetmetadata: name: example-daemonsetspec: selector: matchLabels: app.kubernetes.io/name: example template: metadata: labels: app.kubernetes.io/name: example spec: containers: - name: pause image: registry.k8s.io/pauseAdministrators can extend the pod template with options such as resource requests, volume mounts, tolerations, node selectors, and node affinity. These settings determine how the DaemonSet pods run and, when scheduling constraints are specified, which nodes are eligible to host them. The Kubernetes documentation provides a basic example in which the DaemonSet schedules one pod on every applicable node.
2. Deploy a DaemonSet
Once the DaemonSet manifest has been created, deploy it to the cluster with kubectl apply. If the manifest is saved locally as daemonset.yaml, run:
kubectl apply -f daemonset.yamlKubernetes also demonstrates applying a DaemonSet directly from a hosted YAML manifest. For example:
kubectl apply -f https://k8s.io/examples/application/basic-daemonset.yamlThe kubectl apply command submits the configuration to the Kubernetes API, after which the DaemonSet controller determines which nodes are eligible and creates the required pods. As additional eligible nodes join the cluster, the controller automatically creates DaemonSet pods for them. Pods associated with nodes that are removed are subsequently garbage collected.
After deployment, changes to the DaemonSet can generally be managed by modifying the manifest and running kubectl apply again. For DaemonSets using the RollingUpdate strategy, changes to the pod template trigger a rolling update of the managed pods. Kubernetes also supports an OnDelete update strategy when administrators want replacement pods to be created only after existing ones are manually deleted.
3. Check DaemonSet Pods
After deploying a DaemonSet, verify that its pods are running on the expected nodes. The Kubernetes documentation recommends listing pods with the -o wide option, which includes the node assigned to each pod:
kubectl get pods -o wideFor a DaemonSet intended to run throughout the cluster, the output should show a DaemonSet pod on each eligible node. The NODE column makes it easy to confirm that the pods are distributed as expected.
In environments containing many workloads, use the labels defined in the DaemonSet pod template to limit the results. For the example above, the command would be:
kubectl get pods -l app.kubernetes.io/name=example -o wideYou can also inspect the DaemonSet resource itself with:
kubectl get daemonset example-daemonsetor use the abbreviated resource name:
kubectl get ds example-daemonsetThe DaemonSet status helps administrators compare the desired number of pods with the number that are current, ready, and available. If individual pods are not running correctly, commands such as kubectl describe pod <pod-name> and kubectl logs <pod-name> can then be used to investigate scheduling or container-level problems. Kubernetes’ basic DaemonSet tutorial verifies successful deployment by checking that the resulting pod list contains one pod for every applicable node.
Kubernetes DaemonSet Best Practices
1. Right-size CPU and Memory Requests and Limits
Setting appropriate CPU and memory requests and limits is critical for DaemonSet stability. Requests define the minimum resources a pod requires, while limits set the maximum it can consume. Over-provisioning wastes resources and may cause scheduling failures on resource-constrained nodes. Under-provisioning risks pod eviction or performance degradation. Analyze the workload’s resource profile to determine reasonable defaults, ensuring that each DaemonSet pod fits comfortably on every targeted node.
Regularly review and adjust resource settings as the application evolves. Resource requirements may change due to new features, increased load, or changes in underlying infrastructure. In dynamic Kubernetes environments, periodic tuning of requests and limits prevents resource contention and supports efficient cluster utilization. Integrate resource reviews into your change management process for ongoing optimization.
2. Base Resource Settings on Historical Usage
Resource requests should reflect how DaemonSet pods behave under real workloads rather than relying only on initial estimates. Use historical CPU and memory metrics from tools such as Prometheus, Grafana, or your cloud monitoring platform to identify typical usage, peak demand, and differences between nodes. Set requests high enough to support normal operation while avoiding unnecessary resource reservation across every targeted node.
Review percentile-based metrics over representative periods instead of using short-term averages. CPU requests can often be based on sustained usage with room for bursts, while memory requests should account for observed peaks. Because DaemonSets multiply their resource footprint across nodes, even small improvements to per-pod settings can free significant cluster capacity.
3. Treat Memory More Conservatively Than CPU
CPU and memory limits have different failure modes in Kubernetes. When a container reaches its CPU limit, Kubernetes throttles its CPU usage, which usually causes slower processing. When a container exceeds its memory limit, however, it can be terminated by the kernel with an out-of-memory (OOM) error. For node-level agents, repeated restarts can create gaps in logging, monitoring, or security coverage.
Set memory requests and limits with enough headroom for temporary spikes and workload growth. Monitor peak memory usage and OOM events before reducing allocations. For agents with unpredictable memory requirements, a restrictive memory limit can be more disruptive than moderate over-allocation, so validate limits against production usage patterns.
4. Use the Appropriate Update Strategy
DaemonSets support RollingUpdate and OnDelete update strategies. RollingUpdate, which is the default, automatically replaces existing pods when the DaemonSet pod template changes. Settings such as maxUnavailable and maxSurge can control how many DaemonSet pods are unavailable or temporarily added during an update.
Use OnDelete when pod replacement must be explicitly controlled. With this strategy, updating the pod template does not automatically replace existing pods; administrators must delete them before Kubernetes creates pods from the new template. Whichever strategy you choose, consider the effect of unavailable agents on logging, monitoring, networking, or security coverage during updates.
5. Continuously Monitor Efficiency as the Cluster Changes
DaemonSet resource consumption grows with the number of eligible nodes. A pod that uses modest resources on one node can represent substantial aggregate CPU and memory consumption in a large cluster. Track both per-pod usage and the total resources consumed by each DaemonSet to understand its effect on cluster capacity.
Reassess DaemonSets when node types, workloads, or cluster size change. Watch for unused resource requests, CPU throttling, memory pressure, OOM events, restarts, and pods that fail to schedule. Continuous monitoring helps identify when resource settings or scheduling rules no longer match actual operating conditions.
Optimizing DaemonSet Resource Usage with PerfectScale
Because a DaemonSet places a pod on every eligible node, even small amounts of over- or under-provisioning multiply across the cluster. PerfectScale by DoiT is a Kubernetes optimization platform that deploys via a single Helm command and then delivers actionable insights and autonomous optimization across the entire K8s stack, so node-level agents such as log collectors, monitoring exporters, and security daemons run with the resources they actually need.
Key capabilities of PerfectScale:
- Autonomous workload right-sizing: Podfit gives a granular view of cluster health and costs, prioritizes the areas that need attention, and autonomously optimizes workloads with data-driven right-sizing recommendations that can be applied automatically.
- Node utilization optimization: Infrafit provides comprehensive node utilization visibility and granular insights that identify and eliminate idle node capacity, and helps select the right nodes for your workloads.
- Autoscaler alignment: Works alongside HPA, KEDA, Karpenter, Cluster Autoscaler, EKS Auto Mode, Fargate, Node Auto Provisioning, and Google Autopilot, with actionable recommendations to improve their configurations.
- Real-time alerting with prioritization: Advanced auto-prioritization surfaces the most impactful resilience risks, cost spikes, and anomalies before they affect users or the cloud bill, with alerts delivered to Slack, Datadog, MS Teams, or PagerDuty.
- Trends and governance reporting: The Trends report provides in-depth visibility into cost, waste, and risk metrics over time across clusters, node groups, namespaces, and workloads, supporting forecasting and root cause analysis.
- Broad environment support: Runs on on-premise and cloud-based clusters including OpenShift, EKS, GKE, and AKS, and supports Windows-based containers as well as ephemeral and ML workloads.