


A Kubernetes DaemonSet is a workload object that makes sure a copy of a pod runs on every node in your cluster, or on a specific set of nodes you choose. When a node joins the cluster, the DaemonSet adds its pod to that node automatically. When a node leaves, the pod goes with it. This is how you run node-level agents like log collectors, monitoring agents, and network plugins, without placing a pod on each node by hand.
In this guide, you'll learn how DaemonSets work, what they are used for, how they compare to other workload types, how to write and control a DaemonSet, how to update and scale one, how they affect cluster cost, and the best practices and failures to know about.
What is a Kubernetes DaemonSet?
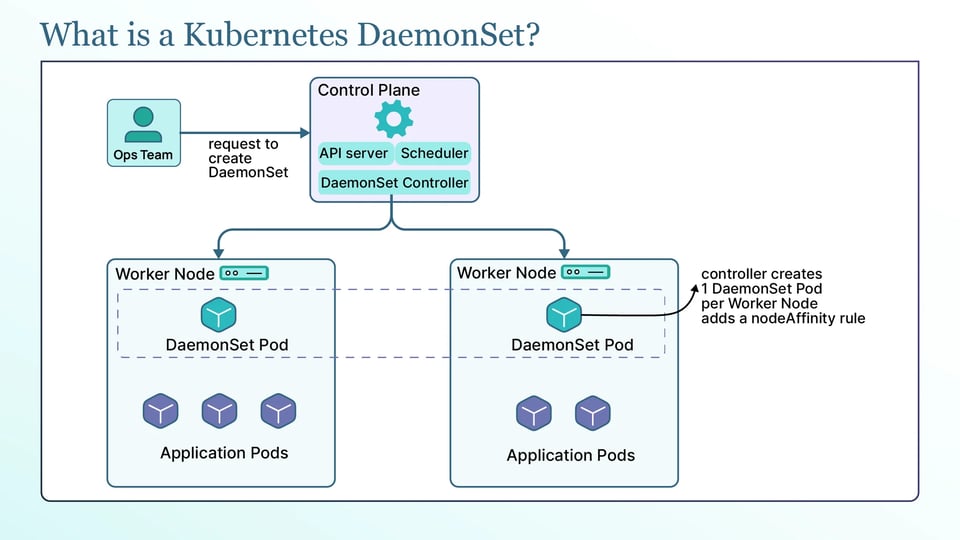
A DaemonSet is designed for node-level workloads rather than a fixed number of replicas. It keeps one pod on every node that matches its scheduling rules, and Kubernetes automatically adjusts the pod count as those nodes change.
That is a different goal from a Deployment. A Deployment runs a number of replicas you choose and lets the scheduler spread them around the cluster. A DaemonSet has no replica count. The number of pods is however many matching nodes you have, and it changes on its own as nodes come and go. DaemonSets are namespaced objects and use apiVersion: apps/v1, and one DaemonSet normally runs one kind of agent across your nodes.
How DaemonSets work?
There are two important things that explain how DaemonSet works: the DaemonSet controller and the Kubernetes scheduler. Let's discuss:
The DaemonSet controller continuously watches the cluster and keeps the actual state matching what you defined. When a new node joins, the controller creates the DaemonSet's pod on that node. When a node is removed, the pod on it is cleaned up. And when you delete the DaemonSet, Kubernetes removes all the pods it created. You never tell it how many pods to run; it derives that from the set of matching nodes.
The way DaemonSet pods are scheduled has changed over time. Since Kubernetes 1.12, DaemonSet pods are placed by the default scheduler, kube-scheduler, just like any other pod. The controller creates one pod per eligible node and adds a nodeAffinity rule that pins each pod to a specific node, and the scheduler then binds the pod to that node. Because the normal scheduler handles them, DaemonSet pods respect taints, tolerations, and pod priority.
Kubernetes also gives DaemonSet pods a set of tolerations automatically so a node agent keeps running when a node is under stress, covering the node-condition taints such as not-ready, unreachable, disk-pressure, memory-pressure, pid-pressure, unschedulable, and network-unavailable. One taint that is not tolerated automatically is the control-plane taint, which is why DaemonSet pods do not land on control-plane nodes unless you add that toleration yourself.
What DaemonSets are used for?
DaemonSets are used for workloads that need to run on every node or on a specific set of nodes, rather than a fixed number of replicas. The common examples are:
a. Log collection agents: Tools like Fluentd and Fluent Bit run as a DaemonSet so there is one collector on each node, reading the logs of every pod on that node and shipping them to a central store.
b. Monitoring and metrics agents: Node-level exporters such as Prometheus node-exporter, and GPU metrics agents like DCGM, run per node to expose that node's hardware and OS metrics.
c. CNI plugins, service proxies, and other networking pods: The container network interface plugins that give pods networking, such as Calico and Cilium, run as DaemonSets because networking has to be set up on every node. kube-proxy itself runs this way too.
d. Storage, security, and hardware agents: CSI node plugins for storage, security and compliance agents, GPU device plugins that expose accelerators to pods, and other node drivers all run as DaemonSets so the capability exists on each node that needs it.
DaemonSet compared with other Kubernetes workload types
DaemonSets solve a specific problem, so it helps to see how they differ from the workload types you may use by default. Let's compare:
If compared with a Deployment, the difference is placement and count. A Deployment runs N replicas and the scheduler decides which nodes they land on, which suits stateless apps where you do not care where each replica runs. A DaemonSet runs one pod per matching node and scales with the node count. The quick rule: if the answer to "how many copies?" is "one on every node," you want a DaemonSet, and if it is "N copies, anywhere," you want a Deployment.
If compared with a StatefulSet, the difference is identity and storage. A StatefulSet gives its pods stable names, ordered rollout, and their own persistent volumes, which is what stateful systems like databases need. A DaemonSet gives you neither ordered identity nor per-pod storage; it gives you node coverage.
And if compared with static pods, bare pods, and sidecar containers, the difference is what manages the pod and where it runs. A static pod is managed directly by the kubelet on one node, not by the API server, so it is used to bootstrap control-plane components rather than to run an agent across multiple nodes.
A bare pod is a single pod with nothing keeping it alive, so it is not rescheduled if its node fails. A sidecar container runs alongside your app inside the same pod, once per app pod, which is the right choice when the helper belongs to a specific workload rather than to the node. A DaemonSet is the tool when you want exactly one managed copy per node.
Anatomy of a DaemonSet manifest
A DaemonSet manifest looks a lot like a Deployment, with a few important differences. Here is one that runs a Fluent Bit log agent on every node:
apiVersion: apps/v1kind: DaemonSetmetadata: name: fluent-bit namespace: loggingspec: selector: matchLabels: app: fluent-bit updateStrategy: type: RollingUpdate rollingUpdate: maxUnavailable: 1 template: metadata: labels: app: fluent-bit spec: containers: - name: fluent-bit image: fluent/fluent-bit:3.1 resources: requests: cpu: 50m memory: 64Mi limits: cpu: 200m memory: 128MiA few rules matter here. There is no replicas field, because the node count sets the number of pods. The selector tells the DaemonSet which pods it owns, it must match the labels in the pod template, and it cannot be changed after the DaemonSet is created. The pod template's restartPolicy must be Always, which is also the default, because a node agent is meant to run continuously.
Node agents also need access to the node itself, which they get through a few pod settings: hostNetwork: true puts the pod on the node's network, which networking and monitoring agents rely on. The hostPath volumes mount a directory from the node, which log collectors use to read /var/log. And hostPID: true lets the pod see the node's process tree, which some security and monitoring agents need. These settings are powerful, so use them only where the agent genuinely requires them.
Controlling which nodes run DaemonSet pods
By default, a DaemonSet runs on every eligible node, but you often need to limit it to a specific set of nodes. Let's see.
To limit it to specific nodes, add a nodeSelector or node affinity to the pod template. A nodeSelector matches nodes by label, for example running an agent only on nodes labeled disk=ssd. Node affinity does the same job with more expressive rules, letting you match on regions, instance types, or combinations of labels when a simple label match is not enough.
Taints and tolerations control the harder cases; because DaemonSet pods go through the normal scheduler, a node's taints keep them off unless the pod tolerates them. This is why control-plane nodes get no DaemonSet pod by default: they carry the control-plane taint, and you have to add a matching toleration to run your agent there. You can tolerate every taint with a single blanket toleration, but that is rarely what you want, since it removes the protection taints provide.
For mixed Linux and Windows clusters, use a nodeSelector with kubernetes.io/os so that Linux agents run only on Linux nodes and Windows agents run only on Windows nodes.
How to create, update, and delete a DaemonSet?
You apply a DaemonSet like any other Kubernetes object:
kubectl apply -f fluent-bit.yamlkubectl get daemonset -n loggingkubectl rollout status daemonset/fluent-bit -n loggingThe get output shows the desired, current, ready, and available counts, which should match your node count, and rollout status confirms the rollout finished.
How updates happen is set by the update strategy. The RollingUpdate, the default, replaces pods gradually across nodes when you change the pod template. The OnDelete does not roll out automatically; the controller only creates a new pod with the updated template after you delete the old one by hand, which gives you full manual control for sensitive agents.
For a rolling update, two fields set the pace. The maxUnavailable, which defaults to 1, is how many nodes can be without the pod at once during the update, so maxUnavailable: 1 updates one node at a time. The maxSurge, which defaults to 0 and became stable in Kubernetes 1.25, lets the controller start the new pod on a node before removing the old one, giving a zero-downtime update per node.
The two cannot be enabled at the same time: if you set maxSurge to a non-zero value, maxUnavailable must be 0, and note that maxSurge does not work with hostPort because two pods cannot bind the same host port. You can roll back a bad update the same way you would a Deployment, with kubectl rollout undo daemonset/<name>. To delete a DaemonSet, use kubectl delete daemonset <name>. This removes the DaemonSet and all the pods it manages.
How to scale a DaemonSet down to zero without deleting it?
A DaemonSet has no replicas field, so you cannot scale it to zero the usual way. The trick is to give it a nodeSelector that no node matches, which leaves the DaemonSet in place but schedules none of its pods:
spec: template: spec: nodeSelector: non-existent-label: "true"Because no node has that label, the controller creates zero pods, but the DaemonSet object and its configuration remain. To bring it back, remove the selector or apply the label to the nodes you want. This is useful for temporarily disabling an agent across the cluster without losing its definition.
How DaemonSets affect cluster cost and node capacity?
DaemonSets can increase costs because they run on many or all nodes in a cluster:
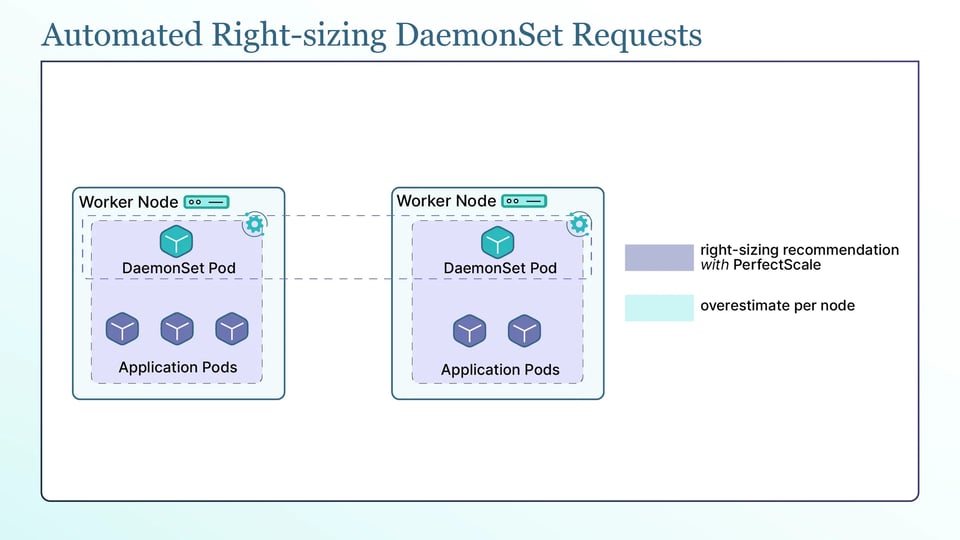
The key point is that a DaemonSet's resource requests multiply across every node in the cluster. If an agent requests 100m of CPU and 128Mi of memory, that is reserved on every single node, so on a 200-node cluster it reserves 20 CPUs and about 25Gi of memory before any of your workloads run. A request that looks tiny per node adds up to real capacity at fleet scale.
That reserved capacity also reduces what is schedulable per node, which hurts bin-packing. Every DaemonSet pod takes a slice of each node's allocatable resources, so the more DaemonSets you run, the less room is left for application pods, and the harder it is to pack workloads tightly. This feeds directly into node autoscaling. Both the Cluster Autoscaler and Karpenter account for DaemonSet overhead when they size nodes, and because that overhead is per node, larger nodes handle it more efficiently: a fixed DaemonSet cost is a smaller share of a big node than of a small one, which is a real input to node-sizing decisions.
Because the cost is multiplied, right-sizing DaemonSet requests matters more than for a single Deployment. You have to size each agent's requests from its real usage rather than a guessed default, since a 50Mi overestimate on one agent becomes 10Gi wasted across 200 nodes.
PerfectScale is built for exactly this problem: its Kubernetes governance platform watches how your workloads, DaemonSet agents included, actually use CPU and memory and turns that into actionable, automated right-sizing recommendations you can apply manually or autonomously, so a per-node overestimate does not multiply into a large cluster-wide waste. Teams like Paramount Pictures and Creditas use PerfectScale to keep their clusters efficient, and you can give it a try or book a technical session.
Alongside it, Kubecost and the open-source OpenCost report cost by workload so you can see what your DaemonSets consume, and Goldilocks and the Vertical Pod Autoscaler in recommender mode suggest request values from observed usage.
Keeping DaemonSet pods running during disruption
Node agents are workloads that you do not want to lose, so it is important to make them resilient to disruption. Let's see how:
Priority classes are the main tool for this. When you assign a DaemonSet, the built-in system-node-critical priority class marks its pods as critical to the node. The scheduler and kubelet then treat them as high priority, making them less likely to be evicted under resource pressure. This is appropriate for essential node-level components such as CNI and monitoring agents.
It is also important to understand how DaemonSet pods behave during common disruptions. Under node pressure, the kubelet can evict lower-priority pods first, which is why the critical priority class can help protect important agents.
During a node drain, such as before maintenance, DaemonSet pods are handled differently from regular pods because they are tied to the node. During a cluster upgrade, DaemonSet agents move along with the nodes, so check that the agent version is compatible with the new Kubernetes version before upgrading.
Kubernetes DaemonSet best practices
The following best practices can help keep DaemonSets efficient, reliable, and safe to operate:
a. Limit DaemonSets to genuine node-level workloads: you know, every DaemonSet runs on every node and multiplies its cost; only use one when the workload truly needs to run per node. If a helper belongs to a specific app, a sidecar container is the better fit.
b. Set explicit resource requests and limits on every agent: you should never run a DaemonSet without requests and limits. Given the fleet multiplication, an unbounded or oversized agent wastes far more than the same mistake in a single Deployment.
c. Scope tolerations narrowly instead of tolerating every taint: Add only the tolerations an agent actually needs, such as the control-plane toleration for an agent that must run there. A blanket "tolerate everything" toleration removes the protection that taint is meant to provide.
d. Roll out updates with a conservative maxUnavailable: For critical node agents, update slowly, one or a few nodes at a time, so a bad agent version does not break networking or monitoring across the whole cluster at once. maxSurge: 1 with maxUnavailable: 0 gives a zero-downtime per-node update where the agent supports it.
e. Track numberUnavailable and rollout duration as ongoing signals: you have to watch how many DaemonSet pods are unavailable and how long rollouts take. A rising unavailable count or a slow rollout is an early sign that an agent is failing on some nodes.
f. Re-check the DaemonSet resource footprint whenever cluster size changes: Because cost scales with node count, a footprint that was fine at 20 nodes can be significant at 300. Review resource requests as the cluster grows so DaemonSet resource usage doesn't grow too much.
Troubleshooting common DaemonSet failures
The following are the two types of problems that come up most often, and each has a clear place to start:
a. Pods missing on specific nodes and stuck rollouts: If a node has no DaemonSet pod, it is almost always scheduling: the node has a taint the pod does not tolerate, or the pod's nodeSelector or affinity excludes it. You run kubectl describe node <node> to see its taints and labels, and kubectl describe pod on a pending DaemonSet pod to see why it will not schedule. A stuck rollout usually traces to the same causes, or to a new pod that cannot become ready, so check the events and the new pod's logs.
b. OOMKilled agents and CPU throttling: DaemonSet agents are commonly under-provisioned, so they get OOMKilled when their memory limit is too low, or CPU throttled when their CPU limit is too tight, especially on busy nodes with many pods to watch. An OOMKilled agent shows OOMKilled and exit code 137 in kubectl describe pod. CPU throttling appears in CPU throttling metrics rather than in logs. The fix is to set the agent's requests and limits based on its actual usage. Because these resources are needed on every node, it is important to size them carefully.