Subscribe to our newsletter
Thank you! Your submission has been received!
Oops! Something went wrong while submitting the form.

Kubernetes does a great job of hiding complexity. That’s one of the main reasons people like using it. You interact with a clean API, define what you want, and things just work.
Until they don’t.
When something breaks, all that hidden complexity suddenly becomes very real. And fixing the issue means peeling back layers one by one to understand what’s actually going on.
Ask different engineers what they think about Kubernetes, and you’ll hear mixed opinions. Some love it and see it as essential for modern applications. Others think it’s overcomplicated. And some treat it like just another tool that useful in the right situations, unnecessary in others.
All of those views have some truth.
But one thing is clear: if you’re working with modern infrastructure, Kubernetes is probably part of your stack. And when things go wrong, you need a mental model of how it works under the hood.
This guide is meant to give you exactly that a simple way to understand the different layers of Kubernetes so you can troubleshoot problems more effectively.
If you want a detailed troubleshooting guide for each layer, we also created an ebook called The Ultimate Kubernetes Troubleshooting Handbook. It’s something you can keep handy for real-world issues.
Everything in Kubernetes runs on real machines. These machines can be physical servers, cloud instances, or virtual machines. No matter what, they are the foundation.
Each node runs a component called kubelet. It takes instructions from the control plane and makes sure containers are running properly. If kubelet has issues, pods can get stuck and applications start failing. You might see alerts from different tools, but none clearly show the root cause.
This is usually where deeper debugging starts. You log into the machine, check kubelet logs, look at disk usage, CPU behavior, and system settings. Even small differences like container runtime or OS can affect how things behave.
Managed Kubernetes services make node management easier, but they also limit your control when something breaks at that level.
Nodes also control scheduling decisions through labels and taints. When a node becomes unhealthy, all pods on it are affected. That’s why nodes are one of the most critical parts of a cluster.
If you’ve worked with Kubernetes for some time, you’ve probably struggled with networking at least once.
Every pod gets an IP address. Pods can talk to each other directly. Services provide stable access points.
But the actual implementation depends on CNI plugins like Flannel, Calico, or Cilium. Each one behaves differently and has its own limitations.
On top of that, kube-proxy handles how traffic is routed. If routing rules break or become outdated, traffic may stop reaching the right pods. It can look like your application is broken, even though it’s working fine.
DNS is another common issue. CoreDNS runs inside the cluster, so if the cluster is under pressure, DNS can fail. Pods won’t be able to find services, and errors won’t clearly point to DNS as the problem.
Ingress adds another layer for external traffic, and configuring it can be confusing. If you add a service mesh, things get even more complex.
When networking breaks, you end up tracing requests across multiple components just to find where things failed.
Kubernetes was originally built for stateless applications. Storage support came later, and it still shows.
The system uses Persistent Volumes and Persistent Volume Claims to manage storage. But the actual storage can come from many sources like cloud disks, NFS, or distributed systems.
Each storage type behaves differently and has its own issues.
The Container Storage Interface helped standardize things, but it also added more components that need to be managed. If something goes wrong, volumes may fail to mount and applications may not start.
Stateful workloads like databases add more complexity. They need stable identity and data, which makes deployments slower and more sensitive.
Many storage problems only show up during failures, especially when workloads move to another node. That’s usually the worst time for things to break.
Security in Kubernetes is not just one setting. It’s made up of multiple parts that work together.
RBAC controls who can access what. If it’s misconfigured, you can either block access or create security risks.
Service accounts give identities to applications. They are used for accessing other services securely.
Secrets store sensitive data, but they are not fully secure by default. Many teams use additional tools to handle secrets properly.
There are also rules that control how pods run, like preventing root access or restricting privileges. These are important but can break workloads if not configured carefully.
Network policies control communication between pods, but they only work if your network plugin supports them.
Because there are so many parts, managing security in Kubernetes can feel overwhelming.
This layer decides how much CPU and memory your applications use.
You define requests and limits. Requests help Kubernetes decide where to place pods. Limits control how much they can use.
If you request too much, you waste resources and increase costs. If you request too little, your application may slow down or crash.
There is an important difference here. CPU can be limited and slowed down. But memory cannot. If a container exceeds memory limits, it gets killed immediately.
Settings like ResourceQuotas and LimitRanges help control usage at a higher level. Kubernetes also assigns priority classes that decide which pods get removed first under pressure.
Resource allocation directly affects both performance and cost, which makes it very important.
This is what Kubernetes is mainly known for.
You define what you want, and Kubernetes keeps trying to match that state. It constantly checks and fixes differences.
Different workload types like Deployments, StatefulSets, and Jobs handle different use cases.
The scheduler decides where pods run based on many factors like resources, rules, and constraints.
Rolling updates work well for simple applications, but more complex workloads need careful handling.
Custom resources and operators extend Kubernetes further. They allow you to manage complex systems, but they also add more components to maintain.
To debug issues here, you need to understand what Kubernetes is trying to do, not just what you see.
Autoscaling helps Kubernetes adjust resources based on demand.
The Horizontal Pod Autoscaler increases or decreases pods. The Vertical Pod Autoscaler changes resource settings. Cluster Autoscaler manages nodes.
These tools are powerful, but they are not perfect.
Scaling takes time, especially when new nodes are needed. Sudden traffic spikes can still cause problems.
Different scaling tools can also conflict with each other if used together.
There are newer approaches like event-based scaling and predictive scaling, but they also come with challenges.
To make autoscaling work well, you need good metrics and a clear understanding of your workload.
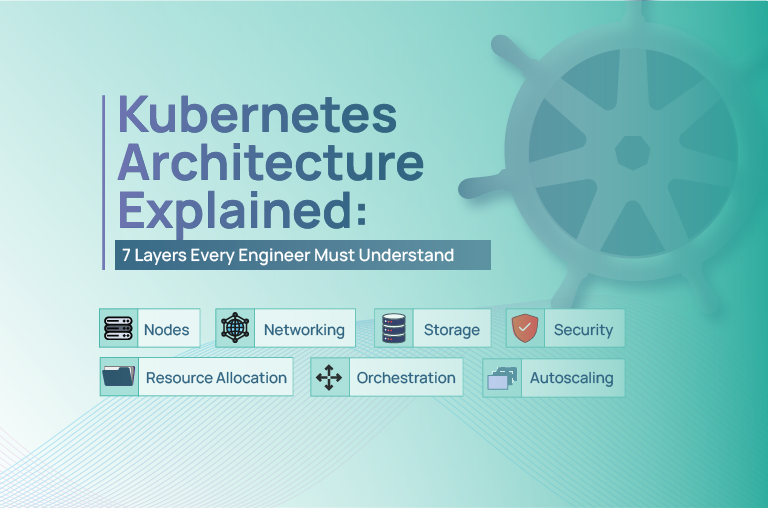
These layers - nodes, networking, storage, security, resource allocation, orchestration, and autoscaling help explain how Kubernetes works.
But in reality, they are not separate. They overlap all the time. That’s why problems are hard to debug.
A networking issue can look like a storage problem. A resource issue can trigger scaling issues. A security change can break communication.
You can’t focus on just one layer. You need a general understanding of the whole system.
Even with modern tools, this understanding is important. Otherwise, you’ll spend time fixing symptoms instead of the real problem.
We’ve put everything we’ve learned into The Ultimate Kubernetes Troubleshooting Handbook. It covers real-world issues, debugging steps, and practical examples.
If it helps you fix even one issue faster, it’s worth it. And hopefully, your clusters run smoothly.


Install in minutes and instantly receive actionable intelligence.


.jpg)
