Subscribe to our newsletter
Thank you! Your submission has been received!
Oops! Something went wrong while submitting the form.

Most teams understand one side of Karpenter really well. They know how it adds nodes. A pod becomes pending, Karpenter checks the requirements, selects an instance type, and a new node appears in less than a minute. That part feels almost automatic, so it gets most of the attention.
But the other side of Karpenter is just as important, and it is the part that directly affects your cloud costs: how Karpenter removes nodes. This is the job of the Disruption Controller. It decides when a node is no longer useful, figures out where the workloads can move, and then either removes the node completely or replaces it with a cheaper option.
If you understand this part properly, you can remove a lot of wasted capacity from your cluster without affecting applications. But if you do not understand it well, teams usually end up in one of two situations. Either they reduce disruption too much and keep paying for nodes they no longer need, or they leave everything on default settings and later get surprised when workloads move around more often than expected.
This post explains how the Disruption Controller decides what to replace in Karpenter (v1). We will go through the actual decision process, look at how consolidation works, explain the Spot instance behavior, and understand how to tune disruption safely.
When Karpenter launches a node, it adds a Kubernetes finalizer to both the Node object and the NodeClaim. This finalizer prevents the node from being deleted immediately, which gives Karpenter enough time to safely drain workloads before the cloud instance is terminated. The actual draining process is handled by another component called the Termination Controller, but the Disruption Controller is the component that starts the entire process.
The Disruption Controller continuously checks the cluster and asks a simple question: “Can I safely remove or replace this node without affecting workloads?”
If the answer is yes, Karpenter starts disruption.
Karpenter only runs one automated disruption method at a time, and it follows a fixed order. Drift runs first, and Consolidation runs after that. Each method has different rules for selecting nodes, but both use the same disruption process underneath.
One important thing to understand early is how disruption budgets work. Many people think budgets decide whether disruption happens, but that is not true. Budgets mainly control how quickly disruption happens. They work more like a rate limiter.
This is why nodes sometimes stay in the cluster longer than people expect, even when they already qualify for consolidation. The controller may already want to replace the node, but the disruption budget slows down how fast those actions are allowed to happen.
Here is the actual flow Karpenter follows when it runs a disruption method. This is the core part of how the Disruption Controller decides what should be removed or replaced, so it is important to understand each step carefully.
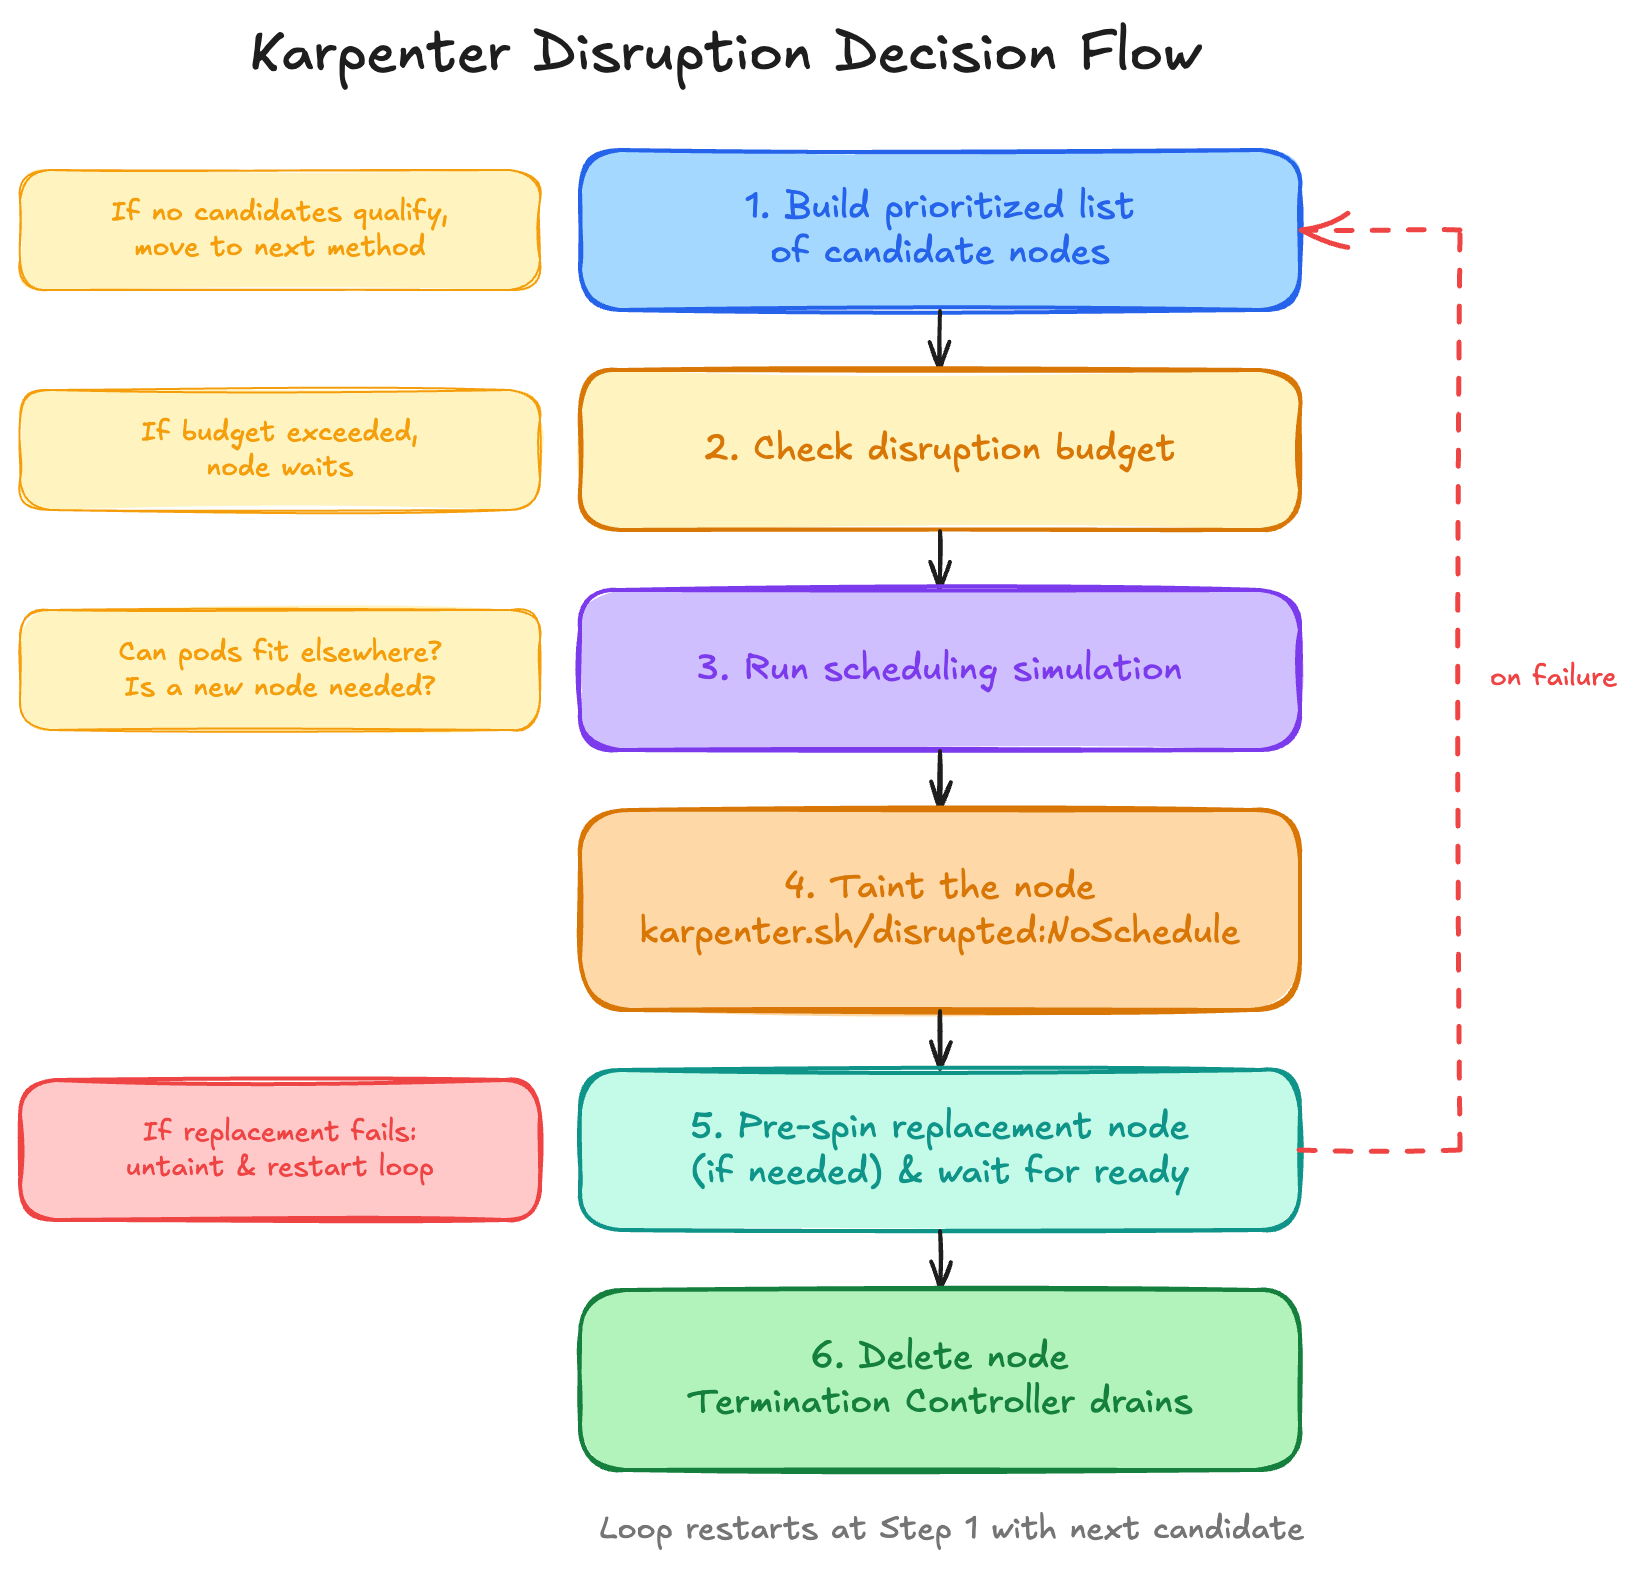
First, Karpenter builds a list of candidate nodes. These are the nodes that qualify for the current disruption method. The controller checks them in priority order. If a node contains pods that cannot be safely evicted, Karpenter skips that node for now and checks it again later during another loop. If no nodes qualify, the controller moves to the next disruption method.
Next, Karpenter checks the disruption budget. Before doing anything, it verifies whether disrupting the node would exceed the limits defined for that NodePool. If the allowed disruption limit has already been reached, the node has to wait until more disruption becomes available.
After that comes the most important step: the scheduling simulation.
Before touching the node, Karpenter simulates where the workloads will go. It checks two things:
This step is important because Karpenter does not remove nodes blindly. It first makes sure workloads still have a safe place to run.
Once the simulation succeeds, Karpenter taints the node using:
karpenter.sh/disrupted:NoScheduleThis prevents new pods from getting scheduled onto a node that is already planned for disruption.
If the simulation showed that additional capacity is needed, Karpenter launches the replacement node before removing the old one. Then it waits for the new node to become healthy and ready.
If the replacement node fails to start correctly, Karpenter removes the disruption taint and restarts the entire process from the beginning. This protects workloads from losing capacity unexpectedly.
Finally, once everything is ready, Karpenter deletes the old node and hands control over to the Termination Controller, which drains workloads and shuts the node down gracefully.
After the process finishes, the controller starts the loop again and checks for the next possible disruption candidate.
The important thing to understand here is that Karpenter does not suddenly remove a node during normal consolidation. It first confirms where workloads can run, creates replacement capacity if required, and only then removes the old node.
The decision is always that these pods have a safe place to go before removing the node.
Drift is mainly about configuration changes, which we will discuss later. But the feature that actually decides whether nodes should be replaced to reduce costs is Consolidation. This is the part of Karpenter that usually has the biggest impact on cloud spending, so it is worth understanding properly.
Consolidation is controlled by two settings inside the NodePool:
apiVersion: karpenter.sh/v1
kind: NodePool
metadata:
 name: default
spec:
 disruption:
   consolidationPolicy: WhenEmptyOrUnderutilized
   consolidateAfter: 1m
The first setting is consolidationPolicy. This decides when a node can even be considered for consolidation.
It supports two values:
With WhenEmpty, Karpenter only looks at nodes that are already empty. That means the node has no running application pods except DaemonSets. In this mode, Karpenter simply cleans up unused nodes, but it does not try to optimize underutilized ones.
With WhenEmptyOrUnderutilized, Karpenter becomes much more aggressive about saving costs. A node can now become a candidate not only when it is empty, but also when Karpenter believes the workloads could run more efficiently somewhere else. This allows Karpenter to replace larger or more expensive nodes with cheaper options.
The second setting is consolidateAfter.
This tells Karpenter how long it should wait after workloads change on a node before considering that node for consolidation. You can think of it as a cooldown timer. It prevents Karpenter from reacting immediately every time a pod starts or stops.
One important thing many teams miss is the default behavior.
If you do not configure these settings yourself, Karpenter automatically uses:
spec:
 disruption:
   consolidationPolicy: WhenEmptyOrUnderutilized
   consolidateAfter: 0s
These defaults are very good for reducing infrastructure cost, but they are not always ideal for cluster stability.
WhenEmptyOrUnderutilized combined with consolidateAfter: 0s means Karpenter is constantly checking for opportunities to pack workloads more tightly. The moment a node looks removable or replaceable, Karpenter may act immediately.
In clusters where workloads scale frequently or pods move around often, this can create more node churn than teams expect. Nodes may get replaced too frequently simply because short-term workload changes temporarily made consolidation possible.
This is one of those situations where the default settings mainly optimize for lower cloud bills, not necessarily for operational comfort.
A common and more balanced setup is to keep WhenEmptyOrUnderutilized enabled but increase consolidateAfter to something like 1m or even longer. This gives workloads time to stabilize before Karpenter makes consolidation decisions.
In practice, this usually gives most of the cost savings while reducing unnecessary workload movement and node replacements.
Once a node becomes a consolidation candidate, Karpenter has two possible ways to handle it.
The first option is deletion. If all the pods running on that node can fit onto free capacity that already exists elsewhere in the cluster, Karpenter simply removes the node. No replacement node is needed because the workloads already have enough room to move.
The second option is replace. This happens when the workloads cannot fully fit on existing free capacity, but they could fit if Karpenter launches one new and cheaper node. In that case, Karpenter creates the cheaper replacement node first and then removes the old one.
This replacement process is where most of the real “what should I replace?” decision-making happens.
Karpenter is basically asking: “Can I swap this node for something cheaper or smaller while still running all the workloads safely?”
If the answer is yes, the replacement happens.
Inside consolidation, Karpenter follows three mechanisms, and it always checks them in the same order.
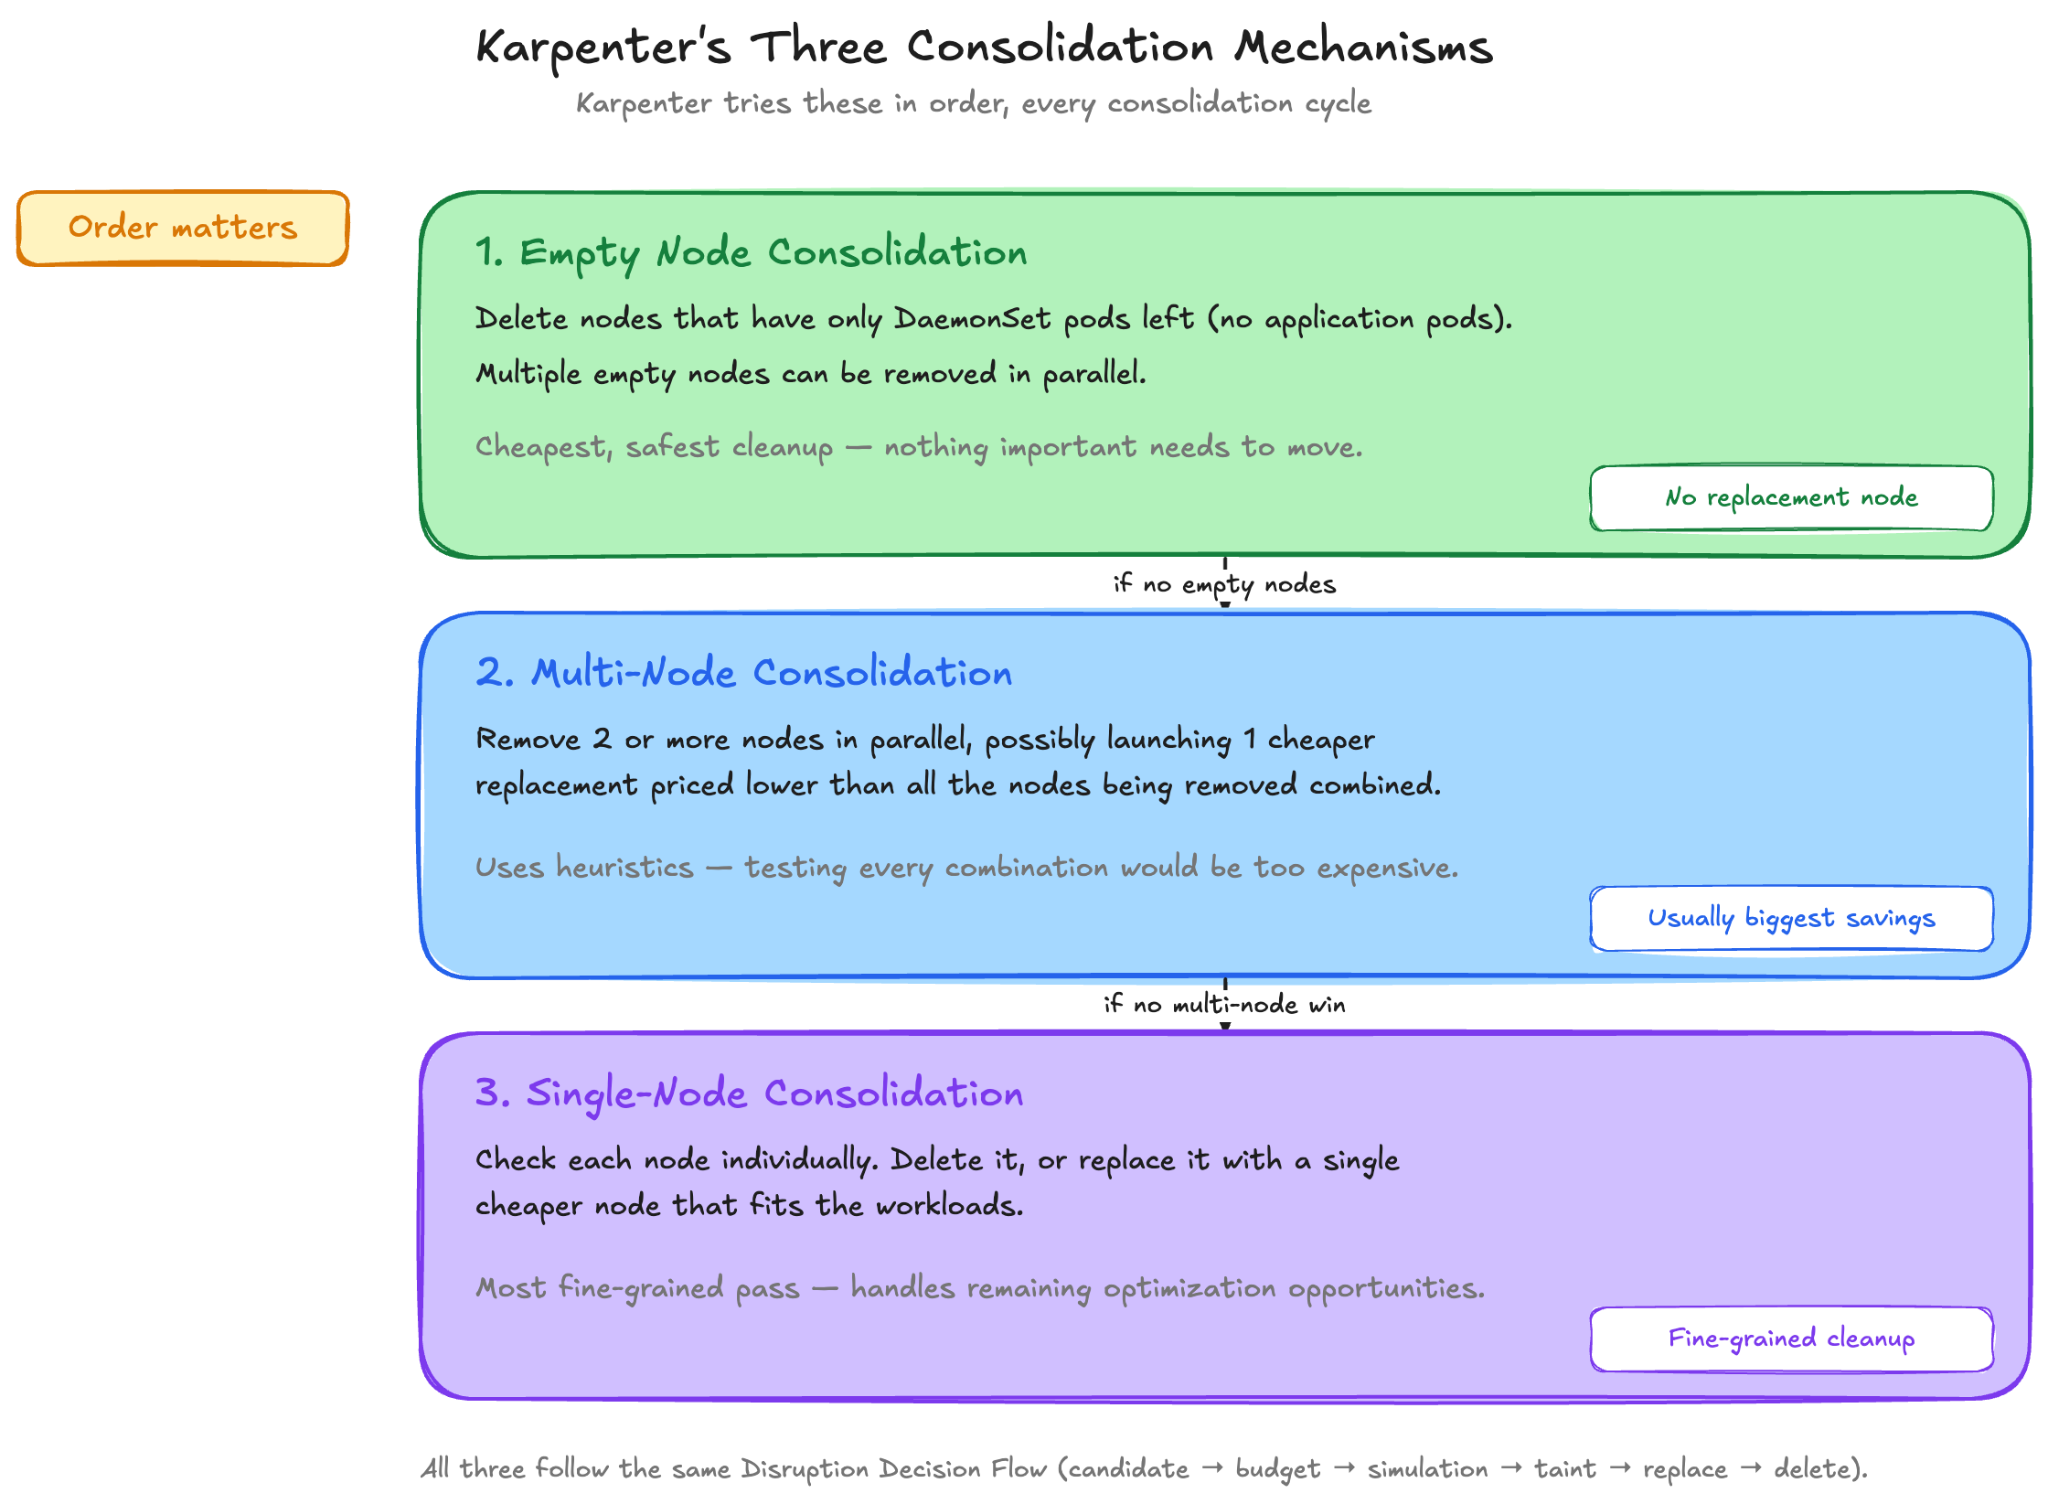
First comes Empty Node Consolidation. These are nodes that only have DaemonSet pods left and no actual application workloads running. Since nothing important needs to move, these nodes are the easiest and safest to remove. Karpenter can even remove multiple empty nodes at the same time.
Next comes Multi-Node Consolidation. Here, Karpenter checks whether workloads running across several nodes could fit onto fewer nodes, possibly even onto one single replacement node that costs less than all the existing nodes combined.
Karpenter does not test every possible node combination because that would take too much computation in large clusters. Instead, it uses heuristics to find combinations that are likely to work well.
After that comes Single-Node Consolidation. This is the most detailed pass. Karpenter checks each node individually and asks whether it can either be deleted completely or replaced with a cheaper option.
The order matters for a reason.
Empty nodes are simple cleanup opportunities. Multi-node consolidation usually gives larger cost savings because multiple nodes may collapse into one. Single-node consolidation is more fine-grained and handles the remaining optimization opportunities.
One question that confuses people is what happens when multiple nodes qualify for consolidation at the same time.
If several nodes are valid candidates, Karpenter tries to choose the option that causes the least disruption to workloads.
In general, it prefers:
The goal is not only to save money. Karpenter also tries to reduce workload movement and avoid unnecessary impact on important applications.
That is an important way to think about consolidation decisions. Karpenter is balancing two things at the same time:
There is also one behavior that surprises many teams.
Soft scheduling preferences like preferredDuringSchedulingIgnoredDuringExecution anti-affinity rules or topology spread preferences can quietly block consolidation.
Even if Kubernetes could technically place the pods somewhere else, Karpenter still tries to respect those preferred scheduling rules during consolidation, just like it did when the pods were first scheduled.
Because of that, a node may stay alive longer than expected simply because moving the workloads would violate a preferred placement rule.
If you ever see underutilized nodes that should theoretically consolidate but do not, soft affinity or topology spread preferences are often the reason.
This is one area where many teams get confused because Spot nodes can be disrupted for two completely different reasons. People mix these behaviors together even though they work very differently.
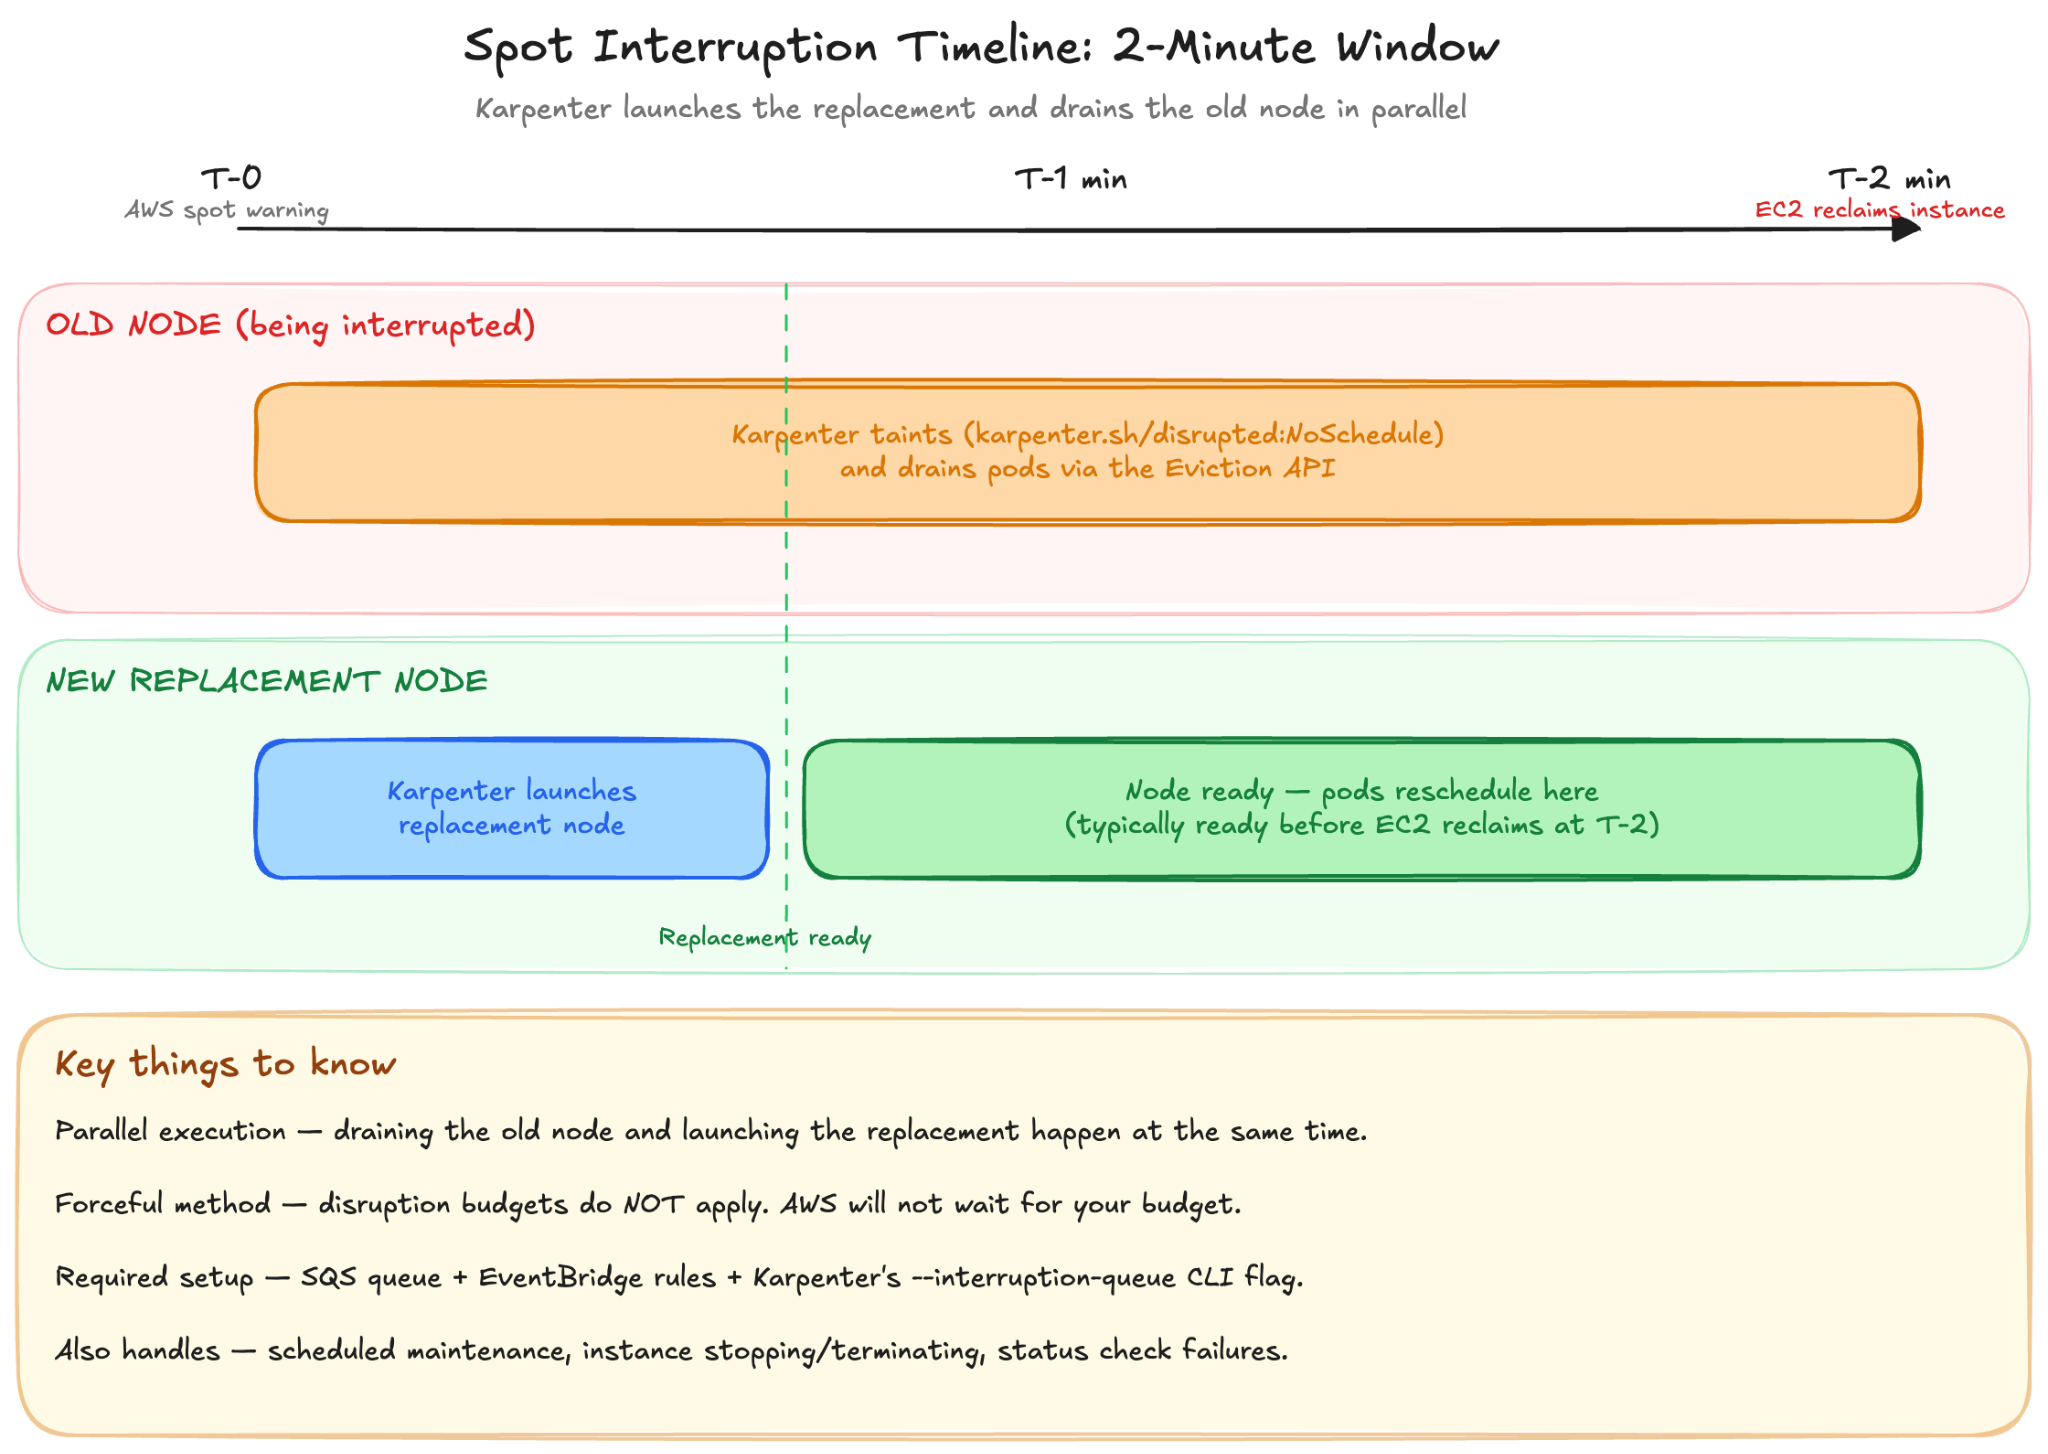
The first case is Spot interruptions.
A Spot interruption is not Karpenter making a decision. It is AWS deciding to reclaim the Spot instance. When this happens, AWS sends a two-minute interruption warning before shutting the instance down.
If interruption handling is enabled, Karpenter watches for these interruption events and reacts immediately. As soon as it receives the warning, it starts creating a replacement node while also tainting and draining the node that is about to disappear.
Because Karpenter usually launches nodes very quickly, the replacement node is often ready before AWS actually terminates the original instance.
The important thing to understand is that this process is forceful. It does not wait for disruption budgets because AWS is not going to delay the interruption just because the cluster has disruption limits configured.
To make interruption handling work, teams usually configure EventBridge rules and an SQS queue, then connect Karpenter to that queue using the --interruption-queue setting.
The second case is Spot consolidation.
This one is completely different because now the disruption is Karpenter’s own decision.
Here, Karpenter checks whether a Spot node can be replaced with a cheaper option to reduce infrastructure cost.
By default, Karpenter already allows deletion-based consolidation for Spot nodes. That means if workloads can fit elsewhere, the Spot node may simply get removed.
But replacing one Spot node with another cheaper Spot node is disabled by default. To enable that behavior, teams must turn on the SpotToSpotConsolidation feature flag.
The reason this feature is disabled by default is because of something called the “race to the bottom” problem.
The absolute cheapest Spot instances are usually the cheapest because they are interrupted very frequently. If Karpenter always replaced nodes with the lowest possible Spot price, workloads would constantly move around and clusters would become unstable.
To avoid this, Karpenter does not simply chase the lowest price.
Instead, it uses the price-capacity-optimized strategy along with a concept called instance type flexibility.
When Karpenter evaluates a single-node Spot replacement, it requires enough cheaper instance options to exist before making the change. More specifically, it wants at least 15 cheaper instance types available in the replacement decision.
This rule helps Karpenter avoid depending on one extremely cheap but unreliable Spot instance type. Instead, it keeps multiple instance choices available, which improves the chances that the replacement node remains stable and available.
Interestingly, this flexibility rule does not apply the same way during multi-node Spot consolidation. When several nodes are being collapsed into one replacement node, the same race-to-the-bottom risk is lower, so the strict 15-instance requirement is not enforced there.
If you are running large Kubernetes clusters heavily on Spot capacity, this is one of the most important behaviors to understand before enabling SpotToSpotConsolidation.
The feature can definitely reduce cloud costs further, but the flexibility checks are doing important work behind the scenes to prevent aggressive cost optimization from turning into constant instability and interruptions.
Karpenter disruption methods are divided into two groups, and understanding this difference is important because it changes what disruption budgets and other controls can actually affect.
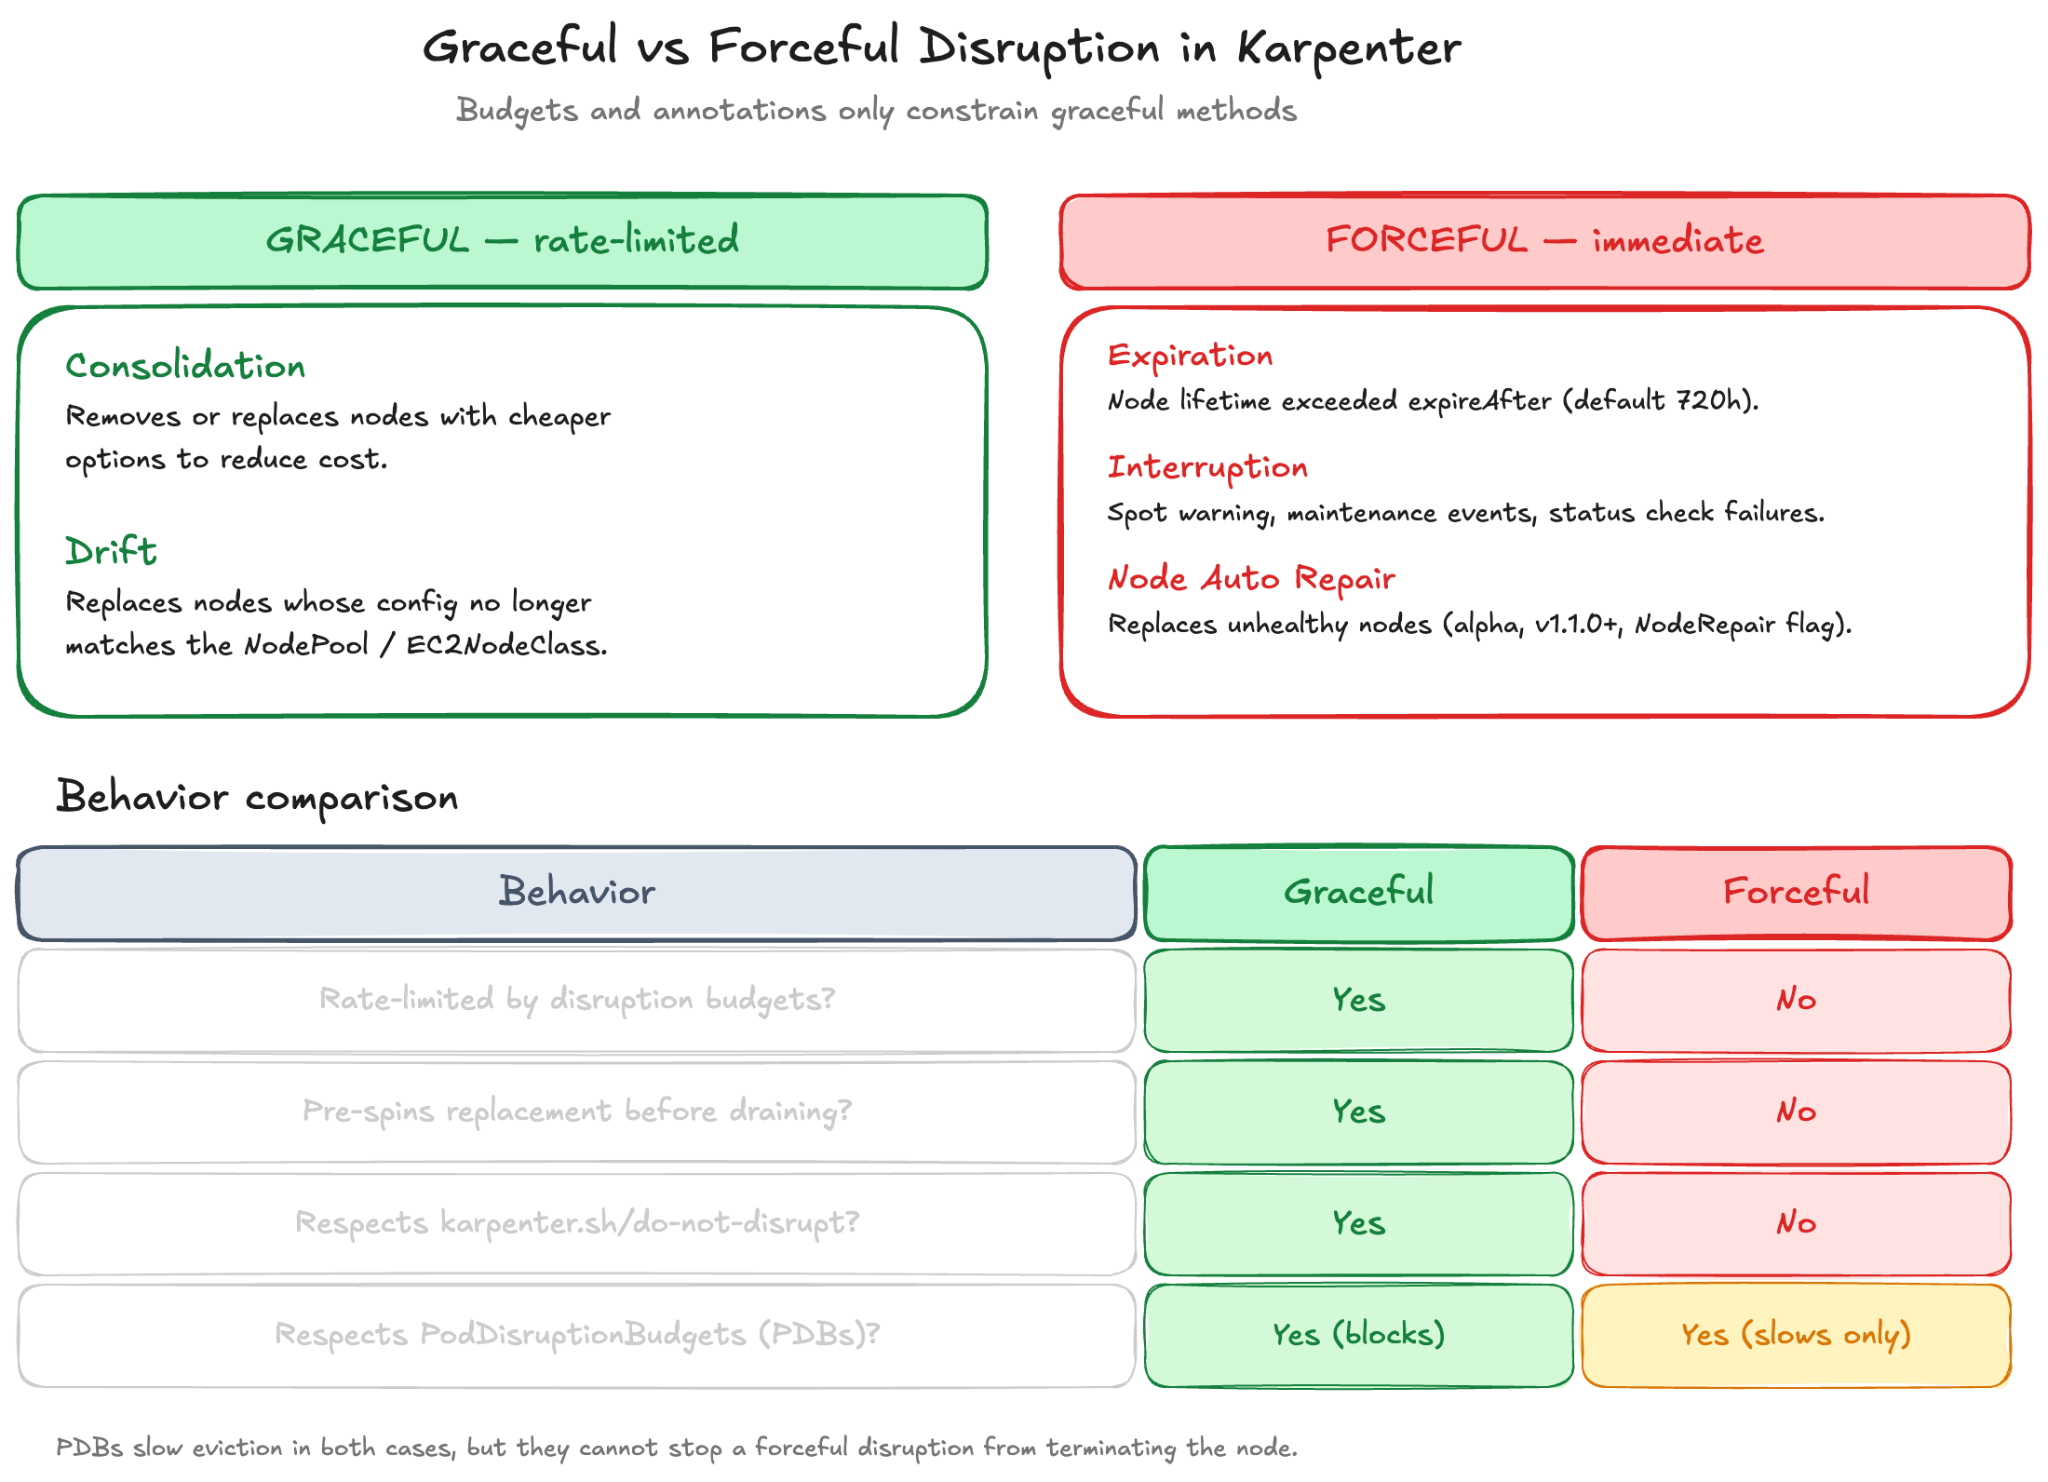
The first group is graceful disruption methods.
These methods respect disruption budgets and usually wait for healthy replacement capacity before workloads move. There are two graceful methods: Consolidation and Drift.
Consolidation is the cost optimization behavior we discussed earlier, where Karpenter tries to remove or replace nodes with cheaper options.
Drift happens when a node no longer matches the desired configuration defined in the NodePool or EC2NodeClass. For example, if you change instance requirements, AMIs, subnets, or security groups, Karpenter marks the old nodes as drifted and starts replacing them so they match the updated configuration.
One important detail here is that not every NodePool change counts as drift. Behavioral settings like:
do not trigger drift replacement because they do not directly describe the node itself.
The second group is forceful disruption methods.
These behave very differently.
Forceful methods start draining nodes immediately once their condition is triggered. They do not wait for disruption budgets, and they do not wait for pre-created replacement nodes before starting the process.
Your application’s PodDisruptionBudgets can still slow down pod eviction itself, but the node is already on the path toward termination.
a. The first is Expiration.
Every node has a maximum lifetime controlled by the expireAfter setting. By default, this value is 720h, which is around 30 days.
This feature is commonly used to rotate nodes regularly and bring in newer AMIs or fresher infrastructure.
One important thing to understand is that expireAfter is only the maximum lifetime of a node. It is not a guarantee that the node will stay alive until then. Consolidation or drift replacement may still replace the node much earlier.
b. The second forceful method is Interruption.
This includes Spot interruption warnings, scheduled maintenance events, or instance health-related failures coming from the cloud provider. In these situations, Karpenter reacts immediately because the infrastructure itself is already being terminated or marked unhealthy.
c. The third method is Node Auto Repair.
This is a newer feature introduced as an alpha capability starting around Karpenter v1.1.0 and enabled using the NodeRepair=true feature flag.
Node Auto Repair watches for unhealthy nodes and replaces them automatically when problems continue for too long. For example, if a kubelet remains in a NotReady state for around 30 minutes, Karpenter may decide to repair the node by replacing it.
There is also an important safety mechanism here. Karpenter avoids running repairs if too many nodes are already unhealthy at the same time. By default, it stops automatic repair when more than 20% of the nodes in a NodePool are unhealthy. This prevents bad deployments or infrastructure failures from triggering large-scale node replacement accidentally.
This graceful-versus-forceful distinction matters because many teams misunderstand what disruption budgets actually control.
A common mistake is setting disruption budgets to zero and expecting all node movement to stop completely. Then later they get confused when interrupted or expired nodes still get replaced.
The reason is simple: disruption budgets only slow down graceful methods like Consolidation and Drift.
They do not block forceful methods like Expiration, Interruption, or Node Auto Repair.
So if you want stricter control over how long nodes stay alive, you usually need to combine expireAfter settings together with carefully tuned disruption budgets and other policies that limit consolidation or drift-based replacements.
You are not completely locked into whatever Karpenter decides automatically. There are several controls that let you influence how disruption and replacement decisions happen inside the cluster.
One of the most important controls is disruption budgets.
Disruption budgets act like a speed limit for graceful disruption methods. If you do not define any budgets yourself, Karpenter automatically uses a default budget of 10% of nodes.
You can also make budgets more specific by targeting certain disruption reasons like Empty, Drifted, or Underutilized, and you can even apply them only during certain time windows.
apiVersion: karpenter.sh/v1
kind: NodePool
metadata:
 name: default
spec:
 disruption:
   consolidationPolicy: WhenEmptyOrUnderutilized
   budgets:
   - nodes: "20%"
     reasons:
     - "Empty"
     - "Drifted"
   - nodes: "5"
   - nodes: "0"
     schedule: "@daily"
     duration: 10m
     reasons:
     - "Underutilized"
In this example, the first budget allows up to 20% of the NodePool to be disrupted at the same time, but only for empty-node cleanup or drift replacement.
The second budget creates a hard limit of five nodes total regardless of disruption reason.
The third budget completely blocks underutilized-node disruption during the first ten minutes of every day.
If multiple budgets apply at the same time, Karpenter always follows the most restrictive one.
For percentage-based budgets, Karpenter calculates the allowed disruption count using the total number of nodes, then subtracts nodes that are already deleting or currently unhealthy.
One thing to remember is that schedules use normal cron syntax and always run in UTC timezone. There is no built-in timezone support, so teams need to handle timezone offsets themselves.
A very common pattern is temporarily freezing voluntary disruption entirely by setting the budget to zero.
spec:
 disruption:
   budgets:
     - nodes: "0"
This stops voluntary disruption methods like consolidation and drift. But it is important to remember that forceful methods like interruptions or expiration can still replace nodes even when the budget is zero.
Another useful control is the do-not-disrupt annotation.
If you have workloads that should not be interrupted by consolidation or drift, you can annotate the pod like this:
apiVersion: apps/v1
kind: Deployment
spec:
 template:
   metadata:
     annotations:
       karpenter.sh/do-not-disrupt: "true"
You can also define a time duration instead of permanent protection.
For example:
karpenter.sh/do-not-disrupt: "30m"This is useful for workloads like jobs that need a guaranteed uninterrupted startup period but can safely move later.
If a node contains an active do-not-disrupt pod, Karpenter completely excludes that node from voluntary consolidation.
The same annotation can also be placed directly on a node to protect the whole node from voluntary disruption.
But there is an important limitation here as well.
The annotation does not stop forceful methods like:
These methods can still terminate the node.
This is also why using expireAfter without configuring terminationGracePeriod carefully can create problems in environments that heavily use do-not-disrupt. Nodes may begin termination but fail to drain cleanly, eventually requiring manual cleanup.
PodDisruptionBudgets are another major control point.
PDBs are standard Kubernetes protection mechanisms, and Karpenter respects them during graceful disruption.
If a PDB blocks eviction, Karpenter cannot voluntarily consolidate that node.
One thing many teams overlook is that when multiple PDBs affect pods on the same node, every single PDB must allow eviction before the node becomes consolidatable.
That means even one very strict PDB, such as maxUnavailable: 0, can effectively keep the entire node from being disrupted.
As clusters grow larger and workloads use more overlapping PDBs, it becomes harder for Karpenter to find safe opportunities for consolidation.
Another important setting is terminationGracePeriod.
This setting exists on the NodePool and defines the maximum amount of time Karpenter allows for draining a node.
Once draining starts, the timer begins counting down. If workloads are still running after the grace period expires, the remaining pods are forcefully removed, and the node gets terminated anyway.
When combined with expireAfter, this creates a true maximum node lifetime.
For example:
This becomes especially important during urgent security patching or AMI rotation events where teams need guarantees that old nodes will eventually be replaced even if some workloads have overly strict PDB settings.
You do not have to guess what Karpenter is doing behind the scenes. Karpenter exposes a lot of information about its disruption and consolidation decisions, and in most cases it explains very clearly why a node was replaced, skipped, or kept alive.
a. The first place to check is Kubernetes events.
When a node could technically be consolidated but something is blocking the action, Karpenter writes events explaining the reason. You can run:
kubectl describe node <node>and look for Unconsolidatable events.
These messages usually explain exactly why the node could not be replaced or removed. Common examples include PodDisruptionBudgets blocking eviction or messages saying Karpenter could not find a lower-cost replacement node.
In practice, these events are usually the fastest way to answer questions like: “Why is this node still running?”
b. The second place to check is the Karpenter controller logs.
The logs contain detailed information about disruption decisions, including scheduling simulations and workload constraints. They can also show when preferred affinity or topology spread rules are preventing consolidation even though the workloads technically fit elsewhere.
c. The third place is metrics.
Karpenter exposes Prometheus metrics by default through:
karpenter.kube-system.svc.cluster.local:8080/metricsSeveral metrics are especially useful for understanding disruption behavior.
Some of the most important ones are:
karpenter_nodeclaims_disrupted_total is usually the most helpful starting point because it shows how many disruptions happened and labels them by disruption reason and NodePool. This quickly tells you whether node churn is mainly coming from consolidation, drift, expiration, or something else.
karpenter_voluntary_disruption_decisions_total shows the actual decisions the controller is making internally.
karpenter_voluntary_disruption_eligible_nodes shows how many nodes currently qualify for voluntary disruption actions.
karpenter_nodepools_allowed_disruptions helps you understand how much disruption capacity is still available based on your budgets.
If nodes are moving too aggressively or not consolidating enough, these metrics usually make the reason visible very quickly.
Once you understand how Karpenter makes decisions, the next step is learning how to tune it safely in production.
One of the best approaches is keeping WhenEmptyOrUnderutilized enabled while adding a proper consolidateAfter value.
The default 0s cooldown reacts very quickly to workload changes, especially in busy clusters where pods constantly scale up and down. Adding even a short delay helps reduce unnecessary node churn while still keeping most of the cost savings from consolidation.
Disruption budgets should also be treated as guardrails instead of complete blockers.
It is usually better to scope budgets carefully based on disruption reason. For example, many teams allow empty-node cleanup and drift replacement to happen more freely while limiting underutilized-node consolidation during peak traffic hours.
This reduces unnecessary reshuffling when workloads are busiest.
Another important recommendation is protecting only the workloads that genuinely need protection.
Features like PodDisruptionBudgets and do-not-disrupt annotations are useful, but every protected workload reduces Karpenter’s ability to optimize the cluster.
If too many workloads are protected unnecessarily, infrastructure waste slowly increases because Karpenter loses flexibility during consolidation.
In most environments, these protections are best reserved for workloads that truly cannot tolerate interruptions, such as stateful services or long-running jobs.
It is also a good idea to pair expireAfter together with terminationGracePeriod.
This combination creates predictable node rotation behavior. Nodes begin draining once they reach the expiration limit, and terminationGracePeriod guarantees they eventually terminate even if workloads are slow to exit.
This becomes especially important during security patching or AMI updates where old nodes must eventually disappear.
Another common best practice is separating workloads into different NodePools.
Stateful workloads, stateless services, Spot workloads, on-demand workloads, batch jobs, and serving applications all tolerate disruption differently.
Keeping them in separate NodePools allows teams to configure different disruption policies, consolidation behavior, and budgets for each workload type instead of forcing one compromise across the entire cluster.
The difficult part is that the correct settings depend heavily on how workloads actually behave over time, and that is not always obvious from looking at a single cluster snapshot.
This is one of the areas where PerfectScale helps teams optimize Karpenter more effectively.
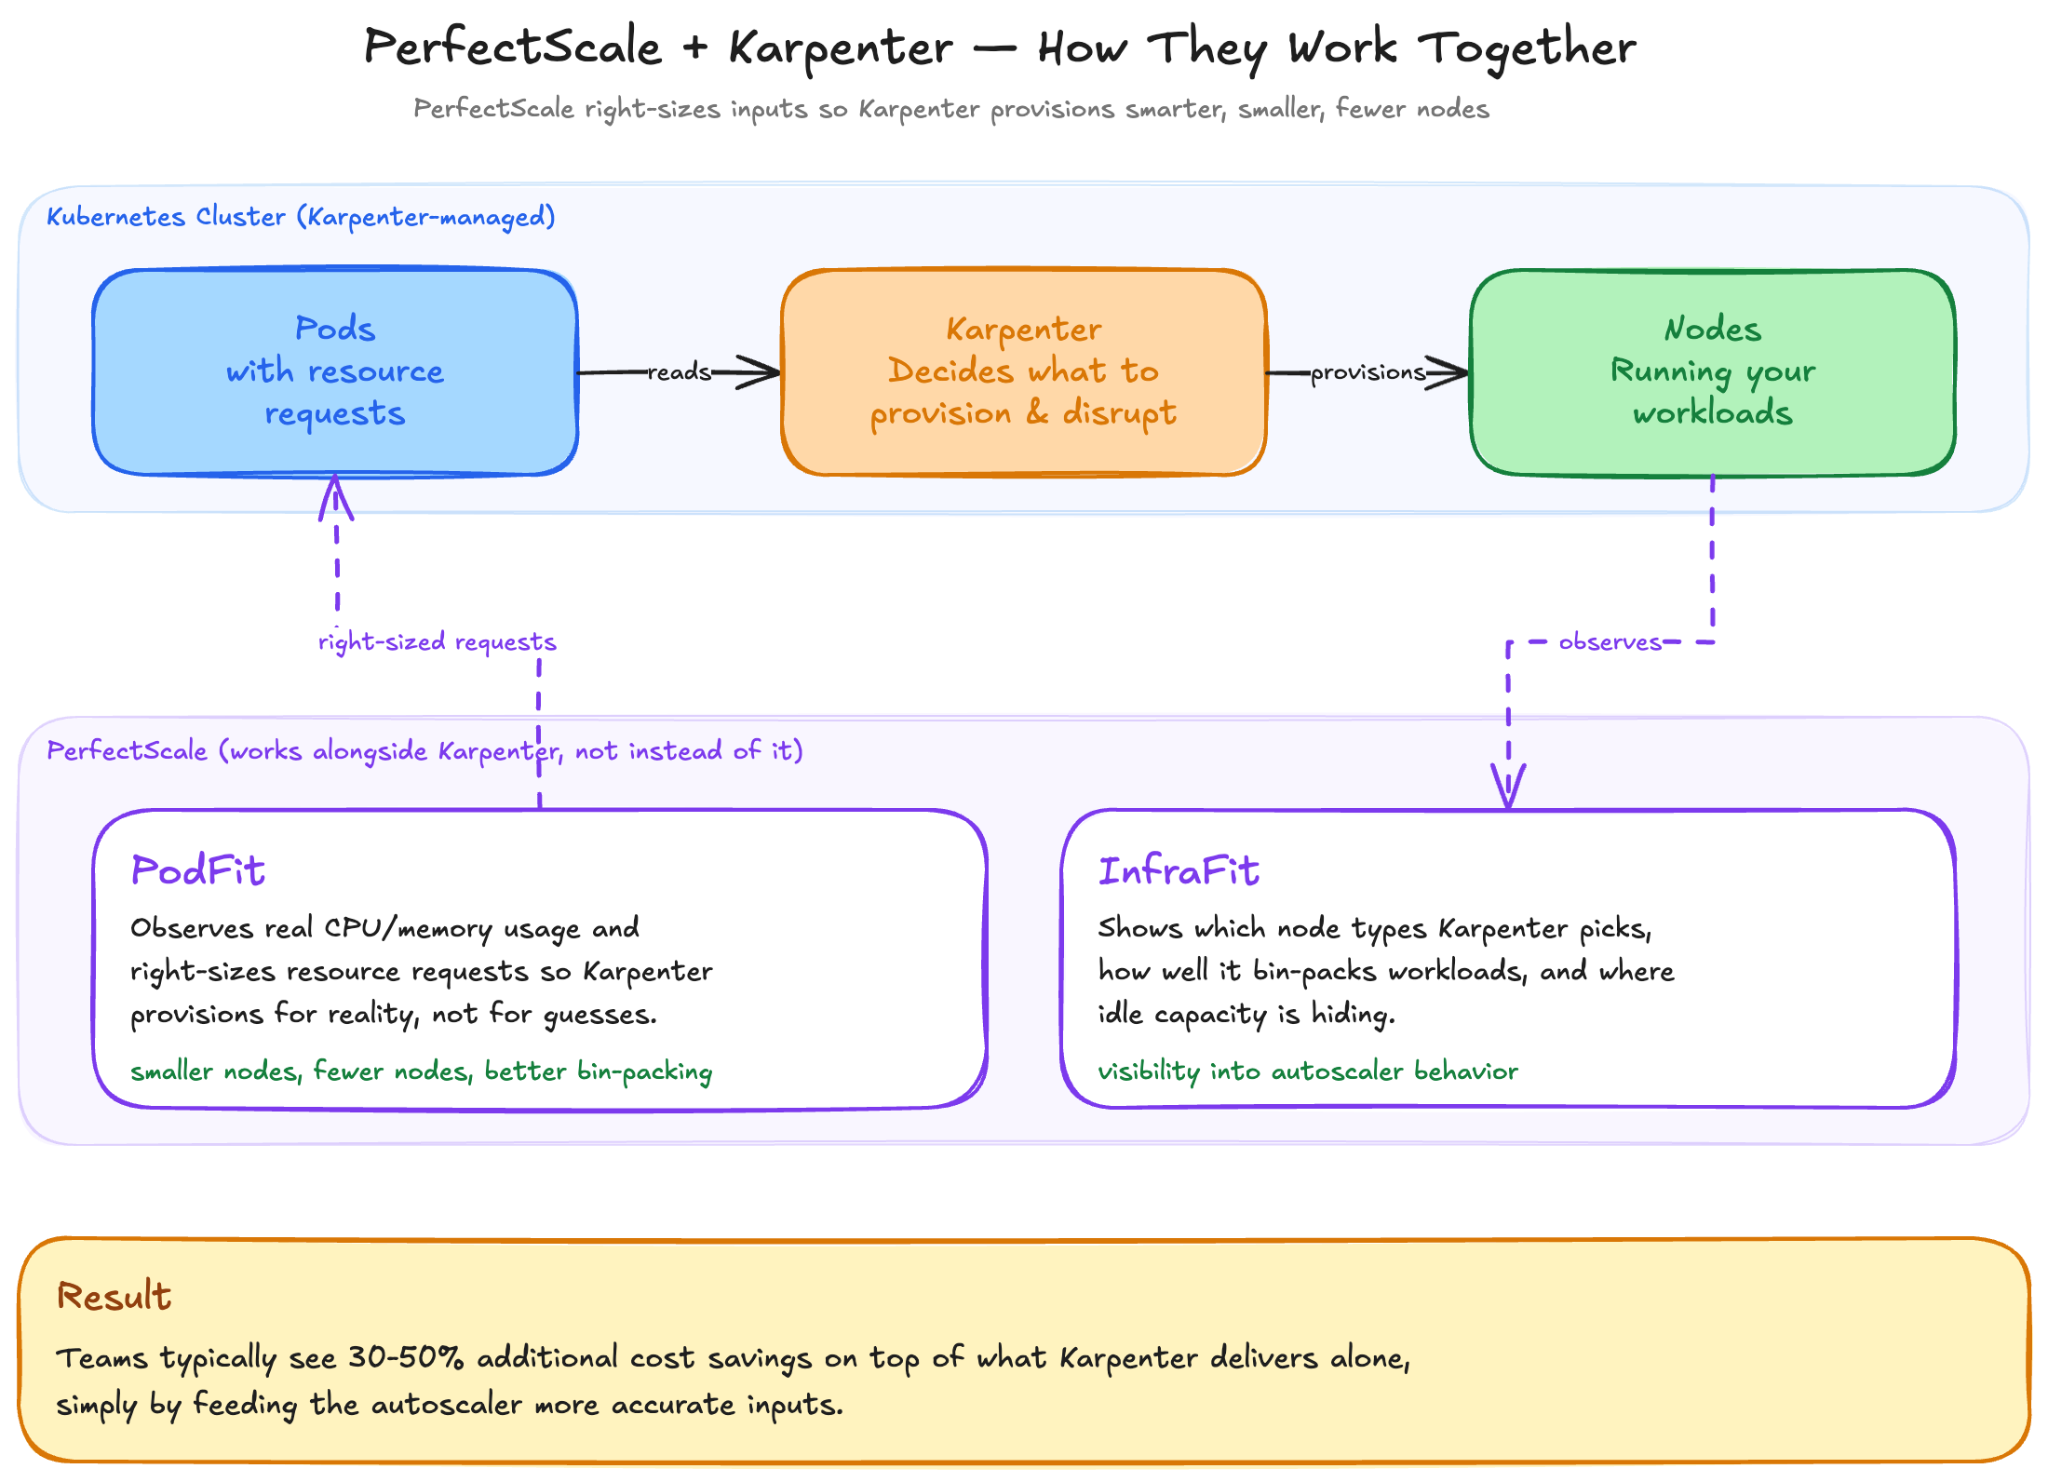
One important thing to remember is that Karpenter makes decisions based on Kubernetes resource requests, not on real container usage.
If CPU or memory requests are heavily overestimated, Karpenter still provisions nodes based on those inflated numbers. Even perfect consolidation cannot fully solve that problem because the cluster is already sized incorrectly from the beginning.
That is the gap PerfectScale helps close.
PerfectScale works together with Karpenter rather than replacing it.
PodFit analyzes real workload usage and helps right-size resource requests so Karpenter provisions nodes based on actual usage patterns instead of guesses. This usually leads to smaller nodes, fewer nodes, and better bin-packing efficiency.
InfraFit provides visibility into how Karpenter is behaving inside the cluster. It helps teams understand which instance types are being selected, how effectively workloads are packed onto nodes, and where unused capacity still exists.
Both tools work alongside existing HPA configurations and fit naturally into GitOps-based workflows.
In many environments, teams already save money with Karpenter alone, but additional optimization of workload requests often unlocks even larger savings. In practice, many organizations reduce another 30–50% of infrastructure cost simply by improving the inputs Karpenter uses for its scheduling and consolidation decisions.
PerfectScale deploys using a lightweight Helm-based agent and can usually be installed within minutes, allowing teams to quickly see optimization opportunities inside their own clusters.
Learn more about PerfectScale.


Install in minutes and instantly receive actionable intelligence.



.jpg)