


Karpenter on Azure helps AKS create the right nodes when they are needed. Instead of choosing VM sizes in advance and managing fixed node pools, Karpenter looks at pending pods, finds a VM that can run them at the lowest cost, and creates the node when needed. On AKS, this is delivered as a managed feature called Node Auto Provisioning (NAP), which became generally available in 2025.
In this guide, you'll learn how Karpenter provisions nodes on AKS, the difference between managed NAP and self-hosted Karpenter, the custom resources you use to configure it, how it compares to the AWS provider and to the AKS cluster autoscaler, how to enable it, and how to tune it for cost and resilience.
What is Karpenter on Azure?
Karpenter is an open-source node autoscaler that provisions nodes based on what your pods actually need, rather than scaling fixed groups of identical machines. On Azure, you use it through Node Auto Provisioning (NAP), which is AKS's managed integration of Karpenter. NAP automatically deploys, configures, and manages Karpenter on your cluster, and it is built on the upstream Karpenter project and the AKS Karpenter provider that Microsoft maintains.
The difference is in how nodes get chosen. With traditional node pools, you decide the VM size up front, and you are stuck with that SKU unless you create another pool and migrate workloads to it. NAP removes that step. It looks at the resource requests of pods that cannot be scheduled, picks the most cost-effective VM SKU that will fit them, and provisions it. As demand falls, it consolidates work onto fewer nodes and removes the ones it no longer needs.
How Karpenter provisions nodes on AKS?
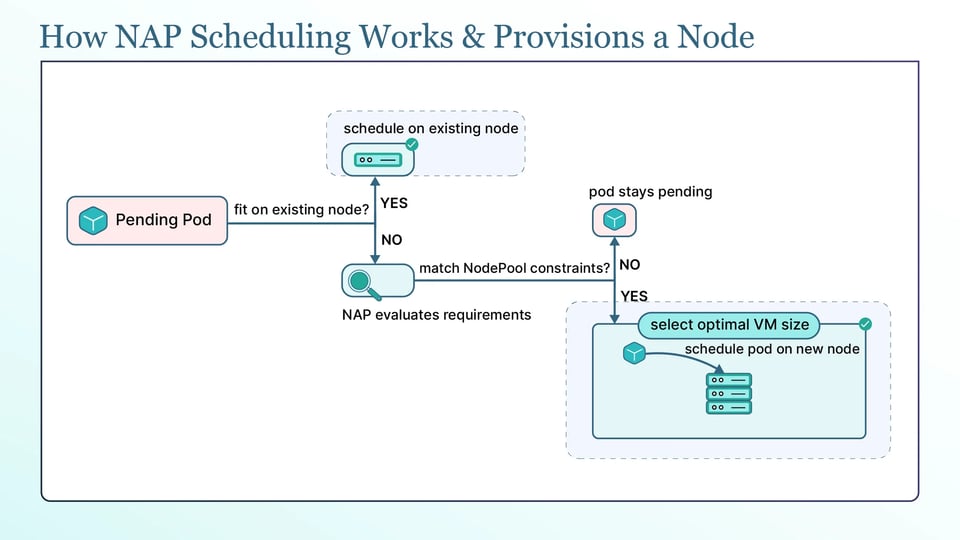
Karpenter watches the cluster for unschedulable pods. When a pod cannot fit on an existing node, Karpenter looks at its CPU, memory, and other resource requests, along with constraints such as node selectors, affinity, and tolerations. These details help Karpenter decide what kind of node the pod needs, which is why accurate resource requests are important.
Karpenter then selects a suitable VM SKU and packs the pending pods onto it. Instead of using one fixed machine type, Karpenter considers the VM sizes allowed by your configuration and chooses a cost-efficient option that can fit the pods. It also tries to place as many pods as possible on the new node, reducing unused capacity.
Karpenter represents each planned node with a NodeClaim. The NodeClaim connects Karpenter's decision to the actual VM. Karpenter creates the NodeClaim, the Azure provider launches the matching VM, the VM joins the cluster, and the pending pods are scheduled onto it. You can check NodeClaims to see which nodes Karpenter is provisioning.
Karpenter also manages nodes after they are created. It consolidates underused nodes by moving pods to fewer nodes and removing nodes that are no longer needed. It also detects drift when a node no longer matches the desired configuration, such as after a node image or configuration change, and replaces the node with a correctly configured one.
Node auto-provisioning vs self-hosted Karpenter on Azure
There are two ways to run Karpenter on AKS, and the right one depends on how much you want to manage yourself.
Node Auto Provisioning (NAP) runs Karpenter as a managed AKS add-on. Microsoft deploys and runs the Karpenter controller, handles upgrades, and provides support as part of AKS. You only create the custom resources that define how you want nodes to be provisioned. This is the simpler option for most teams. On AKS Automatic clusters, NAP is preconfigured by default and includes a pod readiness SLA that guarantees 99.9% of qualifying pods become ready within five minutes.
Self-hosted Karpenter requires you to install and run the open-source AKS Karpenter provider yourself. You get more control, but you also manage installation, upgrades, identity configuration, and ongoing operations. The cluster must use manual provisioning because NAP and a self-hosted Karpenter controller cannot manage nodes at the same time. The Azure provider currently supports and is tested with Azure CNI Overlay and the Cilium dataplane.
The main difference comes down to support and operational ownership. NAP is managed and supported by Microsoft, making it the better starting point for most production workloads. Self-hosted Karpenter is community-supported and makes more sense when you need customization that NAP does not provide and have a team ready to operate it yourself.
Karpenter custom resources on Azure
Karpenter on AKS uses two custom resources: NodePool and AKSNodeClass.
The NodePool defines the rules Karpenter follows when creating nodes. It specifies which VM families and sizes it can use, whether it can use Spot or on-demand capacity, which CPU architectures and availability zones are allowed, and the limits it must follow. It also includes disruption settings that control consolidation and node lifecycle.
The AKSNodeClass contains the Azure-specific node settings. It defines details such as the node OS image, OS disk size, maximum pods per node, node tags, and optionally the vnetSubnetID for placing nodes in a specific subnet.
In simple terms, NodePool defines what Karpenter can create, while AKSNodeClass defines how the Azure node is configured. A minimal AKSNodeClass looks like this:
apiVersion: karpenter.azure.com/v1beta1kind: AKSNodeClassmetadata: name: defaultspec: imageFamily: Ubuntu osDiskSizeGB: 128 tags: team: platformKarpenter on Azure vs Karpenter on AWS
Most of what you know from using Karpenter on EKS also applies to AKS, with the main difference being the cloud-specific NodeClass. The NodePool API comes from upstream Karpenter, so it works similarly on both clouds. You use it to define requirements, resource limits, and disruption settings. The NodeClass is provider-specific: Azure uses AKSNodeClass, while AWS uses EC2NodeClass. Each NodeClass contains settings specific to its cloud. Azure provisions VM SKUs, while AWS provisions EC2 instance types, so the labels and values used to select them differ between providers.
The main difference is provider maturity. The AWS provider has been available longer and supports more features, while the Azure provider is newer and may not have an exact equivalent for every AWS feature. Both support core capabilities such as provisioning, consolidation, Spot capacity, and drift, but check the documentation before assuming an AWS-specific feature works the same way on Azure.
Node auto-provisioning vs the AKS cluster autoscaler
NAP and the AKS cluster autoscaler solve the same problem in different ways. The cluster autoscaler works within node pools you have already defined. It watches for pending pods and resizes those fixed pools up or down, but it can only add more of the VM sizes you chose in advance. NAP has no such constraint. It provisions right-sized VMs on the fly from a broad set of SKUs, bin-packs pods onto them, and consolidates aggressively, which usually means less wasted capacity and less manual pool planning.
There is one important rule: you do not run both. NAP and the cluster autoscaler both try to manage node capacity, so when you enable NAP you disable the cluster autoscaler on the cluster. Let one system own node scaling.
Limitations and unsupported features of node auto-provisioning
NAP is production-ready, but it does not support every AKS configuration. The following limitations must be checked before enabling it:
a. Operating system and cluster type: Windows node pools are not supported, so NAP provisions Linux nodes only. IPv6 clusters are not supported either.
b. Identity and cluster operations: The Service principals are not supported, so the cluster must use a system-assigned or user-assigned managed identity. You also cannot stop a cluster that has NAP enabled, and you cannot change the cluster's egress outbound type after creation.
c. Networking: NAP works with Azure CNI Overlay, Azure CNI Overlay powered by Cilium, and Azure CNI, and Microsoft recommends Azure CNI with Cilium. Calico network policy and dynamic IP allocation are not supported. If you create a NAP cluster in a custom virtual network, you must use a Standard Load Balancer, because the Basic Load Balancer is not supported.
Enabling node auto-provisioning on an AKS cluster
Before enabling NAP, make sure you meet the prerequisites. You need Azure CLI version 2.76.0 or later, which you can check with az --version, and the cluster must use a managed identity rather than a service principal. You also need a supported network configuration, which means Azure CNI in overlay mode, and Cilium is the recommended dataplane.
To enable NAP on a new cluster, set the provisioning mode to Auto along with the network settings:
az aks create \ --name myCluster \ --resource-group myResourceGroup \ --node-provisioning-mode Auto \ --network-plugin azure \ --network-plugin-mode overlay \ --network-dataplane ciliumTo enable it on an existing cluster, update the provisioning mode:
az aks update \ --name myCluster \ --resource-group myResourceGroup \ --node-provisioning-mode AutoIf your cluster runs in a custom virtual network, remember the Standard Load Balancer requirement, and grant the cluster's managed identity the Network Contributor role on the target VNet or subnet so Karpenter can attach nodes to it.
Once NAP is enabled, verify it by confirming the Karpenter resources exist and then triggering a scale-up. Check that the CRDs are present with kubectl api-resources | grep karpenter, then deploy a workload and scale it beyond the current capacity so pods go pending. Watch Karpenter respond:
kubectl get nodeclaimskubectl get nodes -wYou should see a NodeClaim appear, a new VM join the cluster, and the pending pods schedule onto it.
Configuring NodePools for cost and resilience
The NodePool controls how Karpenter balances cost, capacity, and resilience:
a. Restrict VM SKU families, sizes, and generations: You should use the NodePool requirements to tell Karpenter which VMs it may choose. You can allow whole families, exclude oversized SKUs, or prefer newer generations, which keeps provisioning predictable while still giving Karpenter room to find a cheap fit. A broader set of allowed SKUs gives Karpenter more options to find a cost-effective fit.
b. Blend spot and on-demand capacity: Karpenter can provision both spot and on-demand VMs through the karpenter.sh/capacity-type requirement, and running separate NodePool resources with weights lets you prefer cheap spot capacity and fall back to on-demand when spot is unavailable. This is where a lot of the cost savings come from for workloads that tolerate interruption.
c. Spread nodes across availability zones: You should allow multiple zones in the NodePool requirements (topology.kubernetes.io/zone) so Karpenter can place nodes across zones, which protects your workloads from a single-zone failure.
d. Set ceilings and taints for special workloads: Give each NodePool CPU and memory limits to cap the capacity it can provision, and use taints to reserve a NodePool for specific workloads such as GPU or batch jobs, so only pods that tolerate the taint land on those nodes. A NodePool with requirements and limits looks like this:
apiVersion: karpenter.sh/v1kind: NodePoolmetadata: name: generalspec: template: spec: requirements: - key: karpenter.sh/capacity-type operator: In values: ["spot", "on-demand"] - key: kubernetes.io/arch operator: In values: ["amd64"] nodeClassRef: name: default limits: cpu: "200" memory: 400GiControlling consolidation and disruption
The consolidationPolicy in the NodePool controls consolidation. WhenEmpty removes a node only when it has no workload pods, making it the more conservative option. WhenEmptyOrUnderutilized also considers nodes that are running but not fully used. Karpenter can move their pods to other nodes and remove the underused nodes, which can save more but may move pods more often. The consolidateAfter setting controls how long Karpenter waits before considering a node for consolidation.
Karpenter also manages the node lifecycle. You can set nodes to expire after a specific age so they are regularly replaced. NAP also handles node image updates and keeps nodes aligned with the control plane's Kubernetes version when you upgrade the cluster. An appropriate auto-upgrade channel and planned maintenance window help control when these updates happen.
To protect availability while all this runs, use three controls together. Disruption budgets in the NodePool limit how many nodes Karpenter may disrupt at once. PodDisruptionBudgets protect your workloads by capping how many of their pods can be unavailable during voluntary disruptions like consolidation. And the karpenter.sh/do-not-disrupt: "true" annotation on a pod or node tells Karpenter to leave it alone, which is useful for a job you must not interrupt.
Why pod resource requests decide how much Karpenter saves?
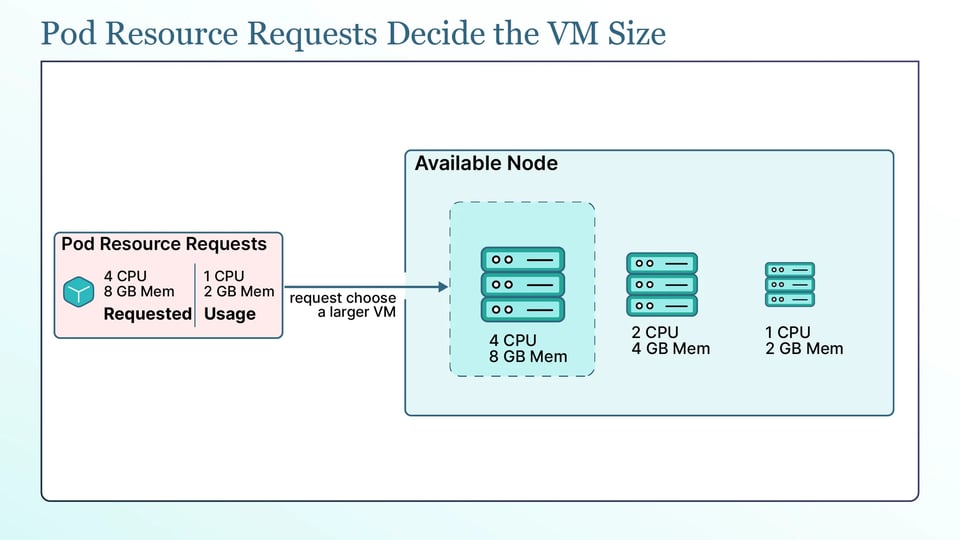
Karpenter provisions nodes based on pod resource requests, not actual resource usage. It uses those requests to choose a VM that can fit the pending pods, so accurate requests directly affect how much capacity it provisions and how much you pay.
Inflated requests can make Karpenter choose larger and more expensive VM SKUs. For example, if a pod requests 4 CPU and 8 GB memory but uses only 1 CPU and 2 GB, Karpenter still needs to find enough capacity for the requested 4 CPU and 8 GB. It may therefore choose a larger VM and fit fewer pods on the node. Across a cluster, inflated requests can lead to unused capacity and higher costs. Karpenter is simply following the resource requirements you defined.
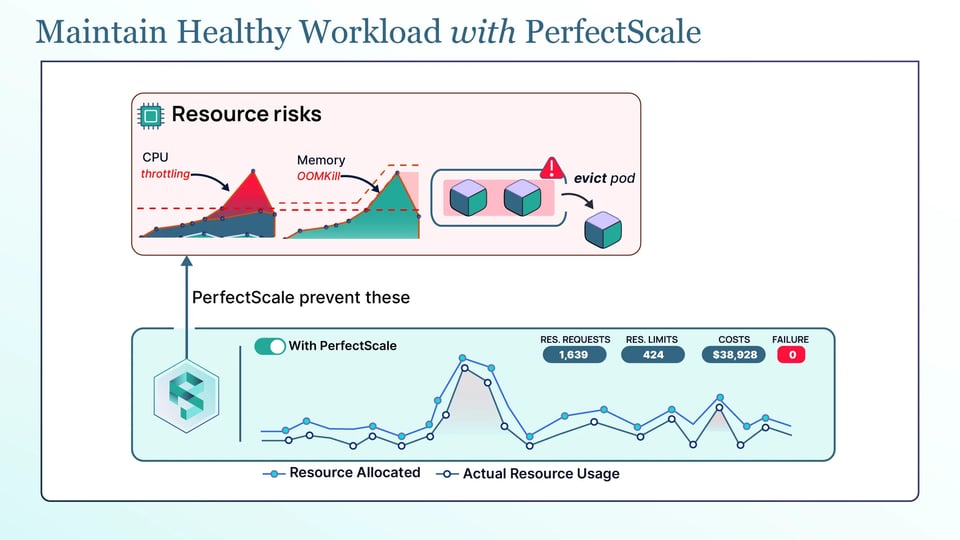
This is where continuous right-sizing pays off. PerfectScale's Kubernetes governance platform watches how your workloads actually use CPU and memory and turns that into actionable, automated right-sizing recommendations that you can apply manually or autonomously. Feeding NAP accurate requests is what lets it do its job: with requests that match reality, Karpenter provisions smaller, cheaper VMs and packs them tightly, so the savings NAP promises actually show up on your bill. Teams like Paramount Pictures and Creditas use PerfectScale to keep their clusters efficient, and you can sign up or book a technical session.
Monitoring NAP node activity, provisioning latency, and node cost
Once NAP is running, you want visibility into what it is doing. Start with NodeClaims, which show what Karpenter is provisioning and let you see provisioning activity as it happens.
AKS surfaces Karpenter events in the control plane logs (the karpenter-events category), which is where you look when a node fails to provision or register.
For metrics, enable control plane metrics through Azure Monitor managed service for Prometheus to monitor Karpenter's behavior, including provisioning activity and latency.
Cost visibility matters just as much because NAP continuously changes the mix of VM SKUs in the cluster. Tools such as Kubecost and OpenCost can provide basic cost allocation, while PerfectScale can also help identify inefficient resource requests and underused capacity, making it easier to measure NAP's cost impact.
Best practices for running Karpenter on AKS
The following are the best practices you should know:
a. Right-size pod requests before enabling NAP: Karpenter provisions nodes based on pod resource requests, so accurate requests have a major impact on cost. Right-size them first to avoid provisioning more capacity than your workloads need.
b. Keep NodePool requirements broad enough to find cheaper SKUs: Restricting Karpenter to one or two VM sizes limits its ability to find cost-effective options. Allow a reasonable range of VM families and sizes so Karpenter has more choices.
c. Use ephemeral OS disks and Spot capacity for fault-tolerant workloads: Ephemeral OS disks can provide faster storage, while Spot VMs can cost much less than on-demand capacity. Both have trade-offs, so use them for workloads that can handle node replacement or interruption. Keep critical workloads on on-demand capacity when reliability is more important than cost.
d. Define NodePool limits to cap runaway provisioning: Always set CPU and memory limits on your NodePool resources. Without them, a misconfigured workload or a runaway deployment could have Karpenter provision far more capacity and cost than you intended.
e. Manage NodePools and AKSNodeClasses as code: Keep your NodePool and AKSNodeClass definitions in Terraform or Bicep alongside the rest of your infrastructure, so provisioning policy is version-controlled, reviewed, and repeatable across clusters rather than edited by hand.