


Optimizing Azure Kubernetes Service (AKS) costs requires reducing compute waste, which accounts for 70-80% of total expenses, tuning resource requests, and leveraging Azure's pricing models. Azure Kubernetes Service provides powerful automation and scaling features; however, inefficient resource allocation, over-provisioning, and unused capacity can lead to unnecessary spending. For new deployments, consider using AKS Automatic, which preconfigures production-ready, cost-efficient defaults.
Azure Kubernetes Service provides powerful automation and scaling features; however, inefficient resource allocation, over-provisioning, and unused capacity can lead to unnecessary spending.
In this article, you’ll learn about AKS, understand its pricing and cost components, and best Practices for AKS Cost Optimization.
To achieve immediate and long-term savings, implement the following battle-tested strategies:
- Rightsize pods and nodes: Over-provisioning is the primary cause of AKS waste, so audit actual utilization and set strict requests and limits, and consider Karpenter-based node auto-provisioning that matches nodes to real pod demand.
- Leverage Azure discounts: Commit to 1-year or 3-year Reserved Instances to save up to 72% on steady workloads, and use Spot VMs for fault-tolerant workloads to gain discounts up to 90%.
- Enable autoscaling: Use the Cluster Autoscaler, Horizontal Pod Autoscaler (HPA), or KEDA to scale pods and nodes down during off-peak hours.
You can capture further savings by cleaning up waste and improving visibility:
- Optimize hidden costs: Filter noisy namespaces out of monitoring, clean up orphaned Azure disks and dangling persistent volumes, and optimize inter-node traffic with the Standard Load Balancer.
- Improve cost visibility: Enable the AKS Cost Analysis add-on in the Azure portal to map spend back to specific namespaces, applications, and labels.
Cost optimization on AKS has also shifted from periodic, manual tuning toward continuous, automated approaches. Teams running AKS at scale routinely report 30% to 60% cost reductions after a proper optimization pass, with most of the savings coming from compute rather than the control plane or networking. As workloads change week to week, manual fixes tend to drift, so pairing Azure's native cost tooling with automated rightsizing has become the practical way to keep clusters lean over time.
Let’s dive in!
What is Azure Kubernetes Service (AKS)?
Azure Kubernetes Service (AKS) is a managed Kubernetes service from Microsoft Azure that simplifies deploying, managing, and scaling containerized applications. It provides a free control plane, automated updates, and built-in security while handling complex Kubernetes operations for users.
Understanding AKS Pricing & Cost Components
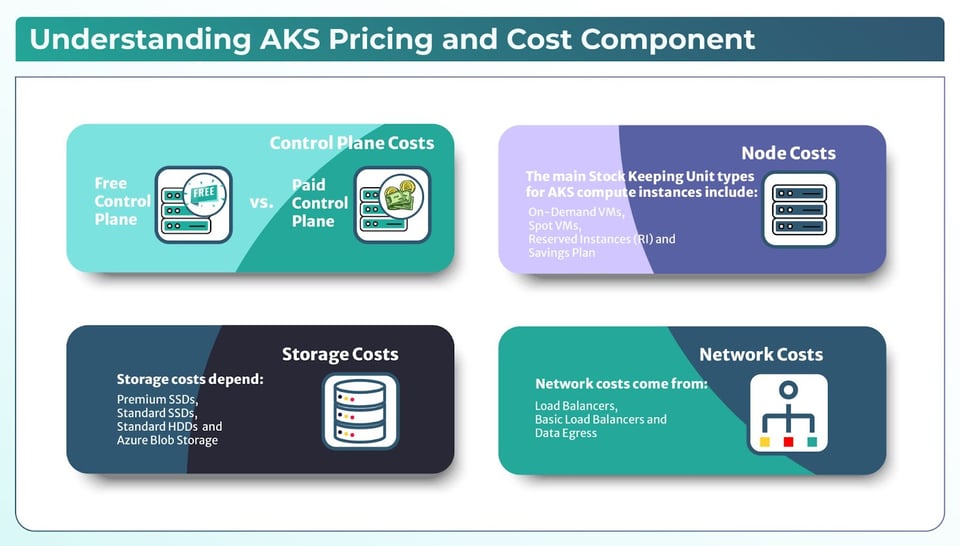
Let’s understand the AKS pricing components and how billing works:
AKS provides a free control plane, meaning you only pay for the worker nodes running your workloads. But the costs come from various factors like compute costs, ctorage costs and networking costs. The different VM sizes, node scaling, storage and network usage directly impact your costs.
In AKS, the billing depends on various SKU (Stock Keeping Unit) types and pricing factors:
- Compute SKUs: It is based on VM type and pricing model.
- Storage SKUs: It depends on the type of Azure disks used.
- Networking SKUs: It covers the load balancers and data transfer costs.
Azure Kubernetes Service (AKS) provides different SKU (Stock Keeping Unit) types for its compute, storage, and networking components. These SKUs define the pricing model and capabilities available to users.
Let’s understand these SKUs:
1. Control Plane Costs (Free vs. Paid)
Free Control Plane: AKS provides a managed control plane at no cost, meaning you don’t pay for Kubernetes API servers or master nodes.
Paid Control Plane: Azure provides a Uptime SLA (Service Level Agreement) for production-critical workloads, where you pay for a guaranteed uptime SLA for the control plane.
2. Node Costs (Compute SKUs)
Compute resources in AKS are the biggest cost factor. The main SKU types for AKS compute instances include:
On-Demand VMs: It provides standard pricing with full flexibility but at a higher cost.
Spot VMs: It is of lower-cost, provide interruptible instances, that is ideal for fault-tolerant workloads.
Reserved Instances (RI): It provides discounted pricing for long-term commitments (1 or 3 years).
Savings Plan for Compute: It is a flexible commitment-based pricing model that applies discounts across multiple instance types.

3. Storage SKUs
Storage costs depend on the type of persistent volumes and disks used:
Premium SSDs: provide high-performance, low-latency storage and are best for critical applications.
Standard SSDs: provide a balance between performance and cost for general workloads.
Standard HDDs: is the cheapest option for infrequent access workloads.
Azure Blob Storage: cost-effective object storage for backups and logs.
4. Networking Costs (Load Balancers & Data Transfer)
Network costs come from:
Load Balancers: AKS provides Standard Load Balancers (paid, better security) and Basic Load Balancers (free but with limited features).
Data Egress: When traffic leaves Azure (cross-region or internet-bound), it incurs costs.
| On-Demand VMs | Spot VMs | Reserved Instances | Savings Plan for Compute | |
|---|---|---|---|---|
| Pricing Model | Pay-as-you-go | Discounted but interruptible | Pre-paid, discounted | Flexible discount based on usage |
| Cost Savings | None (highest cost) | Up to 90% cheaper | Up to 72% cheaper | Up to 65% cheaper |
| Commitment | No commitment | No commitment | 1 or 3 years | 1 or 3 years |
| Best For | General workloads | Fault-tolerant, batch jobs | Long-running, predictable workloads | Flexible workloads needing discounts across VMs |
| Risk of Interruption | No | Yes (Azure can reclaim) | No | No |
Best Practices for AKS Cost Optimization
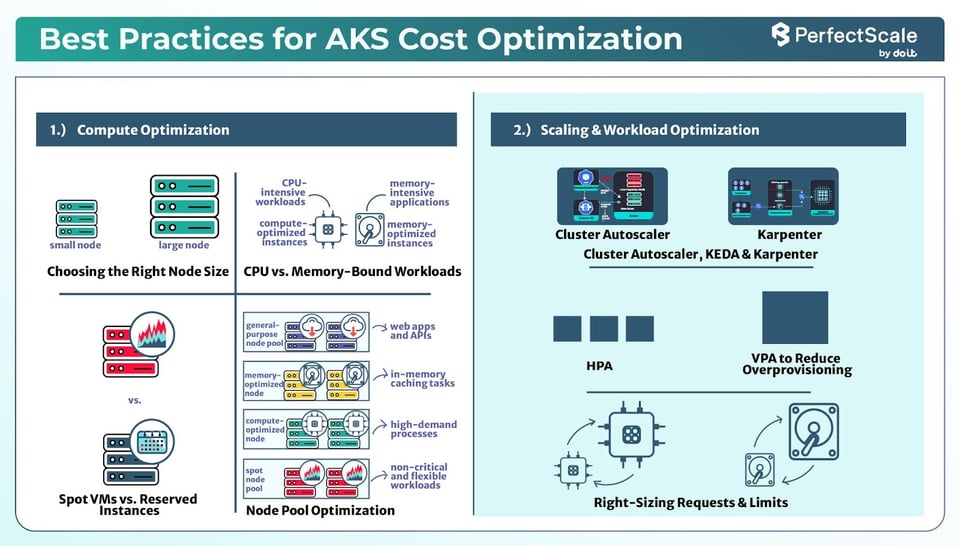
Here are some of the best practices that you can follow:
2. Scaling & Workload Optimization
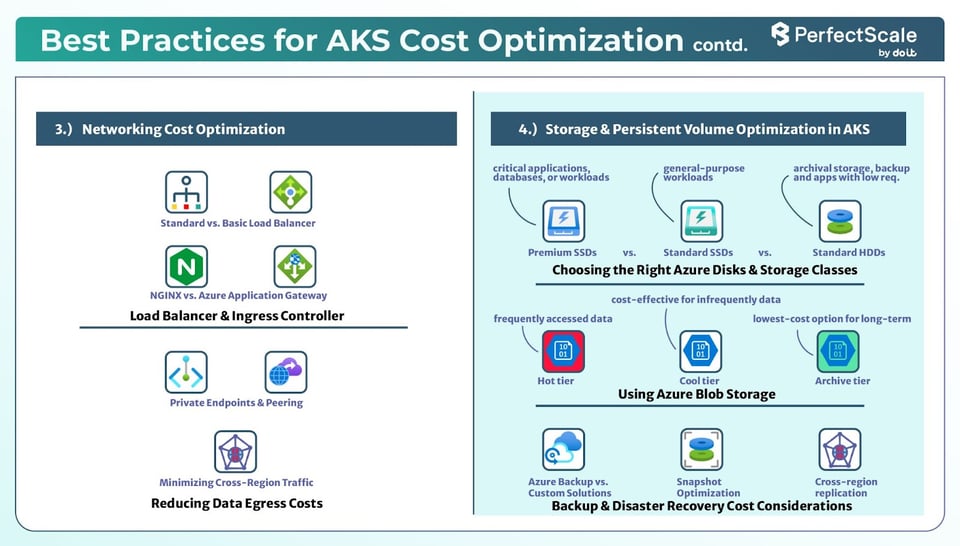
3. Networking Cost Optimization
4. Storage & Persistent Volume Optimization in AKS
Now, let’s discuss these best practices one by one in detail:
1. Compute Optimization
a. Choosing the Right Node Size
You should select the right node size, which affects both performance and cost efficiency. The key factors to consider are small vs. large nodes and CPU vs. memory-bound workloads. Let’s discuss:
To make this easier, Azure offers cluster preset configurations in the portal that start you with cost-appropriate defaults. The Dev/Test preset reduces VM size and disables non-critical features for building and testing workloads, while the Production Economy preset is aimed at serving production traffic cost-consciously when workloads can tolerate some interruption. Starting from the preset that matches your environment avoids the common mistake of paying for production-grade capacity on a development cluster.
Small vs. Large Nodes: One of the biggest decisions in AKS optimization is choosing between many small nodes or fewer large nodes. Each approach has its own advantages and disadvantages:
Small Nodes: Small Nodes (e.g., D2s_v4, B-series) work well for dynamic applications that require frequent scaling, such as web applications and microservices. They allow for more precise autoscaling, ensuring that resources are allocated efficiently and minimizing waste. But having many small nodes can introduce network overhead due to increased inter-node communication.
Large Nodes: Large Nodes (e.g., D16s_v4, F-series, E-series) are better suited for high-performance workloads such as databases, AI model training, or large-scale batch processing. With fewer nodes, the operational overhead per node decreases, reducing the burden on kube-proxy, monitoring agents, and other background processes. Large nodes also improve network efficiency by minimizing inter-node communication. But they can lead to resource fragmentation, making it difficult to schedule small workloads effectively, as leftover resources may not always align with new workload demands.
The best approach is to use a combination of both small and large nodes based on workload characteristics. Large nodes should be reserved for resource-intensive applications that require high performance and stability, while small nodes can handle workloads that need rapid scaling resulting in cost efficiency and better resource management.

b. CPU vs. Memory-Bound Workloads
You should select the right VM types based on your workload if it’s CPU-intensive and memory-intensive.
CPU-intensive Workloads: CPU-intensive workloads like AI processing, game servers, and video encoding, require high clock speeds and multiple cores to process tasks efficiently. These workloads perform best on compute-optimized nodes like the F-series in Azure. Since CPU-heavy workloads can tolerate interruptions, they can be deployed on Spot VMs to take advantage of lower pricing while maintaining cost efficiency.
Memory-Intensive Workloads: Memory-intensive workloads, such as databases, caching systems, and data analytics applications, require higher RAM per vCPU to manage large datasets. These workloads are running well if we choose memory-optimized nodes, such as the E-series in Azure, which provide ample memory for handling data-intensive operations.
If you want to maximize cost efficiency, it’s important to match each workload’s compute requirements with the appropriate node type. By carefully selecting node types based on workload demands, organizations can minimize waste and optimize their AKS infrastructure.
c. Using Spot VMs & Reserved Instances for Savings
Azure Spot VMs let you tap into unused Azure capacity at a steep discount sometimes up to 90% off regular prices. They work best for flexible, interruption-tolerant workloads such as batch processing, CI/CD pipelines, AI model training, and even web applications. Because these VMs can be reclaimed at any moment by Azure, it's important to have fallback plans in place. This could mean using Pod Disruption Budgets or backup nodes to keep your applications running smoothly even if a Spot VM goes offline.
For workloads that need to run without interruption, Reserved Instances are the go-to choice. They provide savings of up to 72% compared to on-demand pricing and are perfect for databases, APIs, persistent services, or any application with steady demand.
Before committing, analyze your usage patterns to see which workloads are truly steady-state, since a commitment only pays off on capacity you would run anyway. Many teams blend a baseline of Reserved Instances or a compute Savings Plan for predictable demand with Spot capacity for the variable portion, which captures deep discounts without locking in more than the workload needs.
By combining both options, use Spot VMs for tasks that can handle interruptions and Reserved Instances for critical applications, you can create a balanced, cost-effective strategy that maximizes savings.
>> Take a look at Amazon EKS Cost Optimization Best Practices
d. Node Pool Optimization
You should segment your AKS cluster into multiple node pools, which helps enhance cost efficiency and workload management. By creating dedicated node pools for specific types of tasks, you ensure that each workload runs on hardware tailored to its needs. For example, a general-purpose node pool works well for web applications and APIs, while memory-optimized node pools are ideal for databases and in-memory caching tasks. Compute-optimized node pools are perfect for high-demand processes like AI/ML workloads and batch jobs. Also, having a dedicated spot node pool for non-critical and flexible workloads allows you to take advantage of cost savings without compromising on performance where it's most needed.
You can also use AKS Node Auto-Provisioning to further refine this strategy by automatically creating node pools as demand increases. This means your cluster can dynamically adjust to changing workload patterns without manual intervention, making sure that you always have the right type of nodes available while avoiding over-provisioning.
e. Starting with AKS Automatic for Cost-Efficient Defaults
For new deployments, AKS Automatic is a strong starting point because it preconfigures production-ready, cost-efficient defaults instead of leaving you to tune everything manually. It applies automated node provisioning, scaling, upgrades, and network configuration, and reduces cost in two ways: it minimizes compute waste through automation and it cuts the operational overhead of running Kubernetes. AKS Standard remains the right choice when you need deeper platform customization, but for most production workloads Automatic reduces the risk of over-provisioning from day one.
2. Scaling & Workload Optimization
a. Cluster Autoscaler, HPA, KEDA & Karpenter
The default Cluster Autoscaler adds and removes nodes based on resource needs, but it only retires nodes that are completely empty. This limitation means that nodes with some workload, even if underutilized, continue to run and contribute to costs. Karpenter offers a better approach by actively assessing incoming pod demands and provisioning nodes that exactly match those requirements. It also has the ability to quickly remove nodes that aren't fully used and helps in reducing expenses. If you have environments with fluctuating workloads, switching to Karpenter can provide faster, more cost-efficient scaling.
On AKS, managed Karpenter is now generally available as Node Auto-Provisioning (NAP), having moved out of preview, so teams can rely on it for production clusters. NAP is preconfigured by default in AKS Automatic, while on AKS Standard you enable and configure it explicitly. It can also be self-installed from the open-source AKS Karpenter provider at https://github.com/Azure/karpenter-provider-azure.
The default Cluster Autoscaler adds and removes nodes based on resource needs, but it only retires nodes that are completely empty. This limitation means that nodes with some workload, even if underutilized, continue to run and contribute to costs. Karpenter offers a better approach by actively assessing incoming pod demands and provisioning nodes that exactly match those requirements. It also has the ability to quickly remove nodes that aren’t fully used and helps in reducing expenses. If you have environments with fluctuating workloads, switching to Karpenter can provide faster, more cost-efficient scaling. On AKS managed Karpenter service is available in preview as NAP (Node Auto Provisioning) or can be self-installed from https://github.com/Azure/karpenter-provider-azure
The Horizontal Pod Autoscaler (HPA) scales the number of running pod replicas based on CPU or memory usage. It ensures that applications get the right amount of resources without overloading nodes. HPA is best suited for steady, predictable workloads where traffic increases gradually.
The workloads that are driven by unpredictable events, such as sudden spikes in API requests or queue-based processing, KEDA (Kubernetes Event-Driven Autoscaler) provides better efficiency in this case. Unlike HPA, which relies only on CPU and memory metrics, KEDA scales workloads based on external events such as messages in a Kafka queue, database load, or cloud-based events like Azure Functions. By scaling workloads only when needed, KEDA reduces idle resource costs.
b. Using Vertical Pod Autoscaler (VPA) to Reduce Overprovisioning
Vertical Pod Autoscaler (VPA) helps to avoid overprovisioning resources by automatically adjusting the CPU and memory requests of running pods based on actual usage patterns.
Instead of manually setting resource requests and limits, VPA analyzes historical usage and dynamically updates the values to match real demand. This prevents pods from consuming unnecessary resources while ensuring they get enough capacity during peak loads. For cost-sensitive applications, you should enable VPA in recommendation mode, which allows teams to monitor optimizations before applying them in production.
>> Learn more about the Kubernetes Vertical Pod Autoscaler
c. Right-Sizing Requests & Limits
You should set the right CPU and memory requests, which is important for efficient workload management. If requests are too high, nodes remain underutilized, leading to increased cloud costs. If requests are too low, applications may suffer from performance issues due to throttling or out-of-memory errors. The best practice is to analyze actual resource consumption and fine-tune requests and limits accordingly.
You can use tools like kubectl top, Metrics Server, and Prometheus to help monitor resource usage, while Kubernetes-native features like VPA assist in auto-tuning requests over time.
And if you are using the PerfectScale platform for your cluster visibility, you can just go to the alerts tab and quickly identify the errors resulting from your Kubernetes resource misconfigurations and resolve them quickly.
d. Improving Cost Visibility with the AKS Cost Analysis Add-on
You cannot optimize what you cannot see, so improving cost visibility is a key step. Enable the AKS Cost Analysis add-on in the Azure portal to map expenditures back to specific Kubernetes namespaces, applications, and labels. Built on the open-source OpenCost project, the add-on reconciles usage data with your Azure invoice and surfaces cost allocation directly in the Microsoft Cost Management views. It also breaks out idle, system, and service charges, which helps you pinpoint exactly which clusters or applications need optimization. The add-on is available at no additional cost on Standard and Premium tier clusters.
3. Networking Cost Optimization
a. Load Balancer & Ingress Controller
The right load balancer and ingress controller totally impacts your performance and costs.
Standard vs. Basic Load Balancer: Azure provides two tiers of load balancers, i.e., Standard and Basic. The Standard Load Balancer provides features like higher availability, more backend pool capacity, and support for availability zones. While it incurs higher costs compared to the Basic tier, its advanced capabilities can justify the investment for production environments requiring robust performance and reliability.
NGINX vs. Azure Application Gateway: When you want to choose an ingress controller, NGINX and Azure Application Gateway are popular options. NGINX is a versatile, open-source solution that offers flexibility and extensive customization. On the other hand, Azure Application Gateway is a managed service that integrates with other Azure offerings, providing features like built-in WAF (Web Application Firewall) and SSL termination. While Azure Application Gateway may have higher associated costs, its managed nature can reduce operational overhead.
b. Reducing Data Egress Costs
Private Endpoints & Peering: You should implement private endpoints that allow resources within your virtual network to communicate securely and privately, which eliminates the need for public IP addresses. This setup not only increases security but also reduces data transfer costs associated with public endpoints. Similarly, virtual network peering enables direct, low-latency connectivity between virtual networks, providing efficient data flow without incurring additional egress charges.
Minimizing Cross-Region Traffic: The data transfers between Azure regions can lead to costs. To minimize these expenses, deploy resources within the same region whenever possible. You should align your AKS clusters, storage accounts, and other services geographically to ensure that data remains within a single region, thereby reducing cross-region data transfer fees.
4. Storage & Persistent Volume Optimization in AKS
a. Choosing the Right Azure Disks & Storage Classes
Azure provides multiple disk and storage options, and selecting the right one for your workload is key to cost savings:
Managed Disks: Azure offers Premium SSDs, Standard SSDs, and Standard HDDs. Each has different performance and cost trade-offs.
Storage Classes in AKS: The default storage class in AKS provisions Premium SSDs, which might not always be necessary. You should choose standard SSDs or HDDs for non-critical workloads, which can cut costs.
Ephemeral Disks: If your application doesn’t require persistent storage, using ephemeral OS disks instead of managed disks can reduce costs and improve performance.

b. Premium SSDs vs. Standard HDDs
Azure Premium SSDs deliver low latency and high IOPS; they're good for performance-sensitive workloads. But they are expensive. If your applications don’t require high throughput, you should use standard SSDs or HDDs, which can save costs without noticeable performance degradation.
When to choose each option:
Premium SSDs: You should use these for critical applications, databases, or workloads requiring high IOPS and low latency.
Standard SSDs: It’s suitable for general-purpose workloads where moderate disk performance is acceptable.
Standard HDDs: It's best for archival storage, backup, and applications with low read/write requirements.
c. Using Azure Blob Storage
For unstructured data, Azure Blob Storage is a cheaper alternative to managed disks. Instead of attaching persistent volumes for logs, backups, or static assets, you should store them in Azure Blob Storage, which can help in cutting down storage expenses.
Hot vs. Cool vs. Archive Tiers: Blob Storage has different access tiers:
- Hot Tier: It is best for frequently accessed data.
- Cool Tier: It is more cost-effective for infrequently accessed data.
- Archive Tier: It is the lowest-cost option for long-term storage of rarely accessed data.
Using Azure Files: If you need shared storage across multiple pods, Azure Files (especially Standard tier) can be a cost-effective alternative to persistent disks.
d. Cleaning Up Orphaned Disks & Dangling Volumes
A common source of hidden AKS spend is storage that is billed but no longer attached to any workload. When pods and persistent volume claims are deleted, the underlying Azure managed disks are not always removed, leaving orphaned disks and dangling persistent volumes that quietly accumulate charges. You should periodically audit your resource groups for unattached disks and unbound persistent volumes, and use the Azure Orphaned Resources workbook to identify and reclaim them. Setting the correct reclaim policy on your storage classes also helps make sure that volumes are cleaned up automatically when they are no longer needed.
e. Backup & Disaster Recovery Cost Considerations
Backup and disaster recovery are important but can be optimized for cost:
Azure Backup vs. Custom Solutions: While Azure Backup is easy to use, it can be costly. The custom solutions like Velero or Restic allow more control over retention policies and cost savings.
Snapshot Optimization: Instead of keeping multiple full backups, incremental snapshots can reduce storage costs while providing data safety.
Cross-region replication costs: If you replicate data across regions, be mindful of data transfer costs. You should keep backup copies within the same region to reduce expenses.
Continuous Optimization & FinOps for AKS
The biggest shift in AKS cost management is the move away from one-off, manual cleanups toward continuous optimization. In most organizations, multiple teams share clusters, developers over-provision "just to be safe," and non-production environments run around the clock, so savings achieved in a quarterly review tend to erode within weeks as workloads change. Treating optimization as an ongoing FinOps practice, rather than an annual audit, is what keeps clusters efficient as demand evolves.
A practical starting point is to make cost a shared, visible metric. Tag every cluster and its associated resources such as VMs, disks, and load balancers with identifiers for team, project, and environment, then use those tags in Cost Management reports to hold teams accountable for their own spend. Combining this allocation with automated node provisioning and rightsizing lets clusters continuously adapt to actual demand instead of relying on engineers to remember to scale things down.
Automation is increasingly doing the heavy lifting here. Modern platforms apply real-time pod rightsizing, replica and node optimization, spot placement, and intelligent bin-packing so that resource allocation tracks demand without manual intervention. This is where continuous tooling consistently outperforms periodic reviews, because it corrects the drift that manual tuning inevitably introduces at scale.
How PerfectScale Can Elevate Your AKS Cost Management
Integrating PerfectScale into your AKS strategy ensures that your Kubernetes environment remains both cost-efficient and high-performing. PerfectScale continuously monitors your workloads, detecting underutilized resources and potential inefficiencies, then applies automated right-sizing to align resource allocation with actual demand. This proactive optimization eliminates waste and ensures that your AKS clusters are always running at peak efficiency. Additionally, PerfectScale provides granular insights into node utilization, helping you make informed decisions about resource scaling and instance selection. By leveraging PerfectScale, you gain a streamlined, intelligent approach to AKS cost management reducing expenses while maintaining reliability and performance. To experience the benefits of PerfectScale firsthand, consider Booking a Demo today and Start a Free Trial today!