


What Is Karpenter?
Karpenter is an open-source, flexible, and high-performance Kubernetes cluster autoscaler built by AWS. It improves application availability and cluster efficiency by rapidly launching right-sized compute resources in response to changing workload demands.
Unlike traditional autoscalers that rely on pre-defined node groups or static capacity planning, Karpenter dynamically launches and terminates nodes based on the real-time requirements of your workloads. This approach enables clusters to scale up quickly when demand spikes and scale down just as efficiently when resources are no longer needed.
Key benefits:
- Fast scaling: Provisions compute nodes in seconds rather than minutes, drastically reducing pod scheduling latency.
- Cost optimization: Automatically analyzes pricing across instance families and picks between On-Demand and Spot capacity to lower compute costs. Savings Plans and Reserved Instances apply automatically at the AWS billing layer regardless of which instances Karpenter provisions.
- No node groups: Eliminates the operational overhead of managing rigid, predefined Auto Scaling Groups (ASGs) or Managed Node Groups.
- Dynamic instance flexibility: Seamlessly considers hundreds of different AWS instance types to find the most efficient compute footprint for your cluster.
Why Use Karpenter on AWS?
Fast Scaling
Karpenter enables Kubernetes clusters to respond to changes in demand faster than traditional autoscalers. When new pods are scheduled and existing nodes lack the resources to host them, Karpenter provisions new EC2 instances tailored to the workload’s requirements. This reduces wait times for pending pods and lowers application latency. The speed of scaling is valuable for workloads with unpredictable or variable traffic patterns, where slow scaling can lead to service degradation.
How this is achieved: The speed advantage comes from Karpenter’s direct interaction with AWS APIs and its ability to bypass node group limitations. Rather than waiting for scaling policies or incremental adjustments, Karpenter launches what is needed when it is needed.
Cost Optimization
Karpenter improves cost efficiency by making decisions about the instance types and sizes it provisions. Instead of using a limited set of predefined node types, it evaluates available EC2 instance options, including spot and on-demand instances, to find a cost-effective match for the workload. This dynamic selection reduces overprovisioning and helps teams avoid paying for unused capacity.
How this is achieved: Karpenter can use AWS pricing models. By supporting spot instances, it allows clusters to benefit from reduced compute costs where workloads tolerate interruption.
No Node Groups
Karpenter removes the need to manage node groups, which are required for traditional Kubernetes autoscalers. Node groups require manual configuration and maintenance, including scaling limits, instance types, and update strategies. With Karpenter, you define high-level requirements, and it launches and terminates nodes in response to workload needs. This reduces operational overhead, especially in large or complex environments.
Why this is useful: Without node group constraints, Karpenter enables more granular scaling. It can mix and match instance types and sizes as needed, supporting a wider range of workloads and optimizing for performance and cost.
Dynamic Instance Flexibility
Karpenter can select from the full range of EC2 instance types at launch time, rather than being limited to those specified in node groups. It adapts to changes in AWS inventory, pricing, and workload requirements. If certain instance types become unavailable or less cost-effective, Karpenter chooses another option.
Why this is useful: This flexibility benefits workloads with diverse or shifting resource requirements. For example, data processing jobs may need high-memory nodes one day and high-CPU nodes the next. Karpenter can provision the appropriate instance type for each scenario, reducing waste and improving cluster performance.
How Karpenter Works with Amazon EKS
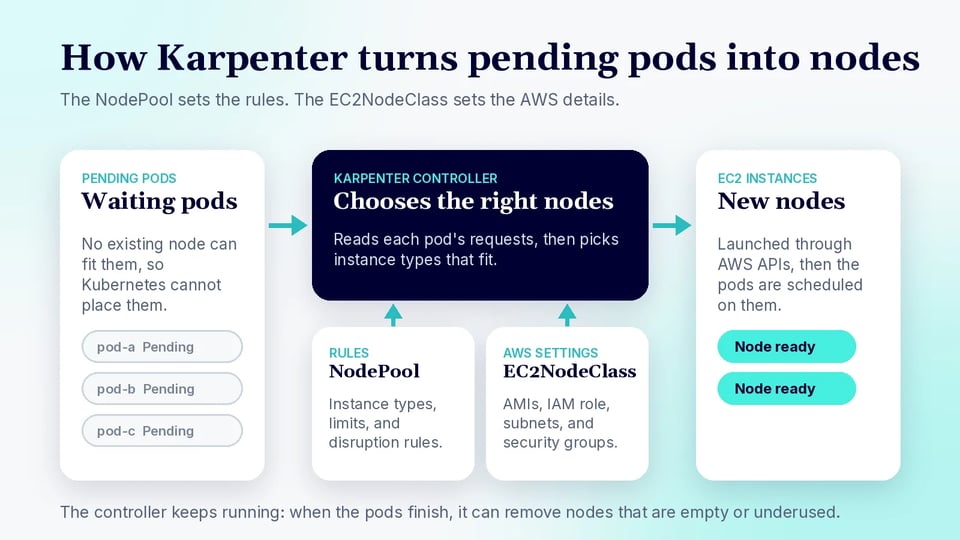
Karpenter integrates with Amazon Elastic Kubernetes Service (EKS) to provide node provisioning for Kubernetes workloads on AWS:
- It runs as a controller inside the EKS cluster and watches for unschedulable pods. When Kubernetes cannot place a pod because of insufficient compute capacity, Karpenter evaluates the pod’s resource requests and launches EC2 instances that meet those requirements.
- The integration with EKS works alongside the Kubernetes scheduler. Kubernetes first attempts to schedule pods onto existing nodes. If no suitable capacity exists, Karpenter detects the pending pods and provisions new worker nodes.
- Once the new instances are ready and registered with the cluster, the pods are scheduled and started.
- Karpenter uses AWS APIs to discover and launch EC2 instances. Instead of relying on fixed autoscaling groups, it selects from available instance types based on constraints defined by administrators. These constraints can include CPU architecture, instance family, availability zone, capacity type, or pricing preferences.
In Amazon EKS environments, Karpenter works with two custom resources: NodePool and EC2NodeClass:
- A NodePool defines scheduling and scaling requirements such as instance types, taints, limits, and disruption policies.
- An EC2NodeClass defines AWS-specific infrastructure settings, including AMIs, IAM roles, subnets, and security groups.
Together, these resources separate Kubernetes scheduling behavior from AWS infrastructure configuration.
Because Karpenter integrates with AWS, it can use spot instances, multiple availability zones, and Graviton-based instance types. This allows EKS clusters to use a broader and more cost-efficient mix of compute resources.
Common Use Cases for Karpenter on AWS
1. Autoscaling Microservices on EKS
Karpenter is suited for autoscaling microservices deployed on Amazon EKS. Microservices often experience variable load patterns and require rapid scaling. Karpenter provisions EC2 instances to accommodate new pods when demand increases and terminates unnecessary nodes as traffic decreases. This ensures that microservices receive the resources they need without manual adjustments or overprovisioning.
2. Batch and Queue-Based Workloads
Batch and queue-based workloads often require bursts of compute for short periods, followed by idle times. Karpenter’s fast scaling supports these scenarios. When a job queue fills up or a batch processing task is triggered, Karpenter provisions compute nodes to handle the load. Once the jobs complete, it scales the cluster down and releases unused resources.
3. Data Processing Workloads
Data processing workloads, such as analytics, ETL, or machine learning pipelines, benefit from Karpenter’s ability to provision compute resources on demand. These workloads often have specific CPU, memory, or GPU requirements that vary by job. Karpenter evaluates these needs and launches appropriate EC2 instance types. As jobs complete, Karpenter decommissions unused nodes, preventing resource waste.
4. Cost Optimization for Multi-Tenant EKS Clusters
Multi-tenant EKS clusters often need to balance resource efficiency and tenant isolation. Karpenter allocates compute resources based on usage patterns. When tenants require more capacity, it provisions additional instances; when demand drops, it releases resources. Karpenter can also enforce separation policies using taints, tolerations, or affinity rules. This helps platform teams manage costs while maintaining boundaries between tenants.
Karpenter vs. Kubernetes Cluster Autoscaler on AWS
Karpenter and Kubernetes Cluster Autoscaler both add compute capacity when pods cannot be scheduled, but they use different scaling models.
Cluster Autoscaler works with existing node groups, such as Amazon EKS managed node groups or Auto Scaling groups. It increases or decreases the size of those groups based on pending pods and unused nodes. It works well when workloads fit into a small number of known node types. It is predictable and widely used, but it often requires careful planning. Teams must define node groups, set minimum and maximum sizes, and decide which instance types each group should use.
Karpenter does not require predefined node groups. Instead, it provisions EC2 instances based on the requirements of pending pods. This allows it to choose from a wider range of instance types and capacity options at provisioning time. Karpenter is suited for environments where workload requirements change often. It can select nodes based on CPU, memory, architecture, availability zone, and capacity type.
The main tradeoff is control versus flexibility:
- Cluster Autoscaler uses a model based on fixed node groups.
- Karpenter provides more dynamic provisioning but requires teams to manage Karpenter-specific resources such as NodePool and EC2NodeClass.
Related content: For a deeper side-by-side breakdown, read our guide to Karpenter vs. Cluster Autoscaler.
Tutorial: Getting Started with Karpenter on AWS
This tutorial shows how to create an Amazon EKS cluster, install Karpenter, define a default NodePool, and test automatic node provisioning. The flow uses eksctl, kubectl, helm, and the AWS CLI.
Step 1: Before starting, install the required tools:
aws --versionkubectl version --clienteksctl versionhelm versionKarpenter needs AWS permissions so it can launch and terminate EC2 instances. In this setup, those permissions are attached to the Karpenter service account through pod identity.
Step 2: Start by setting the main environment variables:
export KARPENTER_NAMESPACE="kube-system"export KARPENTER_VERSION="1.14.0"export K8S_VERSION="1.36"export AWS_PARTITION="aws"export CLUSTER_NAME="${USER}-karpenter-demo"export AWS_DEFAULT_REGION="us-west-2"export AWS_ACCOUNT_ID="$(aws sts get-caller-identity --query Account --output text)"export TEMPOUT="$(mktemp)"These variables are reused by later commands. CLUSTER_NAME identifies the EKS cluster, while AWS_ACCOUNT_ID is used when creating IAM roles and policies.
Step 3: Next, retrieve the recommended Amazon Linux 2 AMI IDs for the Kubernetes version:
export ARM_AMI_ID="$(aws ssm get-parameter \  --name /aws/service/eks/optimized-ami/${K8S_VERSION}/amazon-linux-2-arm64/recommended/image_id \  --query Parameter.Value --output text)"
export AMD_AMI_ID="$(aws ssm get-parameter \  --name /aws/service/eks/optimized-ami/${K8S_VERSION}/amazon-linux-2/recommended/image_id \  --query Parameter.Value --output text)"
Karpenter uses these AMIs when it creates EC2 nodes. Keeping them in variables makes the later EC2NodeClass definition easier to reuse.
Step 4: Create the supporting AWS infrastructure and EKS cluster:
curl -fsSL https://raw.githubusercontent.com/aws/karpenter-provider-aws/v"${KARPENTER_VERSION}"/website/content/en/preview/getting-started/getting-started-with-karpenter/cloudformation.yaml > "${TEMPOUT}"
aws cloudformation deploy \  --stack-name "Karpenter-${CLUSTER_NAME}" \  --template-file "${TEMPOUT}" \  --capabilities CAPABILITY_NAMED_IAM \  --parameter-overrides "ClusterName=${CLUSTER_NAME}"
This CloudFormation stack creates the AWS resources Karpenter needs, including IAM permissions for provisioning nodes.
Step 5: Now create the EKS cluster:
eksctl create cluster -f - <<EOFapiVersion: eksctl.io/v1alpha5kind: ClusterConfigmetadata:  name: ${CLUSTER_NAME}  region: ${AWS_DEFAULT_REGION}  version: "${K8S_VERSION}"  tags:    karpenter.sh/discovery: ${CLUSTER_NAME}
iam:  withOIDC: true  podIdentityAssociations:  - namespace: "${KARPENTER_NAMESPACE}"    serviceAccountName: karpenter    roleName: ${CLUSTER_NAME}-karpenter    permissionPolicyARNs:    - arn:${AWS_PARTITION}:iam::${AWS_ACCOUNT_ID}:policy/KarpenterControllerPolicy-${CLUSTER_NAME}
iamIdentityMappings:- arn: "arn:${AWS_PARTITION}:iam::${AWS_ACCOUNT_ID}:role/KarpenterNodeRole-${CLUSTER_NAME}"  username: system:node:{{EC2PrivateDNSName}}  groups:  - system:bootstrappers  - system:nodes
managedNodeGroups:- instanceType: m5.large  amiFamily: AmazonLinux2023  name: ${CLUSTER_NAME}-ng  desiredCapacity: 2  minSize: 1  maxSize: 10
addons:- name: eks-pod-identity-agentEOF
This creates a small managed node group to run system components and Karpenter itself. The cluster is tagged with karpenter.sh/discovery, which Karpenter later uses to find subnets and security groups.
Step 6: Install Karpenter with Helm:
helm registry logout public.ecr.aws
helm upgrade --install karpenter oci://public.ecr.aws/karpenter/karpenter \  --version "${KARPENTER_VERSION}" \  --namespace "${KARPENTER_NAMESPACE}" \  --create-namespace \  --set "settings.clusterName=${CLUSTER_NAME}" \  --set "settings.interruptionQueue=${CLUSTER_NAME}" \  --set controller.resources.requests.cpu=1 \  --set controller.resources.requests.memory=1Gi \  --set controller.resources.limits.cpu=1 \  --set controller.resources.limits.memory=1Gi \  --wait
This deploys the Karpenter controller into the cluster. The controller watches for pods that Kubernetes cannot schedule, then calls AWS APIs to create suitable EC2 instances.
Step 7: Next, create a default NodePool and EC2NodeClass:
cat <<EOF | envsubst | kubectl apply -f -apiVersion: karpenter.sh/v1kind: NodePoolmetadata: name: defaultspec: template: spec: requirements: - key: kubernetes.io/arch operator: In values: ["amd64"] - key: kubernetes.io/os operator: In values: ["linux"] - key: karpenter.sh/capacity-type operator: In values: ["on-demand"] - key: karpenter.k8s.aws/instance-category operator: In values: ["c", "m", "r"] nodeClassRef: group: karpenter.k8s.aws kind: EC2NodeClass name: default expireAfter: 720h limits: cpu: 1000 disruption: consolidationPolicy: WhenEmptyOrUnderutilized consolidateAfter: 1m---apiVersion: karpenter.k8s.aws/v1kind: EC2NodeClassmetadata: name: defaultspec: amiFamily: AL2023 role: "KarpenterNodeRole-${CLUSTER_NAME}" subnetSelectorTerms: - tags: karpenter.sh/discovery: "${CLUSTER_NAME}" securityGroupSelectorTerms: - tags: karpenter.sh/discovery: "${CLUSTER_NAME}" amiSelectorTerms: - id: "${AMD_AMI_ID}"EOFThe NodePool defines which nodes Karpenter is allowed to create. In this example, it allows Linux amd64 on-demand instances from compute, general-purpose, and memory-optimized families.
The EC2NodeClass contains AWS-specific settings. It tells Karpenter which IAM role, subnets, security groups, and AMIs to use when launching nodes.
Step 8: To test scaling, create a deployment with zero replicas:
cat <<EOF | kubectl apply -f -apiVersion: apps/v1kind: Deploymentmetadata: name: inflatespec: replicas: 0 selector: matchLabels: app: inflate template: metadata: labels: app: inflate spec: terminationGracePeriodSeconds: 0 containers: - name: inflate image: public.ecr.aws/eks-distro/kubernetes/pause:3.7 resources: requests: cpu: 1EOFThis deployment uses the lightweight pause image. Each replica requests one CPU, which makes it useful for testing node provisioning.
Step 9: Scale the deployment to create unschedulable pods:
kubectl scale deployment inflate --replicas 5Karpenter should detect the pending pods and create new EC2 nodes. You can watch the controller logs with:
kubectl logs -f -n "${KARPENTER_NAMESPACE}" \ -l app.kubernetes.io/name=karpenter \ -c controllerAfter testing, delete the deployment:
kubectl delete deployment inflateBecause the NodePool uses WhenEmptyOrUnderutilized, Karpenter can remove empty or underused nodes after consolidation. This helps reduce cost when workloads no longer need the extra capacity.
Step 10: To clean up the demo environment, remove Karpenter and delete the cluster:
helm uninstall karpenter --namespace "${KARPENTER_NAMESPACE}"
aws cloudformation delete-stack \  --stack-name "Karpenter-${CLUSTER_NAME}"
eksctl delete cluster --name "${CLUSTER_NAME}"
This removes the main resources created during the tutorial and helps avoid additional AWS charges.
Best Practices for Karpenter on AWS
Here are some useful practices to consider when using Karpenter on AWS.
1. Pin AMIs in Production
In production environments, avoid relying on automatically selected AMIs. Instead, pin specific AMI IDs in your EC2NodeClass definitions. This gives teams control over the operating system image used for worker nodes and reduces the risk of unexpected changes caused by new AMI releases. Pinned AMIs also improve consistency across environments and simplify troubleshooting.
Action items:
- Teams can validate security patches, container runtimes, and Kubernetes compatibility before rolling out updates.
- Test new AMIs in non-production environments before updating production NodePools.
- Maintain a documented AMI update process that includes security reviews, rollback procedures, and version tracking.
2. Use Disruption Controls
Karpenter includes disruption and consolidation features that help reduce cost by replacing or removing underused nodes. While these capabilities improve efficiency, aggressive consolidation can impact workload availability if nodes are terminated too quickly. Disruption controls allow teams to balance cost optimization with application stability by controlling how and when node replacements occur.
Action items:
- Use consolidation policies together with pod disruption budgets, topology spread constraints, and workload priorities.
- For critical services, consider increasing consolidation delays or limiting node replacements during business hours.
- In production clusters, configure disruption and consolidation settings carefully to avoid unnecessary workload interruptions.
3. Separate Workload Types with NodePools
Different workloads often have different infrastructure requirements. For example, stateless batch workloads can run on spot-based NodePools, while customer-facing applications can use on-demand capacity. GPU workloads, ARM-based workloads, and high-memory applications can also use dedicated NodePools with specific instance constraints.
Action items:
- Separate workloads into dedicated NodePools based on cost sensitivity, performance requirements, architecture, or interruption tolerance.
- Use taints, tolerations, node selectors, and affinity rules to ensure workloads are scheduled onto the appropriate NodePools.
- Apply different disruption, consolidation, and capacity-type policies to each NodePool based on workload characteristics.
4. Monitor Karpenter Behavior
Monitor Karpenter like any other cluster component. Visibility into provisioning decisions, node lifecycle events, and scheduling outcomes helps teams identify inefficiencies, diagnose issues, and validate that scaling behavior aligns with workload requirements. Regular monitoring also helps detect AWS capacity constraints, configuration problems, or unexpected node churn before they affect applications.
Action items:
- Track node provisioning events, failed launches, consolidation activity, pending pods, and EC2 instance interruptions.
- Use Amazon CloudWatch, Prometheus, and Kubernetes events to observe Karpenter behavior. Important metrics include provisioning latency, node startup time, pod scheduling delays, and node churn.
- Review controller logs to help diagnose issues related to IAM permissions, subnet discovery, or unavailable instance types.
5. Test Before Enabling Aggressive Policies
Features such as aggressive consolidation, rapid node expiration, or broad spot usage can reduce costs but can introduce instability if not tested. Workloads may respond differently to frequent node replacements, especially those with long startup times, stateful components, or strict availability requirements. Testing helps teams understand operational impacts before applying these settings in production.
Action items:
- Before enabling these settings in production, validate them in lower environments using realistic workloads and scaling patterns.
- Pay attention to workloads with long-running connections, large startup times, or strict availability requirements.
- Test how applications behave during node replacement, spot interruption events, and rapid scale-down operations.
How PerfectScale Maximizes Your Karpenter Autoscaling on AWS
Node autoscalers like Karpenter and Cluster Autoscaler are powerful tools for scaling nodes up and down based on demand, improving cluster availability and reducing idle costs. But even when autoscaling is well-configured, teams frequently run into three problems that undermine it: over-provisioned containers that waste capacity and force the autoscaler to launch more nodes than necessary, under-provisioned containers that lead to pod evictions and node pressure, and inefficient bin-packing that leaves resources underutilized while triggering unnecessary scaling events. PerfectScale solves this by autonomously right-sizing your workloads and giving you deep visibility into node-level efficiency, so Karpenter provisions exactly the compute your cluster actually needs.
Key capabilities of PerfectScale:
- Proactive configuration error fixes: Continuously analyzes your workloads to identify and address configuration errors - such as CPU Request Not Set, Memory Request Not Set, and Memory Limit Not Set - preventing unpredictable evictions, node over-commitment, and inefficient autoscaling.
- Autonomous workload right-sizing: Instantly adjusts workload resources based on actual utilization and improves pod bin-packing to boost autoscaling efficiency, all without manual interaction.
- Maximized autoscaling efficiency: Delivers exceptional visibility into the costs and utilization of your autoscaling groups and node pools, surfaces inefficiencies, and helps you select optimal node types to improve utilization, achieve precise resource distribution, and maximize cost efficiency.
Ready to get the most out of Karpenter on AWS? Discover how PerfectScale autonomously optimizes your workloads and node autoscaling on the PerfectScale node autoscaling solution page.