
PerfectScale
Kubernetes Scheduling: como funciona e o que influencia as decisões
Discover how Kubernetes scheduling works, assigning pods to nodes while ensuring balanced, resilient workloads. Learn key factors ischeduling decisions.
Esta página também está disponível em English, Deutsch, Español, Français, Italiano e 日本語.


What is Kubernetes Scheduling?
Kubernetes scheduling is the process of matching pending Pods to Nodes so that the kubelet can run them. Though the process sounds straightforward, the actual mechanics are complex, involving several decision-making phases and components to ensure balanced, and resilient workload distribution.
In this guide, we’ll break down how Kubernetes scheduling works, how it determines the right nodes for pods, and the factors that influence scheduling decisions.
How Kubernetes scheduling works:
- Queue and prepare: Unscheduled pods enter the scheduling queue, and plugins calculate resource, affinity, topology, and storage requirements.
- Filter nodes: The scheduler removes nodes that cannot satisfy mandatory requirements such as resources, labels, taints, ports, and volumes.
- Handle scheduling failures: If no suitable node remains, Kubernetes may preempt lower-priority pods to free capacity.
- Score and select: Feasible nodes are ranked using weighted criteria, and the highest-scoring node is selected and temporarily reserved.
- Approve and bind: Plugins perform coordination and final checks, the pod is bound to the selected node, and post-binding tasks such as logging and cleanup run.
Methods for controlling Kubernetes scheduling:
- Node selector: Restricts pods to nodes with matching labels and is useful for simple placement requirements.
- Node affinity: Defines required or preferred node label rules for more flexible workload placement.
- Pod affinity and anti-affinity: Places pods near or away from other pods based on labels and topology domains.
- Taints and tolerations: Taints repel pods from nodes, while tolerations allow eligible pods to run on tainted nodes.
- Topology spread constraints: Distribute pods across nodes, zones, or regions to improve availability and avoid concentration.
- Pod priority and priority classes: Assign importance to workloads so higher-priority pods can be scheduled first or preempt others.
- Direct node assignment with nodename: Assigns a pod directly to a node, bypassing normal scheduler filtering and scoring.
Kubernetes Scheduling Example
When you create a workload in Kubernetes, such as a deployment, the API server receives the request and saves it in etcd, a highly available key-value store that backs Kubernetes cluster state. However, it's not the scheduler that creates pods. The controller manager is responsible for creating pods, along with ReplicaSets and other resources needed to run the deployment. These new pods are initially set to "Pending" and added to a scheduling queue.
From here, the kube-scheduler, the default Kubernetes scheduling component, takes over to assign each pending pod to an available node that meets the pod’s requirements.
Let’s break this down with an example:
Create a Deployment:
apiVersion: apps/v1kind: Deploymentmetadata: name: my-deploymentspec: replicas: 2 selector: matchLabels: app: my-app template: metadata: labels: app: my-app spec: containers: - name: my-container image: nginx resources: requests: memory: "64Mi" cpu: "250m"The API server receives the deployment request. It stores the deployment specification in etcd. The replicaset controller creates a replicaset and then the Pod controller creates the pods and places them in a Pending state in the scheduling queue.
Then kube-scheduler reviews the pending pods one by one. For each pod, it checks the available nodes in the cluster to find one that satisfies the pod’s requirements (like requested CPU, memory, or node labels). Once the pod is assigned to a node, it transitions from Pending to Running after the kubelet successfully starts at least one of its primary containers. The kubelet on the node pulls the container image (e.g., nginx), starts the container, and manages the pod lifecycle.
>> Take a look at Guide to Kubernetes Health Checks
How Kubernetes Scheduling Works: The Full Kubernetes Scheduling Process
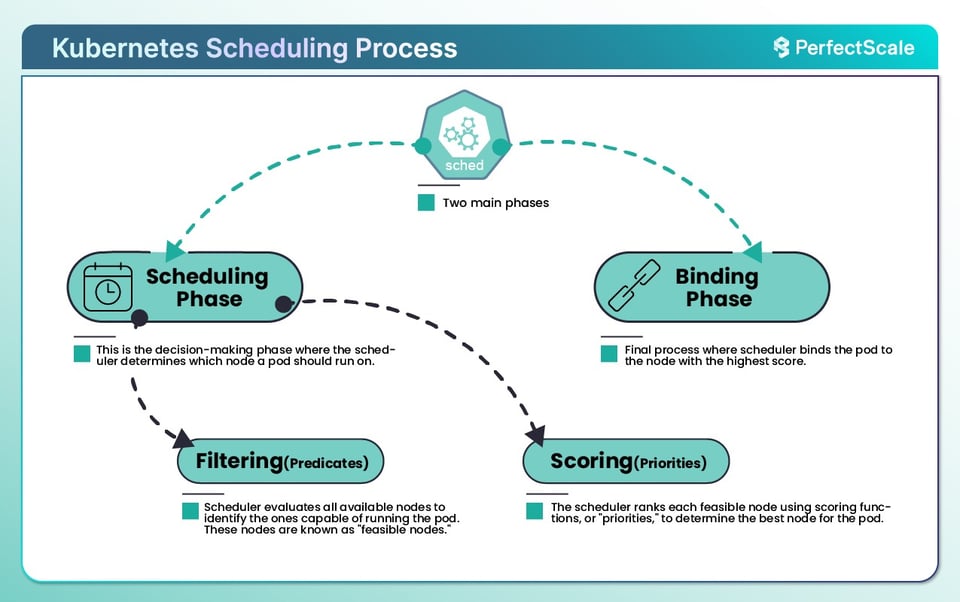
Kubernetes scheduling is the process of assigning newly created pods to suitable nodes in a cluster. When a pod is created without a value in its spec.nodeName field, it enters the scheduler queue in a Pending state. The Kubernetes scheduler evaluates the pod’s requirements, identifies nodes that can run it, ranks those nodes, and binds the pod to the best available option.
Modern Kubernetes uses the Scheduling Framework, which organizes the process into multiple extension points. Scheduler plugins can participate at different stages, including queue sorting, filtering, scoring, reservation, permission checks, and binding. The process is commonly divided into two main cycles: the scheduling cycle and the binding cycle.
1. Scheduling Queue:
Before evaluating nodes, the scheduler places unscheduled pods into an internal scheduling queue. Pods may be stored in an active queue, a backoff queue, or an unschedulable queue depending on their current state.
The scheduler selects one pod at a time from the active queue. Pod priority can influence this order, meaning higher-priority workloads may be evaluated before lower-priority ones.
If a pod cannot be scheduled, it may be moved to the unschedulable queue and retried when cluster conditions change, such as when resources become available, a node label is updated, or another pod terminates.
2. Pre-Filtering
During the PreFilter stage, scheduler plugins perform preliminary checks and calculate information that will be needed during node filtering.
For example, plugins may calculate the pod’s total resource requirements, evaluate affinity terms, inspect topology spread rules, or prepare storage-related information. This avoids repeating the same calculations for every node.
2. Filtering
Filtering identifies the nodes that are capable of running the pod. Nodes that satisfy all mandatory requirements are called feasible nodes.
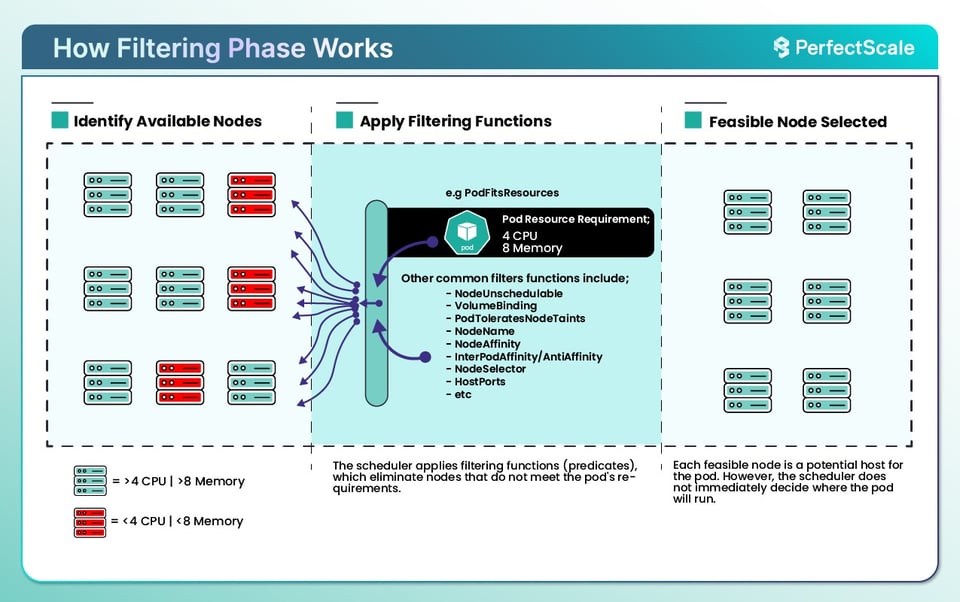
Modern Kubernetes uses filter plugins rather than the older predicate model. Common filtering considerations include:
- Whether the node is marked as unschedulable
- Whether the node has sufficient requested CPU, memory, and extended resources
- Whether node labels satisfy the pod’s node selector or required node-affinity rules
- Whether the pod tolerates the node’s taints
- Whether required storage volumes can be attached or bound
- Whether pod affinity and anti-affinity requirements are satisfied
- Whether topology spread constraints can be maintained
- Whether host ports requested by the pod are available
For example, suppose a pod requests four CPUs and 8 GB of memory. A node that does not have enough unallocated requested capacity will be excluded, even if its real-time CPU and memory usage appears low.
Scheduling is primarily based on resource requests rather than current utilization. Kubernetes also considers node allocatable capacity, pod overhead, init-container requirements, extended resources such as GPUs, and storage constraints.
Common filter plugins include:
NodeResourcesFitNodeAffinityTaintTolerationVolumeBindingInterPodAffinityPodTopologySpreadNodePorts
If no node passes the filtering stage, the pod remains Pending. Kubernetes records an event explaining why it could not be scheduled, such as insufficient memory, unmatched node affinity, untolerated taints, or a volume-node affinity conflict.
4. Post-Filtering and Preemption
If filtering produces no feasible nodes, Kubernetes can run PostFilter plugins to determine whether the scheduling failure can be resolved.
One possible action is preemption. If a high-priority pod cannot be scheduled, the scheduler may identify lower-priority pods that could be removed to make space for it.
Pod priority is defined using a PriorityClass object and referenced through the pod’s priorityClassName field. Higher-priority pods are generally considered earlier in the scheduling queue and may preempt lower-priority pods when necessary.
Preemption does not guarantee immediate scheduling. Lower-priority pods may require time to terminate, and cluster conditions may change before the higher-priority pod is placed.
5. Pre-Scoring
Once the scheduler has identified feasible nodes, PreScore plugins prepare information needed for ranking them.
For example, the scheduler may calculate how placing the pod on each node would affect workload distribution, affinity preferences, or topology balance.
6. Scoring
During scoring, the scheduler ranks the feasible nodes. Each enabled score plugin assigns a value to every remaining node according to specific criteria.
Common scoring considerations include:
- Whether the container image is already available on the node
- Whether CPU and memory allocation would remain balanced
- Whether the node satisfies preferred node-affinity rules
- Whether the placement improves pod affinity or anti-affinity
- Whether pods remain evenly distributed across topology domains
- Whether the placement avoids undesirable taints
- Whether the node has an appropriate amount of remaining resources
Common score plugins include:
- ImageLocality
- NodeResourcesFit
- NodeResourcesBalancedAllocation
- NodeAffinity
- InterPodAffinity
- PodTopologySpread
- TaintToleration
Plugin scores may be normalized and multiplied by configured weights. The scheduler combines the results and selects the node with the highest total score.
If several nodes receive the same highest score, the scheduler selects one of them.
7. Reserve
After selecting a node, the scheduler enters the binding cycle. During the Reserve stage, plugins can temporarily reserve resources or state for the pod.
This reservation helps prevent multiple scheduling operations from assuming that the same capacity or resource is available at the same time.
If a later stage fails, the scheduler can run an Unreserve operation to roll back the reservation.
8. Permit
Permit plugins can approve, reject, or temporarily delay the scheduling decision.
This extension point can support advanced scheduling workflows in which a pod must wait for an external condition, a group of related pods, or another coordination requirement before binding is allowed to continue.
9. Pre-Bind
The PreBind stage performs final operations required before the pod is assigned to the node.
For example, storage-related plugins may complete volume binding or verify that required storage resources are ready for the selected node.
10. Binding
During binding, the scheduler submits the assignment through the Kubernetes API server. The selected node is written to the pod’s spec.nodeName field, and the API server persists the updated cluster state in etcd.
The scheduler does not normally write directly to etcd.
After the binding is recorded, the kubelet on the selected node detects the pod assignment. It then begins the steps required to run the pod, including admitting the workload, mounting volumes, configuring networking, pulling container images, and starting containers.
11. Post-Bind
PostBind plugins run after the pod has been successfully bound. These plugins can perform cleanup, logging, monitoring, or other informational operations.
The PostBind stage does not change the scheduling decision because the pod has already been assigned to a node.
Methods for Controlling Kubernetes Scheduling
Kubernetes provides several pod-level mechanisms for influencing where workloads are placed. These mechanisms add requirements or preferences that the default scheduler evaluates during filtering and scoring.
1. Node Selector
nodeSelector is one of the simplest ways to restrict a pod to a specific group of nodes. Nodes are assigned labels, and the pod specifies the labels that an eligible node must have.
For example, a workload that requires a GPU can be limited to nodes labeled gpu: "true".
apiVersion: v1kind: Podmetadata: name: gpu-podspec: nodeSelector: gpu: "true" containers: - name: gpu-container image: my-gpu-appIf no node has the required label, the pod remains in the Pending state.
nodeSelector is useful for straightforward placement requirements, but node affinity provides more flexible matching options.
2. Node Affinity
Node affinity lets you define hard and soft placement rules based on node labels.
Hard rules use requiredDuringSchedulingIgnoredDuringExecution. A node must satisfy these conditions for the pod to be scheduled.
Soft rules use preferredDuringSchedulingIgnoredDuringExecution. Kubernetes tries to satisfy these preferences but may place the pod elsewhere when necessary.
apiVersion: v1kind: Podmetadata: name: affinity-podspec: affinity: nodeAffinity: requiredDuringSchedulingIgnoredDuringExecution: nodeSelectorTerms: - matchExpressions: - key: topology.kubernetes.io/zone operator: In values: - us-east-1a preferredDuringSchedulingIgnoredDuringExecution: - weight: 100 preference: matchExpressions: - key: node.kubernetes.io/instance-type operator: In values: - high-memory containers: - name: high-memory-app image: my-high-memory-appIn this example, the pod must run in the us-east-1a zone and prefers nodes labeled as high-memory instance types.
Node affinity is commonly used for hardware selection, availability-zone placement, compliance boundaries, workload isolation, and cost optimization.
3. Pod Affinity and Anti-Affinity
Pod affinity and anti-affinity control placement based on other pods already running in the cluster.
Pod affinity attracts workloads toward pods that match a label selector. For example, frontend pods may be placed near backend pods to reduce network latency.
Pod anti-affinity repels workloads from matching pods. It is often used to prevent multiple replicas of the same application from running on the same node or in the same availability zone.
apiVersion: v1kind: Podmetadata: name: web-pod labels: app: webspec: affinity: podAffinity: requiredDuringSchedulingIgnoredDuringExecution: - labelSelector: matchLabels: app: backend topologyKey: kubernetes.io/hostname podAntiAffinity: preferredDuringSchedulingIgnoredDuringExecution: - weight: 100 podAffinityTerm: labelSelector: matchLabels: app: web topologyKey: kubernetes.io/hostname containers: - name: web-container image: web-appIn this example, the pod must run on a node that already hosts a backend pod. It also prefers not to share a node with another pod labeled app: web.
Required affinity rules should be used carefully because overly strict rules can leave pods unschedulable.
4. Taints and Tolerations
Taints are applied to nodes to repel pods. Tolerations are added to pods to allow them to remain eligible for nodes with matching taints.
A toleration does not force a pod onto a tainted node. It only allows the scheduler to consider that node. For dedicated workloads, tolerations are usually combined with node selectors or node affinity.
Common taint effects include:
- NoSchedule: New pods without a matching toleration cannot be scheduled on the node.
- PreferNoSchedule: The scheduler tries to avoid placing non-tolerating pods on the node.
- NoExecute: Non-tolerating pods cannot be scheduled and existing non-tolerating pods may be evicted.
For example, a GPU node could be tainted so that general-purpose workloads are not scheduled on it.
apiVersion: v1kind: Podmetadata: name: gpu-podspec: tolerations: - key: gpu-dedicated operator: Equal value: "true" effect: NoSchedule nodeSelector: gpu: "true" containers: - name: gpu-container image: my-gpu-appThe toleration permits the pod to run on the tainted node, while the node selector directs it toward GPU-labeled nodes.
5. Topology Spread Constraints
Topology spread constraints distribute matching pods across topology domains such as nodes, availability zones, or regions.
These constraints help prevent replicas from becoming concentrated in a single failure domain. They are especially useful for applications that require high availability and balanced placement.
apiVersion: v1kind: Podmetadata: name: distributed-app labels: app: my-appspec: topologySpreadConstraints: - maxSkew: 1 topologyKey: topology.kubernetes.io/zone whenUnsatisfiable: DoNotSchedule labelSelector: matchLabels: app: my-app containers: - name: my-app-container image: my-appIn this example, pods labeled app: my-app are distributed across zones. The maxSkew value defines the maximum permitted difference in the number of matching pods between topology domains.
The whenUnsatisfiable field controls how Kubernetes handles an imbalance:
- DoNotSchedule treats the constraint as mandatory.
- ScheduleAnyway treats it as a preference and still permits scheduling.
Topology spread constraints are often more scalable and easier to manage than complex pod anti-affinity rules.
6. Pod Priority and Priority Classes
Priority classes allow organizations to indicate which workloads are more important.
A PriorityClass object defines a numeric priority value, and pods reference it through priorityClassName.
apiVersion: scheduling.k8s.io/v1kind: PriorityClassmetadata: name: critical-workloadvalue: 100000globalDefault: falsedescription: "Priority class for critical application workloads"---apiVersion: v1kind: Podmetadata: name: critical-podspec: priorityClassName: critical-workload containers: - name: app image: critical-appHigher-priority pods may be evaluated earlier and can potentially preempt lower-priority workloads when cluster capacity is limited.
Priority values should be assigned carefully because excessive use of high-priority classes can reduce scheduling fairness and disrupt less important workloads.
7. Direct Node Assignment With nodeName
The nodeName field assigns a pod directly to a specific node.
apiVersion: v1kind: Podmetadata: name: directly-assigned-podspec: nodeName: worker-node-1 containers: - name: app image: my-appThis method bypasses the normal filtering and scoring process. It should generally be reserved for specialized administrative or testing scenarios.
If the named node does not exist or cannot run the pod, the workload may remain unusable rather than being rescheduled automatically to another node.
Advanced Kubernetes Scheduling Techniques
For more advanced configurations, Kubernetes allows custom schedulers and configuration tweaks to meet unique scheduling needs. Some of these techniques are:
7. Pods and Preemption
Preemption allows Kubernetes to prioritize high-priority pods when resources are scarce. If a high-priority pod cannot be scheduled due to resource constraints, Kubernetes identifies and preempts lower-priority pods to free up resources. The preemptionPolicy field in the PriorityClass object can control whether preemption is enabled or disabled.
Example:
apiVersion: scheduling.k8s.io/v1kind: PriorityClassmetadata: name: high-priorityvalue: 1000globalDefault: falsedescription: "High-priority class for critical workloads"preemptionPolicy: PreemptLowerPriority #optional; default behaivor---apiVersion: v1kind: Podmetadata: name: high-priority-podspec: priorityClassName: high-priority containers: - name: critical-workload image: app:latest>> Take a look at Guide to Preemptible Pods: Optimizing Kubernetes Node Utilization
8. Resource Guarantees with QoS Classes
Quality of Service (QoS) classes are assigned to pods based on their resource requests and limits. Kubernetes uses these classes to determine eviction priorities and scheduling preferences.
There are different QoS Classes:
a. Guaranteed: The Pods with equal requests and limits for all containers. It is least likely to be evicted.
b. Burstable: The Pods with requests lower than limits. It is a moderate eviction priority.
c. BestEffort: The Pods without specified requests or limits. It is most likely to be evicted.
Example:
apiVersion: v1kind: Podmetadata: name: qos-guaranteedspec: containers: - name: guaranteed-app image: app-image:latest resources: requests: memory: "512Mi" cpu: "1" limits: memory: "512Mi" cpu: "1"By differentiating workloads based on their QoS class, Kubernetes optimizes node utilization and ensures critical workloads remain stable even during resource pressure.
9. Custom Schedulers
In Kubernetes, the default scheduler (kube-scheduler) assigns pods to nodes based on predefined policies. You can run custom schedulers alongside the default kube-scheduler to handle specific workloads or teams.
This is how you can implement the custom scheduler:
a. Develop the Scheduler: You can create a scheduler that interfaces with the Kubernetes API to watch for unscheduled pods and assign them to appropriate nodes based on custom logic. This involves writing a controller that handles the scheduling decisions.
b. Deploy the Scheduler: Then run the custom scheduler as a separate deployment within the cluster, ensuring it has the necessary permissions to interact with the Kubernetes API.
c. Assign Pods to the Scheduler: Then specify the custom scheduler for particular pods by setting the schedulerName field in the pod specification.
Example:
apiVersion: v1kind: Podmetadata: name: custom-scheduled-podspec: schedulerName: my-custom-scheduler containers: - name: my-container image: my-imageBy assigning my-custom-scheduler as the schedulerName, this pod will be scheduled by the custom scheduler instead of the default kube-scheduler.
10. Topology Management Policies
Topology management policies ensure that pods are scheduled onto nodes in a manner that optimizes hardware resource utilization, considering factors like CPU and memory locality. The Topology Manager component is the one in the kubelet that coordinates these optimizations.
These are available policies:
a. None: It means that no topology alignment is performed.
b. Best Effort: It attempts to align resources for optimal topology but does not guarantee it.
c. Restricted: It enforces strict alignment of resources, rejecting pod scheduling if alignment is not possible.
d. Single NUMA Node: It ensures that all resources for a pod are allocated from a single NUMA(Non-Uniform Memory Access) node, optimizing performance for latency-sensitive applications.
You can set the desired policy in the kubelet configuration on each node.
Example:
apiVersion: kubelet.config.k8s.io/v1beta1kind: KubeletConfigurationtopologyManagerPolicy: "single-numa-node"This configuration directs the Topology Manager to allocate all resources for a pod from a single NUMA node.
Bin Packing vs. Spreading: Balancing Cost and Resilience
Kubernetes can favor different placement strategies depending on your scheduling goals. Bin packing places pods onto as few nodes as possible, increasing resource utilization on each node. This approach can reduce infrastructure costs because unused nodes can be scaled down by tools such as the Cluster Autoscaler. Bin packing is a good fit for development environments, batch workloads, and clusters where maximizing utilization is more important than fault tolerance.
Spreading does the opposite. It distributes pods across nodes, availability zones, or other topology domains to reduce the impact of node or zone failures. This strategy improves application availability because replicas are less likely to be affected by the same outage. Kubernetes supports spreading through topology spread constraints, pod anti-affinity rules, and scheduler scoring plugins that prefer balanced placement across the cluster.
In practice, most production clusters use a combination of both strategies. Critical applications often spread replicas across failure domains to improve resilience, while less critical or stateless workloads are packed more densely to improve resource efficiency. The scheduler combines filtering rules, scoring plugins, and user-defined constraints to find the best balance between cost, performance, and high availability.
Kubernetes Scheduler Limitations and Challenges
Kubernetes' scheduling capabilities are excellent, yet it has limitations and challenges:
1. Resource Allocation Conflicts: The scheduler relies on resource requests and limits defined in the pod specification. If these values are misconfigured or missing, it can result in pods over-consuming node resources or being scheduled on insufficiently capable nodes.
2. Complexity of Advanced Features: The configurations like node affinity, taints, tolerations, and topology spread constraints give users fine-grained control but are often complex to implement correctly. Misconfigurations can lead to pods being unscheduled or misaligned with desired infrastructure.
3. Handling Unready or Unschedulable Pods: The scheduler does not inherently differentiate between pods that are unready for scheduling (e.g., waiting for resources or dependencies) and those that are unschedulable due to missing requirements. This can cause inefficiencies as it retries scheduling repeatedly.
4. Scalability Concerns: In large clusters, with thousands of nodes and pods, the default scheduler may struggle to keep up with the load causing delays in pod scheduling or performance bottlenecks.
5. Preemption Challenges: While preemption allows higher-priority pods to evict lower-priority ones, it can disrupt running workloads and is not always deterministic in resolving resource contention. This can lead to instability in critical environments.
6. Single-Scheduler Model: Kubernetes clusters typically rely on a single scheduler instance, which can become a bottleneck. The custom schedulers or scaling techniques like multiple scheduler instances can help, but they require additional expertise to implement and manage.
Kubernetes scheduling is a process designed to optimize resource utilization, workload performance, and fault tolerance. Whether you're working with default behaviors or customizing scheduling with advanced techniques, understanding these mechanisms helps you fine-tune cluster performance to meet your unique needs.
Best Practices for Kubernetes Scheduling
Set Accurate Resource Requests and Limits
Resource requests determine whether a pod can be scheduled, while limits define the maximum resources it can consume. The Kubernetes scheduler uses resource requests—not limits—when deciding where to place a pod. If requests are set too high, the scheduler may leave cluster capacity unused because it believes more resources are required than the application actually needs. If requests are too low, pods may compete for resources at runtime, leading to CPU throttling, memory pressure, or evictions.
To avoid these issues, base resource requests and limits on actual application usage instead of estimates. Collect historical metrics using tools such as Metrics Server, Prometheus, or Kubernetes monitoring platforms, and review them regularly as workloads evolve. For applications with changing resource needs, use Vertical Pod Autoscaler (VPA) recommendations to fine-tune requests while ensuring limits still protect nodes from excessive resource consumption.
Use Affinity and Topology Spread for High Availability
Node affinity, pod affinity, and pod anti-affinity allow you to influence where pods run based on node labels or the location of other pods. These rules help ensure workloads are placed on suitable nodes, keep related services close together for lower latency, or separate replicas to reduce the impact of node failures. Using preferred affinity rules instead of required ones when possible gives the scheduler more flexibility.
Topology spread constraints complement affinity by distributing pods evenly across nodes, availability zones, or regions. This prevents too many replicas from being concentrated in the same failure domain, improving resilience during node or zone outages. Combining topology spread constraints with pod anti-affinity is a common approach for production applications that require both high availability and balanced resource utilization.
Apply Priority Classes and Pod Disruption Budgets
PriorityClasses allow Kubernetes to distinguish between critical and non-critical workloads. During resource shortages, the scheduler gives higher-priority pods precedence, and if necessary, can preempt lower-priority pods to free resources. This ensures essential applications, such as monitoring systems or customer-facing services, continue running even when cluster capacity is limited.
Pod Disruption Budgets (PDBs) protect applications from excessive voluntary disruptions during operations such as node maintenance, cluster upgrades, or autoscaling. A PDB defines the minimum number or percentage of replicas that must remain available while disruptions occur. Together, PriorityClasses and PDBs help maintain service availability without preventing administrators from performing necessary cluster maintenance.
Right-Size Workloads to Improve Bin Packing
Efficient scheduling depends on accurate resource sizing. Applications with oversized CPU or memory requests reduce the scheduler's ability to place pods efficiently, leaving fragmented resources across nodes. Right-sizing workloads improves bin packing, allowing Kubernetes to utilize node capacity more effectively and potentially reduce infrastructure costs by enabling unused nodes to be removed.
Resource requirements should be reviewed continuously because application behavior changes over time. Analyze usage trends, identify workloads with consistently low utilization, and adjust requests accordingly. Vertical Pod Autoscaler recommendations, load testing, and production monitoring provide valuable data for keeping workloads appropriately sized while maintaining sufficient capacity for traffic spikes.
Continuously Monitor and Optimize Scheduling
Kubernetes scheduling should be monitored as an ongoing operational task rather than a one-time configuration. Watch for metrics such as pending pods, scheduling latency, node utilization, and failed scheduling attempts to identify capacity shortages or overly restrictive scheduling rules. Events from kubectl describe pod and scheduler logs can quickly reveal why a pod could not be scheduled.
Scheduling policies should also be reviewed as the cluster grows and workloads change. New node pools, changing traffic patterns, and evolving application requirements may require updates to affinity rules, topology spread constraints, taints, tolerations, or resource requests. Regular optimization helps maintain high resource utilization while ensuring applications continue to meet their performance and availability requirements.
Scale Kubernetes Clusters with Confidence with PerfectScale
Ready to elevate your Kubernetes management to the next level? With PerfectScale, you can harness the full potential of Kubernetes resource scheduling while reducing cloud costs and enhancing resilience. Our advanced algorithms optimize resource usage across your clusters, ensuring workloads are perfectly balanced and scaling is efficient. Join industry leaders like Paramount Pictures and Creditas in transforming Kubernetes operations with PerfectScale by DoiT. Sign up or Book a demo today to unlock the future of automated Kubernetes optimization and management.