
What Are Kubernetes CPU Limits?
A Kubernetes CPU limit defines the hard ceiling on the maximum amount of compute power a container can use on a cluster node. Unlike memory limits which trigger an out-of-memory (OOM) kill when breached, exceeding a CPU limit results in CPU throttling, which slows down your application without crashing it.
Unlike memory limits, CPU limits do not stop a container from allocating more resources. Instead, they control how much processor time the container can consume. When the limit is reached, the container is temporarily prevented from running until it is allowed to use CPU again.
Common knowledge seems to be that setting CPU limits for containers running on Kubernetes is an anti-pattern. As outlined in this excellent article by Shon Lev-Ran - in most cases CPU limits in Kubernetes do more harm than good.
How CPU limits work under the hood:
Kubernetes manages CPU limits using the Linux kernel's Completely Fair Scheduler (CFS) bandwidth control.
- The time slice: The kernel evaluates resource usage in fixed periods, usually 100 milliseconds.
- The quota: Your CPU limit is translated into an allowable execution time within that 100ms window.
- The throttling: For example, if you set a limit of
200m(20% of a core), your container can only run for 20ms out of every 100ms window. If it exhausts those 20ms in the first few moments of the window, the kernel pauses (throttles) the container until the next 100ms cycle begins.
CPU Request vs. CPU Limit
CPU Request vs.CPU Limit
How Kubernetes schedules and throttles CPU under the hood
| Feature | CPU Request | CPU Limit |
|---|---|---|
| Purpose | Defines the minimum guaranteed CPU allocated. | Defines the maximum allowable CPU. |
| Scheduling | Used by the scheduler to find a node with enough capacity. | Ignored during the initial scheduling phase. |
| Overcommit | Nodes cannot be overcommitted based on requests. | Nodes can be overcommitted based on limits. |
| Impact | If the node is busy, you still get this amount. | If exceeded, your app is throttled (slows down). |
Kubernetes CPU Limit: YAML Configuration Example
Warning: According to current best practices it is not recommended to use CPU limits. However, if you still want to learn how they work, here is a YAML example.
CPU requests and limits are configured under the resources section of each container definition. CPU values can be specified as whole CPU cores or in millicores, where 1000m equals one CPU core and 500m equals half a core.
The following example creates a container that requests 250m of CPU and can use up to 500m before the Linux kernel begins enforcing the limit:
apiVersion: v1kind: Podmetadata: name: cpu-limit-examplespec: containers: - name: app image: nginx:latest resources: requests: cpu: "250m" limits: cpu: "500m"In this example:
- requests.cpu: 250m reserves 0.25 CPU for scheduling purposes.
- limits.cpu: 500m allows the container to use up to 0.5 CPU.
- If the container attempts to use more than
500mover a CFS period, the kernel throttles it until its quota is replenished.
If you omit the CPU limit, the container can use additional CPU when it is available, constrained only by contention with other workloads on the node. If you omit the CPU request, Kubernetes may default it to the CPU limit (depending on the namespace's LimitRange configuration), which can unintentionally reduce scheduling flexibility.
How CPU Limits Work Under the Hood
The Time Slice
The Linux scheduler does not run one process until it finishes. Instead, it divides CPU time into many small execution intervals, often called time slices. During each slice, a runnable task gets a chance to execute before the scheduler decides which task should run next. This rapid switching happens thousands of times per second and gives the impression that many processes run simultaneously.
CPU limits build on top of this scheduling behavior. Rather than restricting how much work a container can perform in a single time slice, the kernel tracks the total CPU time consumed across many slices within a fixed accounting period. This allows the scheduler to remain fair while still enforcing resource limits.
The Quota
The scheduler keeps a running total of how much CPU time a container has consumed during the current period. Every time one of the container's processes runs, the time spent executing is deducted from its available quota. Once the period ends, the quota is automatically reset and the container receives a fresh allowance.
This design lets workloads use CPU in bursts instead of spreading their execution evenly across the entire period. For example, a container with a 50 ms quota can consume all 50 ms immediately if the CPU is available, but it cannot exceed that budget until the next period begins.
The Throttling
If a container exhausts its quota before the end of the current period, the kernel marks its cgroup as throttled. The scheduler simply skips over the container's runnable processes until the quota is replenished. The processes are not terminated or paused explicitly—they just are not selected to run.
Because throttling is based on elapsed time rather than CPU demand, it can occur even when the node has idle CPU capacity. This is why applications can experience increased latency despite the cluster appearing underutilized: the bottleneck is the container's configured CPU limit, not the availability of processor resources.
Why Setting Kubernetes CPU Limits Makes Little Sense
A very basic explanation for this is that the Linux kernel scheduler is a CFS (a Completely Fair Scheduler) - which means that as long as a process has CPU requests defined it will get its share of CPU time. Even if your container goes crazy (because it doesn't have limits) and tries to occupy all of the time on all of the machine’s cores - the scheduler won’t let it do that. It will continue to share the CPU time in a completely fair way between all of the processes in the system according to what they request. Yes, if all the processes collectively use up all of the CPU time and there’s no more idle time to assign - they will eventually all get throttled. And that’s the only thing that k8s CPU limits protect us from - node CPU overbooking. And even that - only if all the processes on the node have CPU limits defined. Otherwise the limitless containers may still occupy all of the idle capacity and cause all the rest to get throttled.
The flip side of that is that a container that has CPU limits will get throttled even when there are spare CPU cycles on the system.
Bottomline is - if efficient and cost-effective resource utilization is your goal - don’t set CPU limits for containers running on Kubernetes!
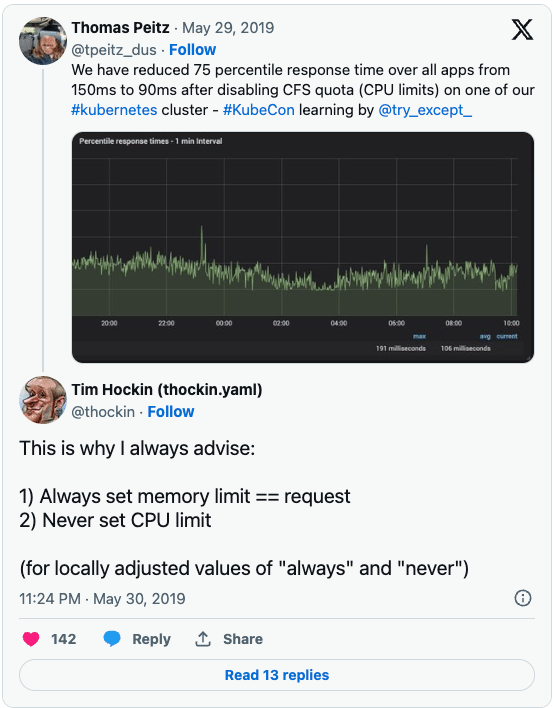
Tim Thockin - one of Kubernetes creators got very clear about this in this famous X-reply (He also talks about setting memory limits equal to requests, but that’s a topic for another blog) :
Removing K8s CPU Limits - Success Stories from the Trenches
The positive effect on system performance and availability that’s stated by Thomas Peitz in the tweet above is something we’ve seen time after time with our customers.
Here are some examples:
- Paramount pictures mention significant reduction in system downtime after using PerfectScale to remove CPU limits on most of their workloads.
- DirecTV also used PerfectScale automation to remove CPU limits across the board - saving them multiple hours of manual work.
- Another thing many customers observe is that when removing CPU limits - memory consumption goes up. And here again PerfectScale automated pod right-sizing comes handy to adjust the memory requests for reliable operation.
Kubernetes CPU Limits in Real Life:
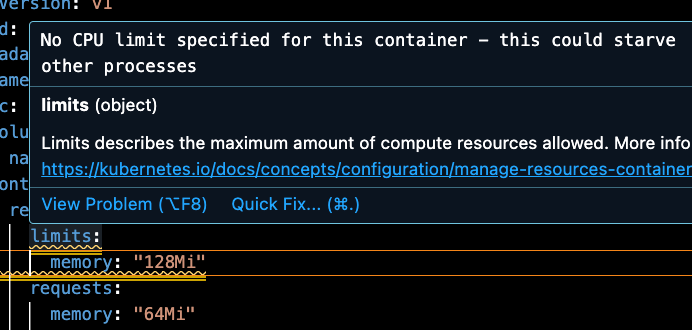
But as I said earlier - common knowledge isn’t all that common. Many engineers continue setting CPU limits on their containers. There are even code checkers and Kubernetes policy scanners that will warn you about K8s CPU limits not set. This is for example what the VSCode kubernetes add-on tells us::
Some folks even dare to go against the crowd and put up a fight for keeping the Kubernetes CPU limits in place
After all - if the CPU limits in Kubernetes made no sense - why would the Kubernetes developers even allow us to define them in the pod spec?
Kubernetes CPU Limits for Predictability
And as Shon outlines in his post - it’s widely known that Google engineers always set CPU limits on all of their production containers. With the reasoning being - they value predictability and consistency over performance (or cost)!
Another often stated reason for setting limits is performance testing - we usually want to do performance testing in predictable environments, without relying on idle capacity that may or may not be available.
And that, IMHO, makes a lot of sense - testing environments can’t and shouldn’t be configured the same as production ones. The goals and priorities are different - and that should be reflected in the configuration.
Bottom line - if predictable performance is of more value to your organization than optimal utilization or resource cost reduction - definitely keep your Kubernetes CPU limits in place (where it makes sense).
›› Take a look at the Kubernetes cluster size best practices to establish and continually maintain the proper Kubernetes requests and limits.
Best Practices for Kubernetes CPU Limits
Always Specify CPU Requests
Define CPU requests for every workload, even if you decide not to set CPU limits. Requests allow the scheduler to make informed placement decisions and ensure workloads receive an appropriate share of CPU when the node is under contention.
Without CPU requests, Kubernetes has no reliable way to estimate how much capacity a Pod needs. This can lead to inefficient scheduling, where too many CPU-intensive workloads are placed on the same node, increasing contention and reducing overall cluster stability.
Choose request values based on observed CPU usage rather than peak utilization. Start with the CPU the application consumes under normal load, then adjust over time using production metrics. Requests that are too high waste cluster capacity, while requests that are too low can cause workloads to compete aggressively for CPU during periods of high demand.
Enforce Defaults via LimitRanges
Not every team or application will define resource requests and limits correctly. A LimitRange lets cluster administrators specify default CPU requests and limits for Pods created in a namespace, preventing workloads from running without resource constraints.
LimitRanges can also enforce minimum and maximum CPU values. This helps maintain consistency across teams and prevents workloads from requesting unrealistic amounts of CPU or using values that are too low to be practical. For example, an organization might require every container to request at least 100m of CPU while preventing any single container from requesting more than a predefined threshold.
Using namespace-wide defaults also reduces configuration mistakes. Developers who omit resource settings still receive sensible defaults, while administrators retain control over resource consumption across shared clusters.
Monitor Throttling Metrics
CPU utilization alone does not reveal whether workloads are being constrained by their configured limits. Monitor throttling metrics, such as container_cpu_cfs_throttled_periods_total and container_cpu_cfs_throttled_seconds_total, to identify containers that are regularly exhausting their CPU quota.
It is also useful to compare throttling metrics with application-level indicators such as request latency, response times, and error rates. High throttling with no user-visible impact may not require action, whereas even moderate throttling can become a problem for latency-sensitive services.
Occasional throttling during short CPU spikes is often acceptable. Sustained or frequent throttling, however, usually indicates that CPU limits are too restrictive, CPU requests are too low, or the application requires additional replicas to handle its workload.
Use Horizontal Pod Autoscaling to Handle Demand
CPU limits restrict how much CPU a single container can consume, but they do not increase the total processing capacity of an application. If workloads consistently reach their CPU limits because of growing traffic, adding more replicas is usually a better solution than continually increasing CPU limits.
The Horizontal Pod Autoscaler (HPA) can automatically scale the number of Pods based on CPU utilization or custom metrics. As demand increases, the HPA creates additional replicas, allowing requests to be distributed across more containers instead of forcing existing ones to consume more CPU.
Autoscaling is generally more effective for stateless applications that can process requests independently. For stateful or batch workloads, scaling strategies may differ, but the same principle applies: adding capacity is often preferable to relying on increasingly higher CPU limits.
Automate Sizing
Choosing CPU requests and limits manually is difficult because application behavior changes over time. Tools such as Vertical Pod Autoscaler (VPA), Goldilocks, and monitoring platforms can analyze historical resource usage and recommend more appropriate values.
These tools typically evaluate CPU consumption over days or weeks rather than relying on short snapshots. This produces recommendations that account for recurring traffic patterns, periodic spikes, and changes in workload behavior, making them more reliable than one-time estimates.
Regularly reviewing and updating resource settings helps avoid both overprovisioning and unnecessary throttling. Automated recommendations reduce the operational effort required to tune resources manually and help keep CPU requests and limits aligned with the application's actual requirements as it evolves.
PerfectScale by DoiT approach to setting Kubernetes CPU Limits
At PefectScale by DoiT our motto is “responsible Kubernetes cost optimization”. We do realize resource allocation has a direct impact on both system reliability and performance.
Our rule of thumb is: “Remove K8s CPU limits - they are inefficient, wasteful and may negatively impact performance”
And yet we are in the right-sizing business - which means we understand there’s no such thing as one-size-fits-all. PerfectScale by DoiT automation is highly customizable and if predictability and consistency are your values (or are a better fit for a specific cluster or workload) - we definitely allow you to define CPU limits and provide the best values for these limits - based on actual CPU utilization and node configuration.
Ready to get your clusters optimized? Schedule a demo today with PerfectScale by DoiT.