


Hello and welcome! We have gathered the most commonly used commands in Kubernetes for you, all in one ready-to-use kubectl cheat sheet. The cheat sheet provides step-by-step instructions on how to manage your Kubernetes cluster using the kubectl command-line tool.
Below is a quick summary of important commands. Jump to the full cheat sheet below.
Cluster context and configuration:
- List contexts:
kubectl config get-contexts - Change active context:
kubectl config use-context <context-name> - View cluster details:
kubectl cluster-info - Check version:
kubectl version
Deployments and application management:
- Deploy from a manifest:
kubectl apply -f <filename.yaml> - Delete resources from a manifest:
kubectl delete -f <filename.yaml> - Scale a deployment:
kubectl scale deployment <deployment-name> --replicas=<N> - Check deployment rollout status:
kubectl rollout status deployment/<deployment-name> - Roll back a deployment:
kubectl rollout undo deployment/<deployment-name>
Inspecting and debugging:
- View all resources across all namespaces:
kubectl get all -A - View pod status and details:
kubectl describe pod <pod-name> - Tail pod logs:
kubectl logs -f <pod-name> - Execute commands inside a container:
kubectl exec -it <pod-name> -- <command> - Open a shell in a pod:
kubectl exec -it <pod-name> -- /bin/bash - Forward a local port to a pod:
kubectl port-forward <pod-name> <local-port>:<container-port>
Productivity tips and flags:
- Set an alias:
alias k=kubectl - Set up autocompletion:
source <(kubectl completion bash) - Filter resources by namespace: Use the
-n <namespace>flag - Test changes without applying:
kubectl apply -f <filename.yaml> --dry-run=client - View resources as YAML:
kubectl get pod <pod-name> -o yaml
What is kubectl?
Kubectl is the CLI tool for Kubernetes that allows you to interact with your clusters, create, manage, edit, and delete resources with ease. It communicates with the Kubernetes API server so you can monitor and control your applications.
How does kubectl work?
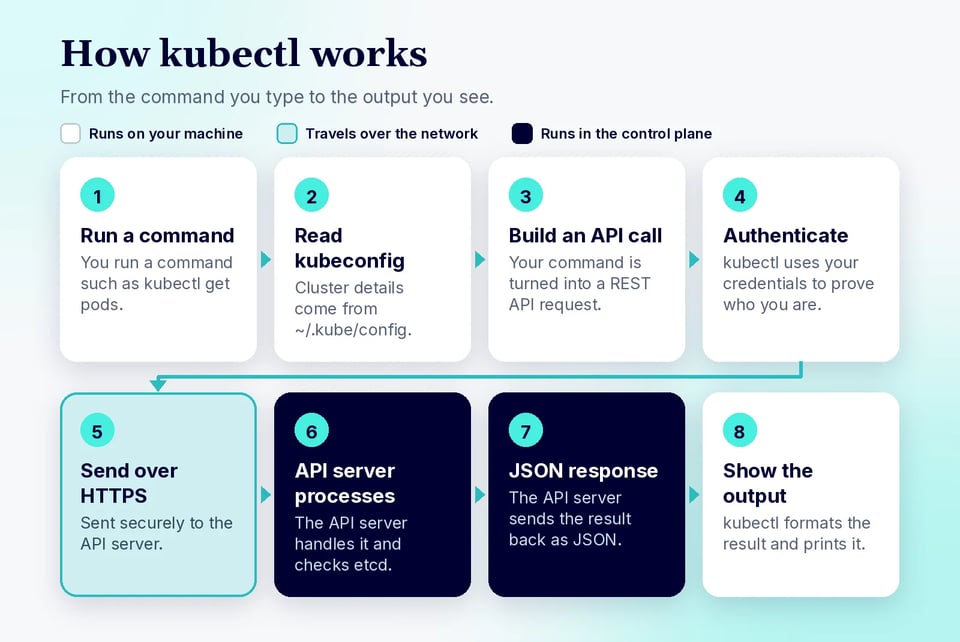
Kubectl operates by sending commands to the Kubernetes API server, which then carries out the requested operations within the cluster. When you execute a kubectl command, such as deploying an application or retrieving the status of resources, kubectl communicates with the API server over HTTP, transmitting your instructions. The API server processes these requests, updates the cluster's state in etcd (a distributed key-value store), and directs other components, like the scheduler or controller manager, to perform necessary actions to achieve the desired state. This interaction allows you to efficiently manage and monitor your Kubernetes resources from the command line.
Note: In earlier versions of Kubernetes, kubectl utilized generators to create resource configurations based on specific inputs. These generators allowed users to specify the type of resource to create, such as a Pod, Deployment, or Job, by using the --generator flag. For example, kubectl run nginx --image=nginx --generator=run-pod/v1 would create a Pod resource. This approach enabled users to script and automate resource creation with predictable outcomes. However, it's important to note that the --generator flag was deprecated in Kubernetes v1.12 and removed in v1.18. As of v1.18, kubectl run is simplified to create only Pods, and the use of generators has been replaced by more explicit and declarative commands like kubectl create and kubectl apply
Now, let’s start:
Setting Up kubectl: Version, Cluster Info and Autocomplete
The first step after installing kubectl is verifying that it is installed correctly and can communicate with your cluster. The following command displays the client version, and if a cluster is configured, it also shows the server version:
kubectl versionTo confirm that kubectl is connected to the correct cluster, use:
kubectl cluster-infoThis command displays the addresses of the Kubernetes control plane and core services. If the command returns an error, verify that your kubeconfig file is configured correctly and that the target cluster is reachable.
You can also inspect the current configuration and available contexts with:
kubectl config get-contextskubectl config current-contextIf you work with multiple clusters, switching between them is straightforward:
kubectl config use-context <context-name>Replacing <context-name> with the desired context updates the active cluster for all subsequent kubectl commands.
To improve productivity, enable shell autocompletion. This allows your shell to automatically complete commands, resource names, namespaces, and other arguments when you press the Tab key. For Bash, run:
echo 'source <(kubectl completion bash)' >> ~/.bashrcsource ~/.bashrcFor Zsh, use:
echo 'source <(kubectl completion zsh)' >> ~/.zshrcsource ~/.zshrcA useful shortcut is to create an alias for kubectl and enable autocompletion for it:
alias k=kubectlcomplete -o default -F __start_kubectl kIf you are using Zsh, replace the last line with:
compdef __start_kubectl kWith version verification, cluster connectivity, context management, and autocompletion configured, your environment is ready for day-to-day Kubernetes administration.
The Ultimate Kubectl Cheat Sheet
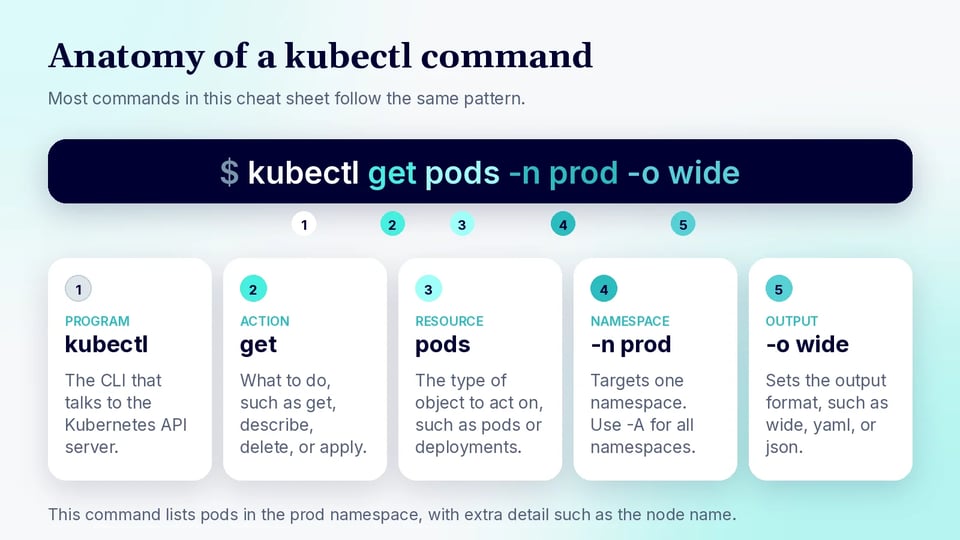
Optional Flags
Kubectl provides optional flags that enhance command output and resource management. For example:
Output Formats:
JSON Output:
You can use the -o=json flag to format command output as JSON.
kubectl get pods -o=jsonYAML Output:
You can use the -o=yaml flag to format command output as YAML.
kubectl get pods -o=yamlWide Output:
The -o=wide option provides detailed plain-text output (e.g., it displays the node name for pods).
kubectl get pods -o=wideFor more tailored outputs, kubectl offers the --custom-columns flag, allowing you to define specific columns to display.
For example, to list pods with their names and the nodes they're running on:
kubectl get pods -o=custom-columns="POD NAME:.metadata.name,NODE:.spec.nodeName"This command will output:
POD NAME NODEnginx-deployment-1 node-1nginx-deployment-2 node-2Namespace Specification:
By default, kubectl commands operate within the namespace defined by the current context. To target a specific namespace, you can use the -n or --namespace flag:
kubectl get pods -n <namespace_name>To view resources across all namespaces, the -A or --all-namespaces flag is used:
kubectl get pods -AAnd to set a default namespace for the current context:
kubectl config set-context --current --namespace=ns_nameFile Input:
The -f flag is used to specify a filename, directory, or URL when creating a resource.
kubectl create -f ./file_nameLabel Filtering:
You can use the -l flag to filter resources based on specific labels.
kubectl get pods -l name=label_nameHelp Option:
To display help for kubectl commands, use the -h flag.
kubectl -hWatch Mode:
You continuously monitor resource changes with the --watch (or -w) flag:
kubectl get pods -wSorting Output:
You can sort the output based on a specific field using the --sort-by flag:
kubectl get pods --sort-by=.metadata.namekubectl Usage with Aliases
Working with kubectl involves typing lengthy commands, which can be time-consuming and error-prone. To improve efficiency, many developers create aliases for frequently used commands.
Setting Up a Basic Alias
alias k=kubectlecho 'alias k=kubectl' >> ~/.bashrcThis allows you to use k in place of kubectl.
You can use the kubectl-aliases repository, which provides hundreds of pre-defined aliases, enabling quicker command execution.
For Cluster Management, Context and Configuration
Cluster Management means setting up, viewing, and modifying your cluster.
| Command | Description |
|---|---|
kubectl cluster-info |
Displays the endpoints and basic information about your Kubernetes cluster. |
kubectl config get-contexts |
Lists all contexts defined in your kubeconfig file. |
kubectl config current-context |
Shows the current active context. |
kubectl config use-context <context> |
Switches the active context to the one you specify. |
kubectl config delete-context <context> |
Removes a context from your kubeconfig file. |
kubectl api-versions |
Lists all the API versions available in the cluster. |
kubectl api-resources |
Lists all resource types available in your cluster, with details on API groups and namespaces. |
kubectl config view |
Displays the configuration details from your kubeconfig file (clusters, contexts, user settings). |
kubectl version |
Prints version info for both the kubectl client and the Kubernetes server. |
Pod Management
Shortcode: po
A Pod is the smallest unit in Kubernetes, representing a single instance of a running process in your cluster. It can contain one or more containers that share storage and network resources.
| Command | Description |
|---|---|
kubectl get pods |
Lists all pods in the current namespace. |
kubectl describe pod <pod-name> |
Provides detailed information about the specified pod, including status, events, and container details. |
kubectl exec -it <pod-name> <command> |
Executes the given command inside the specified pod interactively (the -it flags allow interactive terminal access). |
kubectl delete pod <pod-name> |
Deletes the specified pod from the cluster. |
kubectl run <pod-name> --image=<image_name> |
Creates and runs a pod with the specified image. |
kubectl get pod -n <namespace_name> |
Lists all pods in the specified namespace. |
kubectl exec <pod-name> -c <container-name> <command> |
Executes a command inside a specific container within a pod. |
kubectl top pod |
Displays resource usage (such as CPU and memory) for pods. |
kubectl annotate pod <pod-name> <annotation> |
Adds or updates an annotation on the specified pod. |
kubectl get pods --field-selector=status.phase=Running |
Lists pods that are currently in the Running phase by filtering on the pod status. |
kubectl get pods --sort-by='.status.containerStatuses[0].restartCount' |
Sorts the list of pods by the restart count of the first container in each pod. |
For ReplicaSets
Shortcode: rs
A ReplicaSet ensures a specified number of pod replicas are running. The main difference is that ReplicaSets support set-based label selectors.
| Command | Description |
|---|---|
kubectl get rs |
Lists all ReplicaSets in the current namespace. |
kubectl get rs <replicaset_name> -o yaml |
Displays the configuration of the specified ReplicaSet in YAML format. |
kubectl get rs <replicaset_name> -o json |
Displays the configuration of the specified ReplicaSet in JSON format. |
kubectl describe rs <rs_name> |
Provides detailed information about the specified ReplicaSet. |
kubectl get rs --namespace=<ns_name> |
Lists all ReplicaSets in the specified namespace. |
kubectl delete rs <rs_name> --cascade=orphan |
Deletes the specified ReplicaSet but leaves its managed pods running (orphans the pods). |
kubectl delete rs <rs_name> |
Deletes the specified ReplicaSet along with all the pods it manages. |
kubectl scale rs <rs_name> --replicas=<count> |
Adjusts (scales) the number of pods managed by the specified ReplicaSet to the given count. |
kubectl edit rs <rs_name> |
Opens the ReplicaSet configuration in your default editor, allowing you to make live changes. |
kubectl replace -f <rs_file.yaml> |
Replaces the existing ReplicaSet configuration with the one provided in the YAML file. |
For Daemonsets
Shortcode: ds
A DaemonSet ensures that a specific pod runs on all (or some) nodes in the cluster. This is useful for tasks like running a monitoring agent on every node.
| Command | Description |
|---|---|
kubectl get daemonset |
Lists all DaemonSets in the current namespace. |
kubectl describe daemonset <ds_name> |
Provides detailed information about a specific DaemonSet. |
kubectl get daemonset <daemonset_name> -o yaml |
Displays the configuration of the specified DaemonSet in YAML format. |
kubectl get daemonset <ds_name> -o json |
Displays the configuration of the specified DaemonSet in JSON format. |
kubectl delete daemonset <ds_name> |
Deletes the specified DaemonSet from the cluster. |
kubectl label daemonset <ds_name> <key>=<value> |
Adds or updates a label on the specified DaemonSet. |
kubectl annotate daemonset <ds_name> <key>=<value> |
Adds or updates an annotation on the specified DaemonSet. |
kubectl rollout status daemonset <ds_name> |
Checks the status of a DaemonSet rollout. |
kubectl rollout history daemonset <ds_name> |
Displays the rollout history for a DaemonSet. |
For StatefulSets
Shortcode: sts
StatefulSets manage the deployment and scaling of pods, ensuring each has a unique, stable identity and persistent storage. This is important for stateful applications.
| Command | Description |
|---|---|
kubectl get statefulset |
Lists all StatefulSets in the current namespace. |
kubectl describe statefulset <statefulset_name> |
Provides detailed information about the specified StatefulSet. |
kubectl get statefulset <sts_name> -o yaml |
Displays the configuration of the specified StatefulSet in YAML format. |
kubectl get statefulset <sts_name> -o json |
Displays the configuration of the specified StatefulSet in JSON format. |
kubectl edit statefulset <sts_name> |
Opens the configuration of the specified StatefulSet in your default text editor, allowing you to make live changes. |
kubectl scale statefulset <sts_name> --replicas=<number> |
Adjusts the number of pod replicas managed by the specified StatefulSet to the provided number. |
kubectl rollout status statefulset <statefulset_name> |
Checks and displays the rollout status of the specified StatefulSet. |
For Namespace
Shortcode: ns
Namespaces provide a way to divide cluster resources between multiple users or applications.
| Command | Description |
|---|---|
kubectl get namespace |
Lists all namespaces in your cluster (the current context’s namespaces). |
kubectl create namespace <namespace_name> |
Creates a new namespace with the specified name. |
kubectl describe namespace <namespace_name> |
Provides detailed information about the specified namespace. |
kubectl edit namespace <namespace_name> |
Opens the configuration for the specified namespace in your default text editor so you can make live edits. |
kubectl delete namespace <namespace_name> |
Deletes the specified namespace from your cluster along with all resources contained within it. |
For Services
Shortcode: svc
A Service defines a logical set of pods and a policy to access them. It enables communication between different parts of your application and can expose your application to external traffic.
| Command | Description |
|---|---|
kubectl get services |
Lists all services in the current namespace |
kubectl create service <svc-type> <svc-name> --tcp=<port> |
Creates a new service of the specified type (for example, clusterip, nodeport, or loadbalancer) with the given name, mapping TCP on a given port |
kubectl edit service <svc-name> |
Opens an editor for editing the configuration of specified service |
kubectl describe service <svc-name> |
Provides detailed information about the specified service |
kubectl delete service <svc-name> |
Deletes the specified service from the cluster |
kubectl get endpoints <svc-name> |
Lists the endpoints (i.e., the IP addresses of the pods) that back the specified service |
kubectl expose deployment [deploy_name] |
Creates a service that exposes the specified deployment and possible resources for expose include pod (po), service (svc), replicaset (rs) |
For Service Accounts
Shortcode: sa
A ServiceAccount provides an identity for processes running in a pod, allowing them to interact with the Kubernetes API securely.
| Command | Description |
|---|---|
kubectl get serviceaccounts |
Lists all service accounts in the current namespace |
kubectl describe serviceaccount <sa-name> |
Displays detailed information for the specified service account |
kubectl replace -f <sa.yaml> |
Replace (update) a service account with a new configuration |
kubectl delete serviceaccount <sa_name> |
Deletes the specified service account from the cluster. |
For Deployments
Shortcode: deploy
A Deployment provides declarative updates for pods and ReplicaSets. You can define the desired state of your application, and the Deployment controller changes the actual state to the desired state at a controlled rate.
| Command | Description |
|---|---|
kubectl get deployment |
Lists all deployments in the current namespace. |
kubectl describe deployment <deployment_name> |
Displays detailed information about the specified deployment |
kubectl create deployment <deployment-name> --image=<img-name> |
Creates a new deployment named <deployment-name> using the specified container image |
kubectl edit deployment <deployment_name> |
Opens the deployment configuration in your default text editor for live editing |
kubectl scale deployment <deployment-name> --replicas=<replica-count> |
Adjusts the number of pod replicas managed by the deployment to the specified count. |
kubectl set image deployment/<deployment-name> <container-name>=<new-image-name> |
Updates the image for a specified container within the deployment |
kubectl rollout status deployment/<deployment-name> |
Shows the current rollout status of the deployment |
kubectl rollout pause deployment/<deployment-name> |
Pauses the rollout process, preventing further updates until resumed |
kubectl rollout resume deployment/<deployment-name> |
Resumes a paused deployment rollout |
kubectl rollout undo deployment/<deployment-name> |
Reverts the deployment to its previous revision |
kubectl rollout undo deployment/<deployment-name> --to-revision=<revision-number> |
Rolls back the deployment to a specific revision number |
kubectl delete deployment <deployment-name> |
Deletes the specified deployment along with its managed pods |
For Jobs and CronJobs
Shortcode: job, cj
A Job runs one or more pods until a task completes successfully. A CronJob creates Jobs on a schedule, making it useful for backups, reports, and other recurring tasks.
| Command | Description |
|---|---|
kubectl get jobs |
Lists all Jobs in the current namespace. |
kubectl describe job <job-name> |
Displays detailed information about the specified Job. |
kubectl create job <job-name> --image=<image-name> |
Creates a Job that runs the specified container image. |
kubectl delete job <job-name> |
Deletes the specified Job. |
kubectl get cronjobs |
Lists all CronJobs in the current namespace. |
kubectl describe cronjob <cronjob-name> |
Displays detailed information about the specified CronJob. |
kubectl create cronjob <cronjob-name> --image=<image-name> --schedule="<cron-expression>" |
Creates a CronJob with the specified schedule. |
kubectl create job --from=cronjob/<cronjob-name> <job-name> |
Creates a one-time Job from an existing CronJob. |
kubectl patch cronjob <cronjob-name> -p '{"spec":{"suspend":true}}' |
Suspends future executions of the CronJob. |
kubectl delete cronjob <cronjob-name> |
Deletes the specified CronJob. |
For Horizontal Pod Autoscalers
Shortcode: hpa
A Horizontal Pod Autoscaler (HPA) automatically adjusts the number of pod replicas based on metrics such as CPU or memory usage.
| Command | Description |
|---|---|
kubectl get hpa |
Lists all Horizontal Pod Autoscalers. |
kubectl describe hpa <hpa-name> |
Displays detailed information about the specified HPA. |
kubectl autoscale deployment <deployment-name> --cpu-percent=<target> --min=<min> --max=<max> |
Creates an HPA for the specified deployment. |
kubectl edit hpa <hpa-name> |
Opens the HPA configuration for live editing. |
kubectl delete hpa <hpa-name> |
Deletes the specified HPA. |
kubectl get hpa -w |
Watches HPA metrics and scaling events in real time. |
kubectl top pods |
Displays pod resource usage used by the Metrics Server. |
kubectl top nodes |
Displays node CPU and memory usage. |
For RBAC and Permission Checks
Role-Based Access Control (RBAC) controls which users and service accounts can access Kubernetes resources.
| Command | Description |
|---|---|
kubectl get roles |
Lists all Roles in the current namespace. |
kubectl get rolebindings |
Lists all RoleBindings in the current namespace. |
kubectl get clusterroles |
Lists all ClusterRoles. |
kubectl get clusterrolebindings |
Lists all ClusterRoleBindings. |
kubectl describe role <role-name> |
Displays detailed information about the specified Role. |
kubectl describe clusterrole <clusterrole-name> |
Displays detailed information about the specified ClusterRole. |
kubectl auth can-i <verb> <resource> |
Checks whether the current user can perform an action on a resource. |
kubectl auth can-i <verb> <resource> --as=<user> |
Checks permissions for another user. |
kubectl auth can-i --list |
Lists all permissions available to the current user. |
For Ingress Resources
Shortcode: ing
An Ingress manages external HTTP and HTTPS access to services in a Kubernetes cluster. It typically requires an Ingress controller.
| Command | Description |
|---|---|
kubectl get ingress |
Lists all Ingress resources in the current namespace. |
kubectl describe ingress <ingress-name> |
Displays detailed information about the specified Ingress. |
kubectl create ingress <ingress-name> --rule="<host>/<path>=<service>:<port>" |
Creates an Ingress with a routing rule. |
kubectl edit ingress <ingress-name> |
Opens the Ingress configuration for live editing. |
kubectl delete ingress <ingress-name> |
Deletes the specified Ingress. |
kubectl get ingress -A |
Lists Ingress resources across all namespaces. |
kubectl get ingress <ingress-name> -o yaml |
Displays the Ingress configuration in YAML format. |
For Advanced Debugging
These commands help troubleshoot applications, networking, and resource issues in a Kubernetes cluster.
| Command | Description |
|---|---|
kubectl logs <pod-name> |
Displays logs for the specified pod. |
kubectl logs <pod-name> -c <container-name> |
Displays logs for a specific container in a multi-container pod. |
kubectl logs -f <pod-name> |
Streams logs from the specified pod. |
kubectl logs <pod-name> --previous |
Displays logs from the previous instance of a crashed container. |
kubectl exec -it <pod-name> -- /bin/sh |
Opens an interactive shell inside a running container. |
kubectl port-forward pod/<pod-name> <local-port>:<pod-port> |
Forwards a local port to a pod for debugging. |
kubectl debug <pod-name> -it --image=busybox |
Creates an ephemeral debug container attached to the specified pod. |
kubectl get events --sort-by=.metadata.creationTimestamp |
Lists cluster events in chronological order. |
kubectl describe node <node-name> |
Displays node conditions, allocated resources, and recent events. |
kubectl cp <pod-name>:<remote-path> <local-path> |
Copies files from a pod to the local machine. |
For Events
Shortcode: ev
Events are records of what happened in your cluster, such as pod creations, deletions, or errors.
| Command | Description |
|---|---|
kubectl get events |
Lists all events in the current namespace |
kubectl get events --field-selector type!=Normal |
Displays events that are not of type Normal |
kubectl get events --field-selector type=Warning |
Filters and displays only events of type Warning |
kubectl get events -w |
Watches for new events in real-time |
kubectl get events --field-selector involvedObject.name=<object_name> |
Shows events related to a specific object such as a pod or node |
Logs
Logs are the output of your running applications and system components.
| Command | Description |
|---|---|
kubectl logs <pod_name> |
Retrieves and displays the logs from the main container of the specified pod |
kubectl logs -f <pod_name> |
Streams the live logs from the specified pod |
kubectl logs --since=6h <pod_name> |
Displays logs from the specified pod that were generated within the last 6 hours |
kubectl logs --tail=50 <pod_name> |
Shows the last 50 lines of logs from the specified pod |
kubectl logs -f <pod_name> -c <container_name> |
Streams live logs from a specific container within a pod |
kubectl logs <pod_name> > podfile.log |
Saves the logs from a pod to a file named podfile.log |
kubectl logs --previous <pod_name> |
Displays logs from the previous instance of a container in the specified pod |
For Secrets and Config Maps
Shortcode for ConfigMaps: cm
Secrets store sensitive information like passwords or keys, while ConfigMaps hold non-sensitive configuration data. Both allow you to decouple configuration artifacts from image content to keep your applications portable.
| Command | Description |
|---|---|
kubectl get secrets |
Lists all secrets in the current namespace |
kubectl get configmaps |
Lists all ConfigMaps in the current namespace |
kubectl describe secret <secret-name> |
Provides detailed information about the specified secret |
kubectl delete secret <secret-name> |
Deletes the specified secret from the cluster |
kubectl describe configmap <configmap-name> |
Provides detailed information about the specified ConfigMap |
kubectl create configmap <config-map-name> --from-file=<path-to-file> |
Creates a new ConfigMap with the given name using the contents of the file specified |
kubectl create secret <secret-type> <secret-name> --from-literal=key=value |
Creates a new secret of the specified type using a key-value pair |
For Node Management
Shortcode: no
A Node is a worker machine in Kubernetes.
| Command | Description |
|---|---|
kubectl get nodes |
Lists all the nodes in your cluster |
kubectl describe node <node-name> |
Provides detailed information about the specified node |
kubectl drain <node-name> |
Prepares the node for maintenance by evicting all pods and marking the node as unschedulable |
kubectl uncordon <node-name> |
Marks a previously cordoned (unschedulable) node as schedulable again allowing new pods to be scheduled on it |
kubectl label node <node_name> <key>=<value> |
Adds or updates a label on the specified node |
kubectl cordon <node_name> |
Marks the specified node as unschedulable |
kubectl taint node <node_name> <key>=<value>:<taint-effect> |
Applies a taint to the specified node |
kubectl top node <node_name> |
Displays resource usage metrics (such as CPU and memory) for the specified node |
kubectl annotate node <node_name> <key>=<value> |
Adds or updates an annotation on the specified node |
For Storage(PV, PVC)
Shortcode for Persistent Volume: pv
Shortcode for Persistent Volume Claim: pvc
PersistentVolumes are storage resources in your cluster, and PersistentVolumeClaims are requests for storage by users.
| Command | Description |
|---|---|
kubectl get pv |
Lists all Persistent Volumes in the cluster |
kubectl describe pv <pv-name> |
Provides detailed information about a specific Persistent Volume |
kubectl get pvc |
Lists all Persistent Volume Claims in the current namespace |
kubectl describe pvc <pvc-name> |
Displays detailed information about a specific Persistent Volume Claim |
For Copying Files and Directories
You can transfer files between your local system and a pod's container helping in debugging or data backup.
| Command | Description |
|---|---|
kubectl cp <local-path> <namespace>/<pod-name>:<container-path> |
Copies a file or directory from your local machine into a container in the specified pod and namespace. |
kubectl cp <source-pod-name>:<source-container-path> <local-path> -n <namespace> |
Copies a file or directory from a container inside a pod (in the given namespace) to your local machine. |
kubectl cp <local-path> <destination-namespace>/<destination-pod-name>:<destination-container-path> |
Copies a file or directory from your local machine to the destination pod and namespace. |
For Output Verbosity and Debugging
Verbosity refers to the level of detail included in the logs generated by components like kubectl and kubelet. You can adjust the verbosity of kubectl commands.
| Command | Description |
|---|---|
kubectl get <resource-type> --v=<verbosity-level> |
This is the general form for setting the verbosity level. It tells kubectl how much debugging output to include when executing the command on the specified resource type. |
kubectl get <resource-type> --v=0 |
Runs the command with minimal debug output (the default level). |
kubectl get <resource-type> --v=7 |
Provides a higher verbosity level where additional debug information is printed, including HTTPS request headers sent by the client. |
kubectl get <resource-type> --v=8 |
Increases the verbosity further. At level 8, HTTP request and response contents (body data) are also displayed. |
FAQ
What is kubectl? kubectl is the command-line tool for Kubernetes. It sends your commands to the Kubernetes API server, which carries out the request in the cluster, so you can create, manage, edit, and delete resources and monitor your applications.
How do I switch between clusters with kubectl?
Run kubectl config get-contexts to list the contexts in your kubeconfig file, then run kubectl config use-context <context-name> to make one active. All later kubectl commands then run against that cluster.
How do I list pods in all namespaces?
Add the -A (or --all-namespaces) flag, for example kubectl get pods -A. To target one namespace instead, use -n <namespace_name>.
How do I view logs from a crashed container?
Run kubectl logs <pod-name> --previous to see logs from the previous instance of the container. Add -c <container-name> if the pod has more than one container.
How do I roll back a deployment?
Run kubectl rollout undo deployment/<deployment-name> to return to the previous revision. To pick a specific revision, add --to-revision=<revision-number>.
How do I set up a kubectl alias and autocompletion?
Run alias k=kubectl to use k in place of kubectl, and add it to your ~/.bashrc to keep it. For Bash autocompletion, add source <(kubectl completion bash) to ~/.bashrc. The cheat sheet also covers Zsh.
Reduce up to 50% of your Cloud Costs with PerfectScale
PerfectScale is a powerful tool designed to work seamlessly with Kubernetes. By integrating PerfectScale into your Kubernetes environment, you can simplify and optimize the orchestration of your containers. This integration enhances the efficiency of managing your clusters, allowing you to allocate resources more effectively, reduce operational costs, and improve the overall stability and resilience of your applications. PerfectScale's AI-driven insights provide comprehensive visibility into your system's performance, enabling proactive adjustments to meet dynamic demands. This means you can ensure peak performance while cutting costs by up to 50% through data-driven, autonomous actions that continuously optimize each layer of your Kubernetes stack. To experience the benefits of PerfectScale firsthand, consider Booking a Demo today and Start a Free Trial today!