


The Cluster Autoscaler Helm chart is a way to install the Kubernetes Cluster Autoscaler, which adds worker nodes when your pods cannot be scheduled and removes nodes when they are no longer needed. You can install it with a single helm install command, but two things have a big impact on whether it works well: the settings you configure and the resource requests on your pods.
This guide covers both, along with how the Cluster Autoscaler makes scaling decisions. You'll learn how the Cluster Autoscaler decides when to add or remove nodes, which chart to install, how to install and verify it on EKS, AKS, and GKE, which Helm values control its behavior, how to tune it for large clusters, and how to troubleshoot common scaling problems.
What is the Cluster Autoscaler Helm chart?
The Cluster Autoscaler changes the number of nodes in your cluster based on what your pods need. It adds nodes when pods cannot be scheduled because there is not enough capacity, and removes nodes that are no longer needed when their pods can run on other nodes.
It does this by changing the size of your cloud provider's node groups, such as AWS Auto Scaling Groups (ASGs), Azure Virtual Machine Scale Sets (VMSS), or Google Compute Engine Managed Instance Groups (MIGs).
The Helm chart packages the Cluster Autoscaler Deployment, its RBAC permissions, and configuration into one installation. This makes it easier to install, manage, and upgrade. The Cluster Autoscaler scales nodes, while the HPA and KEDA scale pods.
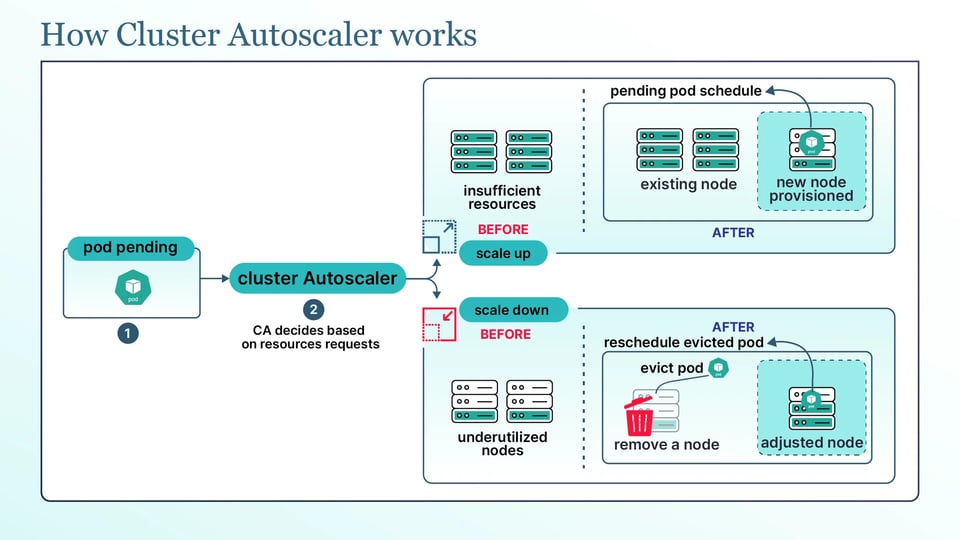
How the Cluster Autoscaler decides to add and remove nodes?
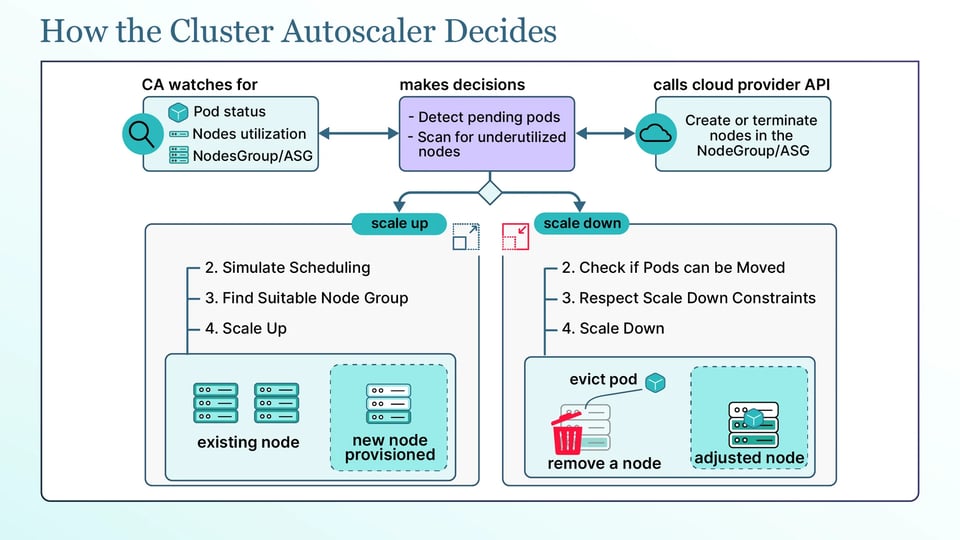
The following are the main factors the Cluster Autoscaler uses to decide when to add or remove nodes:
Pending pods trigger scale-up
Every 10 seconds, based on the --scan-interval setting, the autoscaler looks for pods stuck in Pending because they cannot fit on the existing nodes. It checks whether a new node from each node group could run those pods, chooses a suitable group, and increases its desired size so the cloud provider can add a node. If there are no unschedulable pods, the Cluster Autoscaler does not add nodes.
Low utilization and a delay trigger scale-down
When there is no need to add nodes, the autoscaler checks whether any nodes can be removed. A node becomes a candidate when the CPU and memory requests of its pods are below the --scale-down-utilization-threshold, which defaults to 0.5 (50%). The node must remain underused for the time set by --scale-down-unneeded-time, which defaults to 10 minutes. The autoscaler also waits after a scale-up before removing nodes, based on --scale-down-delay-after-add, which also defaults to 10 minutes. This is why scale-down is usually slower than scale-up.
Node groups and expanders decide where new nodes come from
The autoscaler needs to know which node groups it should manage. It can discover them automatically or use an explicit list. If multiple node groups can run the pending pods, the --expander setting decides which group to grow. The options are random, most-pods, least-waste, price, and priority.
Resource requests drive the scaling decisions
This is one of the most important things to understand. The Cluster Autoscaler uses pod resource requests, not actual CPU and memory usage. It adds nodes when the requested resources do not fit and considers a node underused based on the requests of its pods. For example, if pods request 80% of a node's capacity but use only 20%, the autoscaler still sees the node as 80% used and may not remove it. Oversized requests can therefore keep extra nodes running and increase your cloud costs.
Which Cluster Autoscaler chart to install?
For new installations, use the official autoscaler/cluster-autoscaler chart from the kubernetes/autoscaler repository.
You may still find the old stable/aws-cluster-autoscaler and stable/cluster-autoscaler charts. These are deprecated and no longer maintained, so avoid them.
Helm is not the only option. Managed Kubernetes services may provide Cluster Autoscaler through their own tools, and some teams use Terraform to manage it. The right choice depends on how you manage your cluster.
Prerequisites and version compatibility
Before installing, the following are the two things to check:
Match the Cluster Autoscaler version with your Kubernetes version
You should use Cluster Autoscaler v1.30.x with Kubernetes 1.30, v1.31.x with Kubernetes 1.31, and so on. The autoscaler uses its own scheduling logic to check whether a pod can fit on a new node, so using a mismatched version can lead to incorrect scaling decisions. Check the chart's default image tag and pin it to the correct version if needed.
Give Cluster Autoscaler access to your cloud provider
The autoscaler needs permission to change the size of your node groups and needs to know which node groups it manages. On AWS, this means the required IAM permissions and properly tagged Auto Scaling Groups (ASGs). On Azure and GCE, you need the equivalent permissions and correctly configured VM Scale Sets (VMSS) or Managed Instance Groups (MIGs).
Make sure these permissions and node group settings are correct before installing. The chart can start successfully even when they are wrong, but Cluster Autoscaler will not be able to scale the nodes.
Installing the chart on a running cluster
First, add the official repository:
helm repo add autoscaler https://kubernetes.github.io/autoscalerhelm repo updateBefore installing, you need to tell Cluster Autoscaler which node groups it should manage. The setup depends on your cloud provider.
On managed AKS and GKE, node autoscaling is already available as a built-in feature that you enable at the node-pool level, so you usually do not need to install this Helm chart there. The chart is mainly useful for Amazon EKS and self-managed clusters.
Installing on EKS
On EKS, auto-discovery is the simplest approach. First, tag each Auto Scaling Group (ASG) you want Cluster Autoscaler to manage with k8s.io/cluster-autoscaler/enabled and k8s.io/cluster-autoscaler/<your-cluster-name>.
Then install the chart:
helm install cluster-autoscaler autoscaler/cluster-autoscaler \ --namespace kube-system \ --set cloudProvider=aws \ --set autoDiscovery.clusterName=<your-cluster-name> \ --set awsRegion=<your-region>Installing on self-managed Azure or GCE
For a self-managed Azure or GCE cluster, set cloudProvider=azure or cloudProvider=gce and provide the details of the scale sets or instance groups you want Cluster Autoscaler to manage.
The exact settings differ by cloud provider, but the basic setup is the same: specify the cloud provider, node groups, and credentials or identity Cluster Autoscaler should use.
After installing, check that the Cluster Autoscaler pod is running:
kubectl get pods -n kube-system -l app.kubernetes.io/instance=cluster-autoscalerThen check its status:
kubectl describe configmap cluster-autoscaler-status -n kube-systemThe status ConfigMap shows the size of each node group and recent scale-up or scale-down activity. This gives you a quick view of whether Cluster Autoscaler is running and making scaling decisions.
Helm values that change autoscaler behavior
The following are the important values:
cloudProvider and autoDiscovery
These tell Cluster Autoscaler which cloud provider you use and how to find the node groups it should manage. If these are wrong, the autoscaler has no node groups to scale.
Service account annotations for cloud access
You can give Cluster Autoscaler its own cloud permissions through its service account instead of giving all nodes broad permissions. On EKS, this is commonly done with IAM Roles for Service Accounts (IRSA). On Azure and GCE, Workload Identity can be used. The service account annotations are configured with rbac.serviceAccount.annotations.
extraArgs for scaling behavior
You use extraArgs to set Cluster Autoscaler options such as scan-interval, scale-down-utilization-threshold, scale-down-unneeded-time, and expander. You can also use expendable-pods-priority-cutoff to set the priority below which pods can be treated as expendable. These settings control how often the autoscaler checks the cluster and how it chooses nodes to add or remove.
Replica count, leader election, and resources
For high availability, you can run more than one replica. Cluster Autoscaler uses leader election, so only one replica is active at a time while the others are ready to take over. Also set CPU and memory requests and limits for the autoscaler. Large clusters may need more memory because the autoscaler keeps the cluster’s state in memory.
You can set these values in a values.yaml file and install the chart with -f:
cloudProvider: awsautoDiscovery: clusterName: my-clusterawsRegion: us-east-1replicaCount: 2extraArgs: scan-interval: 10s scale-down-utilization-threshold: "0.5" expander: least-waste balance-similar-node-groups: "true"resources: requests: cpu: 100m memory: 300Mi limits: cpu: 200m memory: 500MiTuning the chart for large or multi-tenant clusters
Large clusters need extra tuning because the Cluster Autoscaler has more pods, nodes, and node groups to check on every scan. A few settings and patterns can help keep it healthy as the cluster grows:
Reduce the number of node groups
The more node groups the autoscaler manages, the more work it does on each scan. Where possible, keep the number of node groups smaller and use auto-discovery tags to include only the groups that need autoscaling.
Use sharding for very large clusters
You can run multiple Cluster Autoscaler instances, with each one managing a different set of node groups. This spreads the work across multiple autoscaler instances. The trade-off is that these instances do not coordinate with each other, so two of them may respond to the same pending pod and temporarily add more nodes than needed. Those extra nodes can be removed later during scale-down.
Use spot nodes with the priority expander
You can pair spot node groups with the priority expander for cost-focused clusters. This lets the autoscaler prefer lower-cost spot capacity and fall back to on-demand nodes when needed.
Use overprovisioning for faster scaling
Overprovisioning uses low-priority placeholder pods to reserve extra capacity in the cluster. When real workloads arrive, these placeholder pods are removed to make room while the autoscaler adds new nodes.
Scale node groups from zero
A node group can scale down to zero when it is not being used. This is especially useful for expensive GPU node groups. On EKS, make sure the node group has the required labels and taints in its autoscaler tags so Cluster Autoscaler knows what the nodes can provide even when the group has zero nodes.
Diagnosing an install that is not scaling
When Cluster Autoscaler is not scaling as expected, the status ConfigMap and pod logs are the best places to start. The following are the most common cases:
Pods stay Pending and no nodes are added
Start with kubectl describe pod <pod-name> and check the pod events. Then check the Cluster Autoscaler logs. Common causes include the node group already being at its maximum size, no node group having enough capacity for the pod's resource requests, or the pod's node selector or affinity not matching any available node group. Missing cloud permissions or node group tags can also prevent the autoscaler from finding or changing the node group.
Nodes stay underused and are not removed
Cluster Autoscaler skips some nodes by default. For example, it skips nodes running kube-system pods when --skip-nodes-with-system-pods is enabled and nodes with pods using local storage when --skip-nodes-with-local-storage is enabled. It also waits during the scale-down delay. More importantly, remember that Cluster Autoscaler uses resource requests, not actual usage. If the requests keep a node above the utilization threshold, the node will not become a removal candidate even when actual CPU and memory usage is low.
Annotations and PodDisruptionBudgets block node removal
Cluster Autoscaler will not remove a node if doing so would violate a PodDisruptionBudget (PDB). It also skips pods with cluster-autoscaler.kubernetes.io/safe-to-evict: "false" and nodes with the scale-down-disabled annotation. These settings protect workloads from unwanted eviction, but an old or unnecessary setting can keep a node running longer than expected. Check kubectl describe configmap cluster-autoscaler-status -n kube-system to see which nodes cannot be removed and why.
Tools that work alongside the Cluster Autoscaler
The Cluster Autoscaler manages the number of nodes, but the following tools can help with pod sizing and node provisioning.
PerfectScale
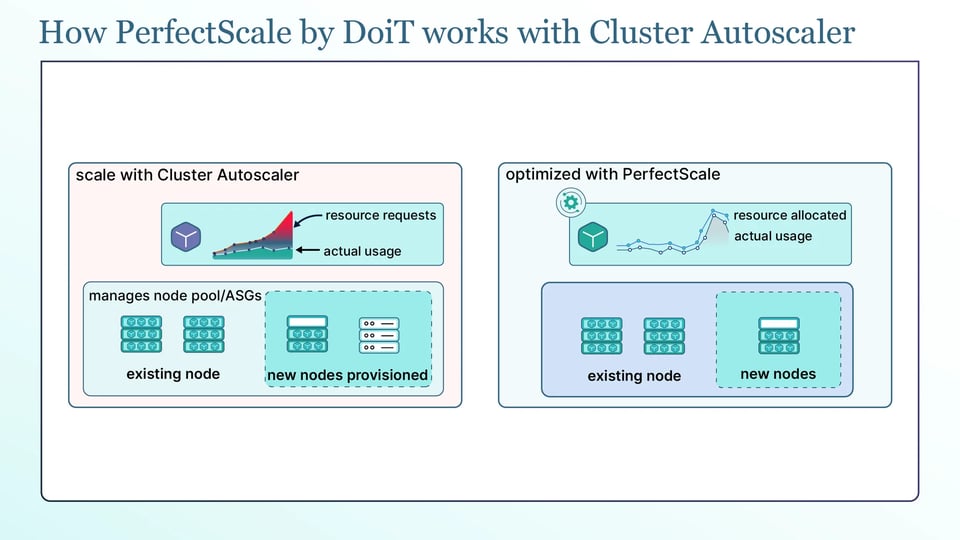
The Cluster Autoscaler makes scaling decisions based on pod resource requests, not actual CPU and memory usage. If requests are too high, it can add nodes you do not need and keep nodes that could otherwise be removed. PerfectScale monitors actual workload usage and provides automated right-sizing recommendations to help bring CPU and memory requests closer to real usage. This helps the Cluster Autoscaler make better scaling decisions. You can give it a try or book a technical session.
Vertical Pod Autoscaler (VPA) and Goldilocks
VPA adjusts pod resource requests based on observed usage. Goldilocks provides a dashboard for viewing VPA recommendations. Both can help keep resource requests closer to actual usage, which gives Cluster Autoscaler better information for its scaling decisions.
Karpenter
Karpenter takes a different approach to node scaling. Instead of resizing fixed node groups, it can provision nodes based on the requirements of pending pods.
Best practices for running the Cluster Autoscaler in production
The following are the practices that can help keep node autoscaling efficient and safe:
1. Right-size pod requests before tuning autoscaler settings
The Cluster Autoscaler makes its decisions based on pod resource requests, so accurate requests are more important than changing autoscaler settings. The resource requests must be fixed first, then tune timers and expanders.
2. Keep node groups similar in CPU, memory, and availability zone
Nodes within the same node group are expected to be similar. Different instance types or availability zones can make the autoscaler's scheduling simulation less accurate. Similar node groups can be balanced with balance-similar-node-groups.
3. Set PodDisruptionBudgets for workloads that should not be interrupted
A PodDisruptionBudget (PDB) defines how many pods can be unavailable at the same time. This helps Cluster Autoscaler remove nodes while keeping enough replicas available for the workload.
4. Pin the chart version and test upgrades
The Cluster Autoscaler version should match your Kubernetes version. A Kubernetes upgrade should therefore be tested with the matching autoscaler version before the change reaches production.
5. Export autoscaler metrics to Prometheus and alert on failed scale-ups
Cluster Autoscaler exposes Prometheus metrics that show scaling activity and failures. Alerts for failed scale-ups and pods that remain Pending can help catch problems before they affect workloads for a long time.
6. Review scale-down thresholds against actual cost savings
Aggressive scale-down can lower costs, but workloads with sudden traffic spikes may scale up and down too often. The scale-down-utilization-threshold and scale-down timers can be adjusted for your actual traffic patterns, rather than being tuned only to reduce the number of nodes.